Curious about what you can hear on shortwave ham radio? This video is a brief survey of the diverse world of communications on the shortwave spectrum. Expand your radio horizons and enhance your emergency communication preparedness by tuning in to the world of shortwave ham radio. If you’ve started delving into radio communications beyond local […]
Turning back time to virtually witness a critical historic method of shortwave communication using the fundamental mode of continuous wave modulation. This is a film from 1944, teaching the basics of Morse code, for military comms. What is the proper (and most efficient) technique for creating Morse code by hand, using a manual Morse code […]
We’ve recently added a new room to the Matrix HAM Radio Space for Digital Voice modes as this was an area of interest that didn’t really fit into any of the other rooms.
The new Digital Voice room has attracted a lot of attention from members, with a lot of the focus being on the AllStarLink system. Michael, DK1MI built an AllStarLink node in the cloud for us all to use for Matrix Nets and so I decided I had to get in on the fun.
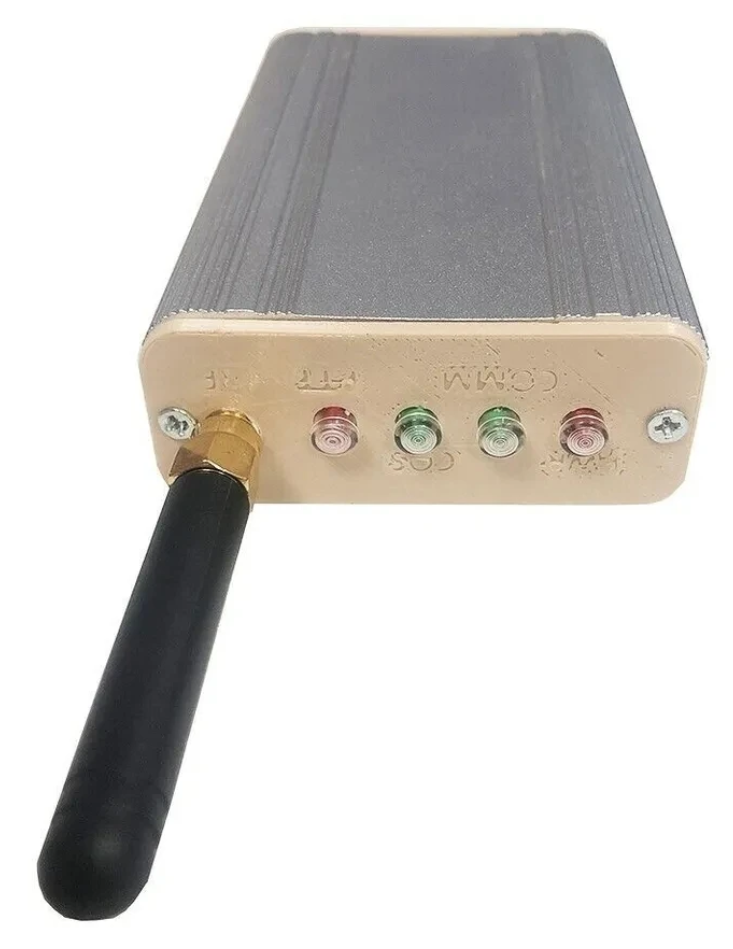
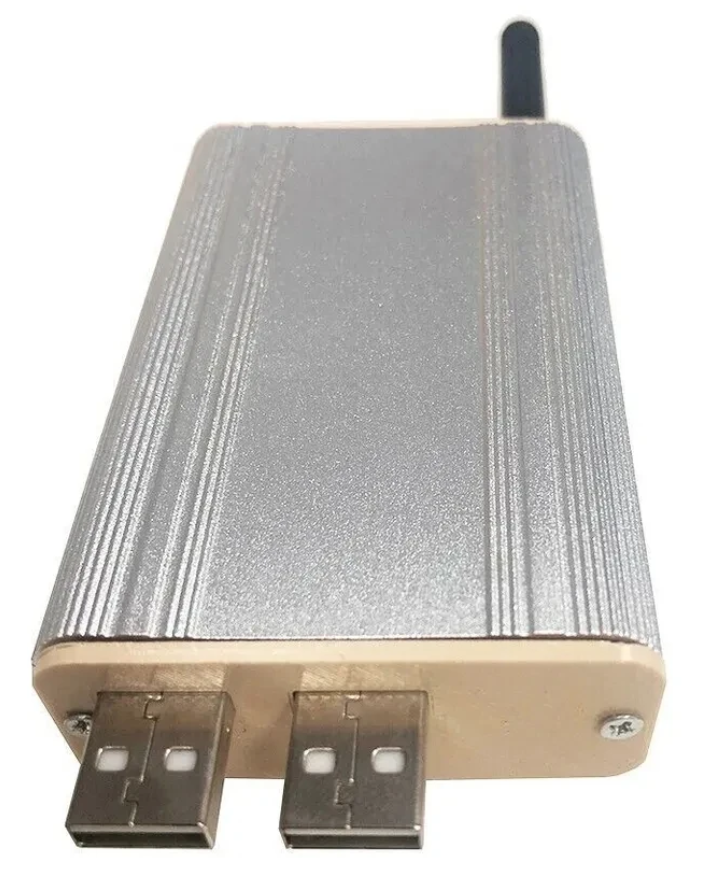
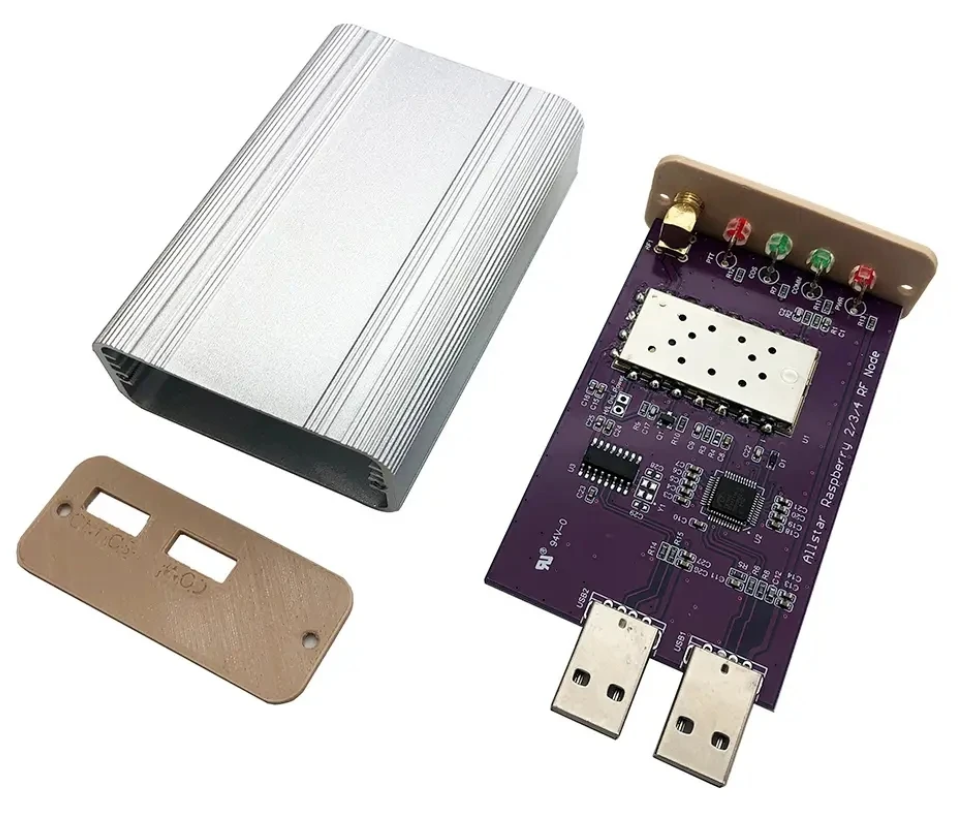
Jumbospot SHARI SA818 Amateur Radio AllStarLink Radio Interface Front Panel ViewJumbospot SHARI SA818 Amateur Radio AllStarLink Radio Interface Rear ViewJumbospot SHARI SA818 Amateur Radio AllStarLink Radio Interface stripped down View
The two USB connectors on the SHARI device are position such that they plug into two of the available 4 USB ports on the RaspberryPi without the need for cables. This keeps the whole solution together in one neat package.
Before you start you will need to obtain a node number and secret (password) from the AllStarLink Portal. To get this you will need to provide proof to the AllStarLink administrators that you are a licensed Amateur Radio (HAM) operator. This is done by uploading a copy of the first page of your HAM licence to the website for the admin team to check. This can take 24hrs to be completed so make sure you get this all done before trying to build your node. You cannot build a node successfully without a node number and secret.
Of course you will also need a transceiver that can operate on the 438.800Mhz frequency or other frequency of your choice on the 2m or 70cm HAM band.
You will also need to open port 4569 on your internet router and setup port forwarding to the IP Address that you will be using on your RaspberryPi node. It’s important to use a static IP Address on your RaspberryPi.
There are quite a few different Linux based operating system (O/S) images that are available for the RaspberryPi devices that have been specifically tailored for the AllStarLink node and include all the necessary software and library packages out the box.
Once downloaded you need to burn the ISO image onto a suitable SD card for your RaspberryPi. I use BalenaEtcher as it’s extremely quick and reliable at burning ISO images to SD cards.
Of course if you are a hardline Linux command line junkie you can always use dd to create the SD card.
Once you’ve got your O/S onto your SD card, slot it into your RaspberryPi making sure your SHARI device is connected to the two USB ports and then power it up. Make sure you have a good PSU for the RaspberryPi as the two devices together draw around 3A of current during the transmit cycle. (I use a 3.6A PSU from Amazon).
The default login for the Raspbian O/S is shown below. Login via SSH and configure your RaspberryPi for your local network. It’s important to use a static IP Address configured either directly on the RaspberryPi or via DHCP in your router.
Next you need to change directory into the asterisk config file directory using the command shown below:
cd /etc/asterisk
In this directory you will find all the default config files that come as part of the distro. For this build we’re not going to use them and so we need to move them out of the way ready for a set of config files that have already been configured correctly.
Using the following commands create a new directory, move into that new directory and then move all the unwanted configuration files into it:
mkdir ORIGINAL-CONF-FILES
cd ./ORIGINAL-CONF-FILES
mv ../*.conf ./
ls -la
cd ../
You should now be back in the /etc/asterisk directory which will now be empty apart from the custom directory which we left in place.
You now need to copy the correctly configured configuration files into the /etc/asterisk directory. Start by downloading the zip file containing the new configuration files
Once downloaded, copy the .zip file into the repeater users home directory (/home/repeater) using either scp on the Linux command line or if using Windows you can use the FileZilla Client in SFTP mode using the login details above.
Once you have the .zip file in the repeater user’s home directory you need to copy the file into the /etc/asterisk directory as user root:
The gpioBASH script and configuration details were supplied by Mark, G1INU in the Digital Voice room on the Matrix. It adds the COS light functionality to the setup. The COS light will now light every time the SA818 hears RF on the input.
The next thing you need to do is configure the SA818 radio device in the SHARI. The script I used was originally from https://wiki.fm-funknetz.de/doku.php?id=fm-funknetz:technik:shari-sa818 all I’ve done is change the entries to switch off CTCSS and changed the frequency to 438.800Mhz. Configuring the SA818 is done by running the SA818-running.pyPython programme that you moved into the repeater user home directory. Making sure you are still user root, run the following commands:
cd /home/repeater
./SA818-running.py
At this point your SHARI SA818 device will be configured to operate on 438.800Mhz and CTCSS will be disabled.
If you want to change the frequency or enable and set a CTCSS tone to access the node you will need to edit the Python programme using your favourite text editor and change the entries accordingly. Once changed rerun the program as shown above and your SHARI will be reconfigured to your new settings.
Next you need to move the allmon.ini.php file into the correct directory so that it enables access to the Allstar Monitor web page on the device so that you can manage connecting/disconnecting nodes. Use the following commands as user root to achieve this:
The allmon.ini.php file needs to have your node name entered into it for it to work correctly. As user root, change directory and edit the file using your favourite editor.
cd /var/www/html
Using your text editor, search for the line starting [XXXXX] and change the XXXXX to your node number. Save the change and exit the file.
At this point you are almost complete, all that is left to do is add your node number and node secret into the appropriate configuration files in the /etc/asterisk directory.
Since I am a Linux command line junkie I use vi to edit all the configuration files on the command line as user root, but you can use any editor of your choice.
cd /etc/asterisk
Start with the extensions.conf file. Search for the line starting with NODE = and delete the XXXXX entry and insert your node number. Save the file and edit it.
Next you need to edit the iax.conf file. This time search for the line starting with register= and change the XXXXX for your node number and the YYYYYYYYYYYY for your node secret. Be careful not to accidentally delete any other characters in the lines otherwise it will corrupt the configuration file.
In the same file search for the two lines that start with secret = and change the YYYYYYYYYYYY for your node secret. Once you have changed both of the secret entries, save and exit the file.
The final file to edit is the rpt.conf file. Once again open the file using your favourite editor and search for the line starting with XXXXX = radio@127.0.0.1:4569/XXXXX, change the XXXXX entries for your node number making sure not to delete any other characters next to the XXXXX entries.
Further down in the same file there is a line that starts with [XXXXX], once again change the XXXXX for your node number making sure to keep the square brackets at each end of the node number as you edit it.
Finally move down to the very bottom of the file and find the two lines that start with /home/repeater/gpio, once again change the XXXXX entries for your node number.
Once this is done, save and exit the file. At this point your node should be fully configured and will only require a reboot to get it working.
As user root, reboot your raspi using the reboot command.
reboot
Once your raspi comes back online, login using SSH as user repeater and then become root user using the sudo command detailed above.
You now need to create the admin user password for the Allstar Monitor web page on the device. This is done using the following commands as user root:
cd /var/www/html/
htpasswd -c .htpasswd admin
You will be asked to enter a password twice for the admin user, make sure you make a note of this password as you will need it to login to the web page.
Once this is done your configuration is complete, logout from the terminal session by entering exit twice (once to logout as user root and another to logout as user repeater).
Using your favourite web browser enter the IP Address of your raspi into the URL bar as shown below:
http://<Your-Raspi-IP>/allmon2
Note: remove the <> from the URL once you have entered the required information.
Once this is done you should be presented with your node control panel as shown below.
First visit to the AllStar Monitor Web Page
Login using Admin and the password you set above and you are now ready to start using your node.
It’s a good idea to connect to node 55553 which is a parrot test node to check your audio levels. you can do this by entering the node into the field at the top left and pressing the connect button.
M0AWS AllStarLink Node 61928 connected to 55553 Parrot
Once connected, tune your radio to 438.800Mhz FM and transmit a test message using your callsign and test123, or something similar. The parrot will then play your recording back to you so that you can hear how you sound. It will also comment on your audio level as to whether it is OK or not.
You are now connected to AllStarLink network and have the world at your finger tips. Below is a small list of nodes in the UK, Australia and America to get you started chatting with other HAMs via your node.
55553	ASL Parrot for testing
41522	M0HOY HUBNet Manchester, UK
60349	VK6CIA 439.275 Perth, Western Australia
51077	VK6SEG South West Hub B Albany WA
2167	M0JKT FreeSTAR UK HUB 2 freestar.network
53573	NWAG NW AllStar Group Lancashire, UK
27339	East Coast Hub Wilmington NC USA
M0AWS AllStarLink Node 61928 sitting on the equipment rack
Thanks to Michael, DK1MI for building and hosting the Matrix HAM Radio Space AllStarLink Node (57881) and getting us all kicked off into the world of AllStarLink!
We hope to be having regular Matrix Net’s on the node soon for all Matrix members and visitors. We’ll organise days/times via the Digital Voice room.
A couple of years ago I built a Matrix Synapse server and connected it to the decentralised global Matrix chat network that is federated world wide by enthusiasts who host their own Matrix servers. Due to the enthusiasm for a decentralised network the Matrix has grown exponentially and is now an established force in the world of Opensource global communication services.
When I built my server and configured it online my aim was to bring together an enthusiastic group of Radio Amateurs (Radio HAMs) who could build a friendly, welcoming community where people could share, learn and have fun with other liked minded individuals without all the nonsense you see on commercial social media platforms.
Overtime we’ve increased the number of rooms available in the HAM Radio space and the number of subjects covered. This has grown organically as our community has grown and we’ve ventured together into new areas of the hobby.
Global Matrix Ham Radio Space hosted on the M0AWS Matrix Server
From the community a number of projects have spawned including the Opensource.radio Wiki that Mike, DK1MI is sponsoring that aims to detail all the Opensource HAM Radio software, Hardware and projects in one centralised site on the internet. This is a great project and one I am very happy to contribute to.
Thanks to Mike, DK1MI we now also have our own Matrix AllStarLink node available. This is a great resource for the community as it is often not possible for all of us to communicate via the radio waves due to geo-location, time zones, local planning regulations etc. Having this 24/7 internet based resource makes it a lot easier for the community to chat at any time even when propagation on the HF bands isn’t in our favour.
We also have a very active satellite room with regular nets on the QO-100 satellite. With such a great range of rooms and subjects there’s plenty to read and talk about with the community.
If you fancy being part of this growing, enthusiastic group of Radio Amateurs and Short Wave Listeners (SWLs) then click on the link below and come and say hello, a warm welcome awaits!
This is a video of the German Weather Broadcast from DWD, Hamburg, on shortwave (HF), using teletype (RTTY). I demonstrate two decoding software options: JWcomm32 (older), and, FLdigi. Note the in FLdigi, the “Reverse” feather is selected to properly decode the signal (in either USB or LSB, you still need to select, “Reverse”). The radio […]
This video is an introduction to an international public-service and technology hobby known as ‘amateur radio’ (or ‘ham radio’). Amateur radio (also called ham radio) describes the use of radio frequency spectrum for purposes of non-commercial exchange of messages, wireless experimentation, self-training, private recreation, radiosport, contesting, and emergency communication. The term “amateur” is used to […]
Before modern radio broadcasting, the trails were being blazed both in public broadcast, but also critical links out of the local area. Here’s a side-look back in time…. in this 1939 Film: New Zealand Shortwave Communications; Morse code (CW) The romance of the radiotelegraph service (in this video, the service in New Zealand) is a […]
If you have not yet explored ham radio repeaters, this might be interesting to you. What is an amateur radio repeater and how do they work? In this video, with a non-amateur-radio viewer in mind, I chat about the very basic concepts of a repeater. It is filmed in a relaxed, “ride along with me,” […]
WINDHAM, ME – The Wireless Society of Southern Maine will participate in the American Radio Relay League’s Summer Field Day activities during Windham’s Summerfest event on June 22nd. Once Summerfest activities end on Saturday evening, ham radio operations will continue through the night and end on Sunday at 2 pm. The public is welcome to visit each operating station to learn more about ham radio.
ARRL Field Day is the single most popular on-the-air event held annually in the US and Canada. On the fourth weekend of June of each year, thousands of radio amateurs gather with their clubs, groups or simply with friends to operate from remote locations.
Field Day is a picnic, a campout, practice for emergencies, an informal contest, and, most of all, FUN!
It is a time when many aspects of Amateur Radio come together to highlight our many roles. While some will treat it as a contest, other groups use the opportunity to practice their emergency response capabilities. It is an excellent opportunity to demonstrate Amateur Radio to the organizations that Amateur Radio might serve in an emergency, as well as the general public. For many clubs, ARRL Field Day is one of the highlights of their annual calendar.
The contest is simply to contact as many other stations as possible and learn to operate our radio gear in abnormal situations and less-than-optimal conditions.
Ham operators use these same skills when they help with events such as marathons and bike-a-thons; fund-raisers such as walk-a-thons; celebrations such as parades; and exhibits at fairs, malls, and museums — these are all large, preplanned, non-emergency activities.
But despite the development of very complex, modern communications systems — or maybe because they ARE so complex — ham radio has been called into action repeatedly to provide communications in crises when it matters. Amateur Radio people (also called “hams”) are well known for our communications support in real disasters and post-disasters.
What is Amateur Radio?
Often called “ham radio,” the Amateur Radio Service has been around for a century. In that time, it’s grown into a worldwide community of licensed operators using the airwaves with every conceivable means of communications technology. Its people range in age from youngsters to grandparents. Even rocket scientists and a rock star or two are in the ham ranks. Most, however, are just normal folks like you and me who enjoy learning and being able to transmit voice, data, and pictures through the air to unusual places, both near and far, without depending on commercial systems.
The Amateur Radio frequencies are the last remaining place in the usable radio spectrum where you as an individual can develop and experiment with wireless communications. Hams not only can make and modify their equipment but can create whole new ways to do things.
Look for them on the athletic field next to the Windham Primary School. They will have signs throughout the facility to point to the location. Actual ham radio operations will begin on Saturday @ 2 pm and end on Sunday @ 2 pm.
To find out more about Amateur Radio locally, and how to get involved in this rewarding pastime, please visit the Wireless Society of Southern Maine’s website at: www.mainehamradio.com
FT4GL Glorioso On The Air! Well, "Kinda". That's funny. I just pulled the Club Log stats. Don't even need to explain (.0007). Those that know, know! hahahaha!
Cure for stray RF on my signal. And here's the $10 permanent fix: Also works on decoupling magnetic field hum from a pole pig transformer in a linear amplifier.