Normal view

There are new articles available, click to refresh the page.
Before yesterdayMain stream

New Product\Vendor Spotlight: 4O3A NC-1 Noise-Canceling Bluetooth Boom Mic Headset

31 May 2024 at 13:39

DX Engineering is excited to announce another valuable addition to its lineup of more than 175 amateur radio providers from around the world: 4O3A. You can find 30,000-plus ham radio products from these leading manufacturers—including 4O3A and DX Engineering branded equipment—at DXEngineering.com.

About 4O3A

The 4O3A call sign belongs to accomplished contester Ranko Boca, who earned his first license in 1980 and went on to participate in multiple World Radiosport Team Championships (WRTC). The 4O3A superstation is located on the Lustica peninsula at the entrance of the Bay of Kotor in southwestern Montenegro. The station—“Ham Radio Paradise,” as it’s called on the 4O3A website—offers a spectacular view from its position on Obosnik Hill, the highest point in the peninsula.

As a company, the innovators and world-class contesters at 4O3A design and manufacture high-quality products that help hams operate more efficiently and push contest scores higher. DX Engineering carries several products from 4O3A’s flagship line of Genius Solutions products that work with FlexRadio transceivers and other modern HF rigs: the Power Genius XL Amplifier, Tuner Genius XL Antenna Tuners, and Antenna Genius 8X2 Plus Antenna Switch.

Also look out for 4O3A band pass filters available soon from DX Engineering.

A Sound Choice for Better Audio

Understanding the competitive edge that crisp and clear audio delivers in a contesting environment, the 4O3A team developed the NC-1 Noise-Canceling Bluetooth Boom Mic Headset. This multipurpose combo features light and comfortable over-the-ear headphones that provide excellent ambient noise canceling and crystal-clear sound—perfect for long hours of contesting as well as enjoyment of music, podcasts, and more.

4O3A NC-1 Noise-Canceling Bluetooth Boom Mic Headset Kit Contents
(Image/DX Engineering)

The headset includes a top-of-the-line noise-canceling system with up to 25 dB of noise reduction; 40mm size neodymium drivers that allow you to hear the slightest details during a contest or while listening to a Beethoven sonata; Bluetooth 5.0 for Android and Apple mobile devices, laptops, tablets, PC, and interfaced radios; and up to 30 hours of worry-free operation on a single charge of the provided 750mA rechargeable Li-Ion battery.

403a noise cancelling headset mic
(Image/DX Engineering)

The plug-in omnidirectional condenser boom mic set provides superior vocal clarity with a wide, flat frequency response. The MC-1 boom mic set works for all transceivers (with optional adapters) and plugs into laptops, tablets, and PCs. It comes with universal 3.5mm mic and headphone cables (detachable from the NC-1 Headphones for use without the boom mic) and includes soft case, 3.5mm to 6.35mm adapter, and two boom mic windscreens. Headphones and a boom mic also available separately.

o3a-4o-nc-mc-1_xl 403A boom mic
(Image/DX Engineering)

Find 4O3A headset-transceiver 8-pin round mic adapters and audio adapters, Bluetooth dongles, NC-1 headset, MC-1 boom mic, the headset/mic combo, and other 403A accessories at DXEngineering.com.

The post New Product\Vendor Spotlight: 4O3A NC-1 Noise-Canceling Bluetooth Boom Mic Headset appeared first on OnAllBands.

Icom IC-7300 Firmware v1.42 NEW FEATURE!!

Discover the Enhanced Experience: Icom IC-7300 Firmware v1.42 Unveils Upgrades for Improved Control and Functionality The Icom IC-7300 recently received a firmware update to version 1.42, bringing a host of exciting changes. This update, available initially on the Icom Japan website, (use google translate for english) introduces several enhancements and features poised to revolutionize user […]

Testing Out Different Headsets with a Crystal Set and Assembling a Sound-Powered Headset

By: AA7EE
2 September 2023 at 02:35

Before building Jim W4LF’s Hobbydyne™ crystal set, I put together an impedance matchbox, for matching the detector diode to a variety of different headsets and earphones, so that I could determine the best ones to use. The world of serious crystal set listening was new to me, so I did some reading up. To give you an idea of how serious this gets, many committed crystal set listeners have heard over 100 different stations on their sets, on the AM broadcast band (thanks to nighttime skywave propagation)!

It appeared that there are a few different kinds of headset that crop up often as being the favored types among crystal set enthusiasts. Of these, perhaps the most storied is the Baldwin Type C radio headset, or “Baldies” as their owners affectionately call them –

My “everyday” set of Baldies.

There are a couple of reasons why crystal set aficionados often have a set of Baldies in their collection. One of these is for their historical significance. Baldwins are considered to be the first mass-produced headset that significantly resembles modern headphones. Developed by Nathaniel Baldwin in Utah in the early part of the 20th century, they were first patented in 1910. He got his big break after sending 4 pairs to the US Navy. They were very impressed with their sensitivity and performance, and put in an initial order for a hundred pairs. Baldwins were a high quality headset. In the early 1920’s a set cost $14-$16 – about $250 in today’s money.

The other main reason for their continued popularity with crystal set folk, is that even by modern standards, they are quite sensitive. The design is different from most other headsets of the era, being that they employ a balanced armature and a mica diaphragm. A small proportion of Baldwin headsets had a phenolic diaphragm, and were slightly less sensitive as a result. It’s easy to tell if your Baldwins have mica diaphragms. If you unscrew the ear caps and see clear diaphragms like this, yours are mica –

This set of Baldies has mica diaphragms.

Here’s a view of the bottom of the element. Looking at it from this angle requires that the diaphragm side is downwards. Do not set it in this orientation without placing it on top of the ear cap, as you could damage the diaphragm or the drive rod (see how, in the above picture, the very end of the drive rod protrudes very slightly above the level of the diaphragm?) In this following view, if you look carefully, you can how the plate (circled) that supports the drive rod, is centered between the two poles of the magnet. This is how it should be – slap bang in the center, and not touching one or other of the poles –

Looking straight down at the back of the element, you can see the 2 screws that are used to connect the ends of the headphone cords. I wish that modern headsets were as simple to disassemble and reassemble as these vintage models are –

Scott (from oldheadphones.com) is a big collector of vintage headsets. He told me that of the Baldwin headsets he has seen that have weak output, it has rarely been because of weak magnets, especially with the units that have purple painted magnets, as seen above. I believe that the purple painted magnet variety are far more common than the other type, which have black painted magnets. If your Baldwins have weak output, things to look for, Scott advised me, are armature plates that are not centered between the magnet poles, or are actually touching one of the poles (keep an eye out for debris between the plate and the poles). Another thing to look for, is warped or broken diaphragms.

Nathaniel Baldwin’s story is an interesting and dramatic one. Read it here – it’s well worth it. My Baldwins, like most of the vintage parts and gear I acquire, came from eBay and, contrary to what seems to be popular opinion, overpaying is not necessarily the norm. As the buyer, the power is in your hands. I paid US$15 + $12 shipping for these, which I think was a very fair price. I did clean them up, but only a little. This is the condition they arrived in, which wasn’t bad at all –

They were in pretty good shape, the main areas in which some shabbiness could be seen being in the headband, which showed very little fraying, though there was some dirt and stains present, and just a small amount of corrosion on the metal parts –

Scott from oldheadphones.com has a useful page on the restoration of old headphones. On this page, he is specifically referencing Western Electric 509-W’s, but the same advice can be applied to other types. Following this advice, I gave the metal parts of the Baldies a very light polish with Brasso (only very cursory, as I really wasn’t that bothered with making them gleam), and cleaned the bakelite earcups up a little with Bon Ami, which is a very minimally abrasive household cleaner. The construction of these headsets makes it very easy to take them apart for cleaning. The headphone cord unscrews from the elements – no soldering needed, and the elements themselves can be taken out from the bakelite earcups with no unscrewing at all – they simply drop out. It is a pleasingly very modular type of construction.

He also gave me some useful advice on cleaning the cords and headbands via email. Following this advice, I sprayed some prewash onto the headband, left it to soak for a short while, then immersed it for a while in a basin of cold soapy water, made with clothes detergent, while giving it a light scrubbing with an old toothbrush. Be careful when doing this, as the old fabric can fray quite easily. Then I rinsed it with cold water and left it out to dry overnight. I didn’t do anything with the cord, as it was in good shape. Incidentally, if you can buy something from him, it helps to fund his hobby of collecting vintage headsets.

Here’s the result. You can see the most improvement in the condition of the headband. Not gleaming, but with the aura of respectability that comes with the evidence of having lived an honest working life –

A very usable pair of Baldwins for everyday use, I think!

While on the subject of Nathaniel Baldwin Type C headsets, I want to share with you a very exciting find that I made while looking for the everyday use pair above. This was also on eBay and, unlike with the above pair, I paid quite a lot for these. They are a set of completely unused Baldwins, in the original box, with the instruction leaflet. The box was a little banged and frayed, but the headset was mint, and looked as if it had never even been assembled, let alone used! I am not an experienced collector of these but, on seeing them, something told me that it was not very common to see a pair in this condition. I ummed and aahed over them, told myself I wasn’t going to pay that much for them, and moved on. Shortly after, I came back, and opened up a correspondence with the seller. He had bought them at an estate sale 30 years ago, he told me, and they had been in storage ever since. He wasn’t sure if they worked, and didn’t know how to test them, but he did own a multimeter. I told him how to do a continuity check on the coils, and they tested out fine. This pushed me over the edge and, after a bit of back and forth, we agreed on a price. They were mine!

I hadn’t seen a pair of Baldies with a green headband before. I think it looks very handsome!

This model was first patented in 1910, and the entire Baldwin operation closed down between 1930 and 1932, so I think it’s fair to say that they are about 100 years old. It’s hard to put into words the appeal of seeing a product that has been sitting in it’s original box for 100 years, in the same unused state the original buyer would have seen it. I can’t help but wonder how this came about. Perhaps this headset sat on the shelves of a radio store somewhere that went out of business and then, along with other remaining stock, was sold, and sat in storage for years? Perhaps it was purchased by a well-heeled customer who bought it and forgot about it?

Just look at that shiny bakelite ear cap, that completely clear mica diaphragm, and that shiny metal, without nary a smidgin of corrosion in sight. Magnificent!

I mean, if you could get in a time machine, walk down Radio Row in NYC in the 1920’s, dive into a store and buy a pair of Baldwins, this is exactly what they’d look like –

Oh lawdy. The shiny bakelite. That is original factory shine. The beautiful green headband. It’s almost too much for me to bear!

That leaflet, that came in the box with the headset? Here it is –

That’s enough of Baldies for now. The other headset of this vintage that I was keen to land a working pair of, was the Western Electric 509-W. Patented in 1918, this headset was also very popular with telegraph and radio operators in the late teens and 1920’s, mainly due to it’s ruggedness and sensitivity. Many believe 509-W’s to be equal to Baldwins due to their sensitivity, robust nature, and quality of manufacture. In the opinion of Scott, from oldheadphones.com, they are ideal for crystal set use, and their performance rival that of Baldwins, only being surpassed by Navy sound-powered headphones.

Continuing my quest to land a bargain, I scored a set of 509-W’s for just $10.50 + $14.85 shipping. They arrived in good, though obviously well used, condition –

A bit shabby, to be sure. Allow me to show you a few more pictures, before I reveal how they cleaned up –

The metal cans were dull, but with no major scratching or other damage. The slots on the two screws that hold the sound element to the nickel-plated brass cans are often knurled or otherwise damaged. Not so in this case, which I took as a good sign –

These are not balanced armature units, like the Baldwins. They are the more traditional style, which makes the poles of the magnets very easy to access for the purpose of re-magnetizing, if that becomes necessary. Like the Baldwins, the headset cord is easily attached and attached with 2 screws. The general rule of thumb for determining if the unit needs re-magnetizing, is if the magnet holds the metal diaphragm on, it is strong enough. These headsets are the more traditional type, with both poles exposed, making remagnetizing easier, if necessary. For these traditional types of headsets, of remagnetizing, Scott says, “I just use a strong rare earth magnet and a couple taps on one pole of the weak magnet takes care of it.”

I polished the metal parts with Brasso, washed the bakelite ear caps with Bon Ami, and soaked the headband in cold, soapy water, then lightly scrubbed them and left them to dry overnight. The headphone cord smelled of tobacco and was a bit greasy, so I also soaked it in cold, soapy water (yes, really) and scrubbed it lightly with an old toothbrush. I then patted it down on a towel, gave it an initial drying with a hair dryer, and hung it up to dry thoroughly, on a hot day.

During this initial cleaning, I did lightly polish the metal cans, but didn’t pay too much attention to the other metal parts. For minimal effort, the 509-W’s came out quite well, I think –

One feature of this set was a little curious. It came with this washer hanging from a piece of string on one side of the headset. To me, it looked as if it belonged there and was an integral part of the unit. I wondered what it was for. I wasn’t able to locate any photos of other instances of this headset with such a washer, and no mentions of a washer anywhere else. After asking a few other 509-W owners, it became apparent that whatever the washer’s purpose was, it was not a stock item, and was not a known 509-W accessory. Eventually, I removed it, but not before taking these pictures. I think the first picture (the very next one) was taken partway through the cleaning process, before all the metal had been cleaned up –

The headband came out a lot cleaner. The cord looked a little better, though the main improvement was that it felt a lot less greasy –

Shiny!

Western Electric 509-W headsets are not hard to find in fairly good, working condition. There are still a lot of them around. They were well made, and cost $12 in the early 1920’s, the equivalent of a week’s wages for the average worker. Other brands of headphones, that were less well-made and not as sensitive, cost less. Brandes were $8, and other brands even less. I wonder how many sets of headphones being used today will still be around 100 years from now and working well?

Cloth headset cords of this era came with strips of material on the ends that attached to tabs on the cans for strain relief –

The headband is looking pretty spiffy and clean from this side!

Next on the agenda was to put together a sound-powered headset. Sound-powered units are used by the military; primarily, I believe, by the Navy. The sound elements are so sensitive, you can connect two together and they will operate without the need for outside power i.e. the tiny current produced by talking into the mouthpiece will produce a sound in the earpiece. This very informative page on Darryl Boyd’s website has information on many of the available sound-powered headsets you’re likely to find. Jim Frederick W4LF’s favorite is the WW2 sound-powered headset known as the RCA “Big Cans”, which I believe are also referred to as the US Navy “Deck Talkers” (see linked page in previous sentence). He says that they are hard to find and expensive, but so far ahead of the others that they are worth it.

Some of the sound-powered units, such as the US Navy Deck Talkers, have a headset, so little physical modification will be needed in order to use them. With others, the sound elements are in a telephone-style handset. In this case, you’ll probably want to remove the elements from the handset and install them in a headset of your choosing. This page on Darryl’s site lists the specs of sound elements in the various units, and also notes the handsets that have identical elements used for both microphone and earpiece. This can be useful, as you will only need one handset to make a complete headset. I set about looking for one of these handsets, and managed to come up with this Canadian RCA MI-2215-E model, which has 2 identical sound elements –

Touching the two leads coming from the handset across the terminals of a AA battery resulted in absolutely no clicking from the headset whatsoever, which was not a very encouraging sign.

Back view of one of the elements, after the leads had been desoldered, with a strip of tape over the holes to prevent ingress of debris –

Front view of the same element –

Removing the metal back cover from the first element, the armature plate was clearly visible. If you look closely (easier if you’re viewing this on a computer, as opposed to a phone), the armature plate, which was connected to the threaded drive rod, appeared to be jammed up against one of the poles of the magnet –

Looking at the threaded drive rod, you may be able to see that there are two small nuts, one above and one below the plate. Adjusting those nuts determines the default positioning of the plate. I adjusted them with a pair of needle-nosed pliers and successfully repositioned the plate halfway between the top and bottom magnet, so it was no longer in contact with the top magnet. At this point, I didn’t have a crystal set to test it out with (I hadn’t yet built the beta kit in my last post). Instead, I connected it to the output of my impedance matchbox, with the output impedance set to somewhere in the region of 300 ohms (the impedance of this element), connected a longwire antenna and ground to the two input terminals of the matchbox, and connected a 1N34A diode across the input terminals of the matchbox. Success, as the sound of a cacophony of MW AM stations sprang forth from the sound element. It was working!

Buoyed by this success, I set about tightening the nuts, and disaster struck. I overtightened one nut, and snapped the very delicate threaded drive rod. I had lost sight of the fact that it is a thin rod. Unfortunately, the break occurred right next to the nuts. If it had been further away from the nuts, I might have been able to solder or epoxy the rod pieces back together. As the break was up against one of the nuts, repairing it would have reduced my ability to adjust the positioning of the nuts on the rod.

Back to the drawing board and, before long, I acquired this H-203/U handset, manufactured by the Dynalec Corporation. This handset has a push-to-talk button –

When this handset is connected to another handset, pushing the PTT button connects the handset to the other handset so that, when the PTT is not pressed, the other station cannot hear what you are saying. If you connect the two handset leads together and talk into the microphone, you should be able to hear your own voice in the earpiece. If you’re unsure whether you’re hearing your own voice via the earpiece or via bone conduction, alternately pressing and releasing the PTT while talking will clarify.

Unlike the previous handset, the identical microphone and earpiece are not soldered in, so it is easy to remove them. They just pull out, revealing the neatly-wired supporting circuitry –

Even the capacitor leads across the earpiece have been neatly preformed. I very much approve!

These are the identical sound elements from this handset –

The terminals are easily soldered to, though you have to be careful to apply the iron for the absolute minimum of time, so as not to melt the plastic. I used a little flux from a flux pen, to help things along –

Next on the agenda was to find a suitable headset or old pair of headphones to install these elements in. I found this new unused pair of earmuffs on Facebook Marketplace for $5 –

This set of earmuffs turned out to be well suited for these sound elements. The aperture in one end of each side of the earmuffs is very slightly wider, and there is a good thickness of foam lining the back of the earmuff –

It was possible to push each sound element in at an angle, such that it ended up being held firmly in place by being pressed up against the ledge/flange around the opening, by the foam in the back –

The headset lead enters one side, at the bottom of the can. Heat-shrink tubing over the lead and tie-wraps on the inside and outside of the can hold the lead in place –

A lead runs in between the cans to connect the elements in series (in phase). It runs between the tops of the cans, underneath the cushioned piece that surrounds the headband –

These ProCase brand earmuffs are available on Amazon at the time of writing for $16.99, although the FB Marketplace price of $5 from a local private seller was a no-brainer, of course. The only possible drawback to them is that the fit is very tight, though as the purpose of earmuffs is to keep ambient noise out, this is an intentional part of the design. One could argue that a sound-powered headset will only be worn for the very weak DX stations, and the absence of outside ambient noise is helpful when trying to copy them. I used an old headphone lead from a pair of AKG 240’s with the molded plug at each end chopped off, but you can use anything that works for you.

Also included in the assortment of headsets/headphones/earbuds/earpieces that I tested with my newly built crystal set and impedance matchbox, was a classic piezo earpiece, often known as a crystal earphone. The styling hasn’t changed over the years, and many of the cheaper crystal radios marketed to youngsters in the past, such as the rocket ship crystal radio, came with one of these. The metal diaphragm is connected to one of the leads, and used to be soldered to it. In recent years, many of the units sold had a foil diaphragm with the lead held to it partially by glue and partially by the pressure of the plastic case against the lead. As a result, there was a high rate of failure. Both the piezo earpieces of this type that I bought failed soon after I acquired them. However, the old-style with a soldered connection are still available. Mike’s Electronics sells them. There is also a seller on eBay called protechtrader who sells them (they recently increased the price significantly, from $10.70 to $14.99, both prices including shipping). The earpieces from the eBay seller have a characteristic black lead and plug. You can see the brass color of the diaphragm too, which I assume is also the case with the one from Mike’s –

These piezo earpieces have a 3.5mm mono plug. The 3.5mm jack on my impedance matchbox is wired to a stereo plug, so a 3.5mm stereo male to mono female adapter was pressed into service.

Also tested were an MDR-W14 yellow headset from an old Sports Sony Walkman cassette player/ AM/FM radio combination, and a pair of C Crane earbuds, both low impedance –

I forgot. I also tested my beloved AKG 240’s, of which I own 2 pairs. I used these for years, when working as a DJ/announcer, and voiceover guy in Los Angeles. I also use them with my Elecraft K2 on CW, as they are very comfortable to wear for long periods. I wasn’t expecting a lot from them for crystal set use though, as they are known for not being as sensitive as the more consumer type low impedance models. They are intended mainly to be driven by the headphone amplifiers present on mixing boards and similar professional equipment, which is capable of providing a greater drive level than the amplifiers in small consumer products such as Walkmans/radios/MP3 players etc –

OK, the big test. How do all these different headsets/headphones/earpieces/earbuds stack up against each other? Firstly, allow me to say that I haven’t yet performed extensive testing with many very weak stations, so take these preliminary results with a pinch of salt. Also, at this point, I still have some significant improvements to make to my antenna, by lengthening the outside portion of it from 45 feet to about 75 feet. This will very possibly yield a far more noticeable improvement than which headset I choose to use will.

That said, here are my initial impressions.

As expected, the AKG 240’s are the least sensitive, though not by as large a margin as I expected. They was, at a rough guess, about a 6 dB difference between them and most of the other headsets which, surprisingly, all seemed to be roughly the same in sensitivity. However, the AKG’s have a wonderfully flat audio response, and AM radio sounds great on them. They’re really good for listening to stations that are moderately strong, or greater.

The piezo earpiece was sensitive, though the sound was very restricted and tinny and, because it’s just one earpiece as opposed to two, doesn’t sound as loud as the other units as it’s only in one ear. Wiring two in series or parallel might help with volume, though the frequency response will still be very tinny. Plus, it kept falling out of my ear, which was annoying.

The Baldwin Type C, Western Electric 509-W, homemade sound-powered headset, Sony Walkman MDR-W14 headset, and C Crane earbuds all seemed to be quite sensitive, about as sensitive as each other, and about the same volume on weak to moderate strength signals. On strong signals, the Baldwins and sound-powered headset weren’t quite as loud as the others due, presumably, to the physical limitations imposed by the balanced armatures.

My initial impression was that, if anything, the Sony Walkman MDR-W14 headset was very slightly more sensitive than any of the others tested here. However, I’m not sure if that’s really the case, or has more to do with the fact that sound is transferred more efficiently to the ear because of the way that the headset earpieces sit in the ear canal. Being earbuds, the C Cranes also sit in the ear canal, but the Sony headset has a slight edge over them. However, I believe this is mainly because the Sony set has more response over the whole audible frequency range, while the C Crane earbuds purposely have their frequency response shaped to favor voice, with a sharp drop-off above about 7-8KHz.

The Baldwins and Western Electric 509-W’s both have somewhat restricted frequency response; the WE’s have slightly more bottom end.

Both the C Crane earbuds and Sony MDR-W14 headset sound a lot louder on strong signals, yet are also sensitive on weak signals. Of the two, the Sony has the widest frequency response. For most types of listening, my favorite headset, of all of them, is the Sony. My sense is that it would also be good for listening for weak DX stations. It’s possible that a headset with less bottom end might increase intelligibility and copy on the very weakest of stations. It’s for this reason that I’m thinking it’s worth keeping several headsets to hand, just as many serious listeners keep a selection of diode detectors on hand, for the most challenging of DX catches. Interestingly, my initial take on these headsets aligns with what Al Klase has said, namely that in his experience, modern earbuds, even the cheap ones, are about as sensitive as sound-powered headsets.

I find all of this a bit frustrating, because I went to quite a lot of expense, time, and trouble, only to discover that my favorite headset to listen to my new crystal set on, was a cheap Sony Walkman model that I already owned! I am not too surprised by this finding, as I had already read Al’s remarks, but needed to find out for myself. I could have saved myself quite a lot of money. On the other hand, I do enjoy owning a few pairs of vintage and antique headphones. The Baldwins and WE 509-W’s both occupy significant places in radio headset history, and my mint Baldies are museum grade. There’s a definite pride of ownership at play here.

Bear in mind that with vintage headsets, there can be variation in their performance, especially if they’ve been treated poorly throughout their long life. Sound-powered headsets often received rough treatment while in service. If you have a set that are in poor physical shape, they may have received a lot of knocks during their life that degraded their performance. In other words, my very brief test drive of these different sound-producing devices was preliminary at best. Nevertheless, things are looking good for the combination of matching transformer and a modern headset/earbuds using neodymium disc magnets and lightweight components.

It turns out, after all those vintage headsets, and a homebuilt one, that my favorite way to listen to this crackin’ little crystal set is on a pair of Sony Walkman MDR-W14 headphones. They have great fidelity, are the loudest on strong stations, and appear to be sensitive as well. I do wonder if a pair of US Navy Decktalkers (the famed RCA “Big Cans”) would beat them on very weak signals, but Al Klase appears to have a pair of those, and still said that modern earbuds are about as sensitive as anything else he has used. Who’d have thought! Crystal set enthusiasts – what are your experiences?

A Crystal Set Impedance Matchbox

By: AA7EE
28 August 2023 at 19:23

Growing up as the youngest of 4 boys, I was well positioned to receive all the hand-me-downs. Although that might sound as if I just ended up with second-rate stuff, that was not the case at all. I inherited a lot of great things from my older brothers. I couldn’t have cared less that they’d had them before me. The stash consisted of all sorts of board games, Dinky toys, and books, as well as something that would fuel my imagination for many years to come – a crystal set. My very own crystal set! Manufactured by Ivalek, this little beauty sat in it’s white plastic case by my bedside, delivering quality programming from the BBC 24/7 –

Image by kind permission of Snellings Museum https://www.snellingsmuseum.co.uk/

In truth, in the big world of crystal sets, this little mass-manufactured set wasn’t a very good performer at all. In fact, I’d go as far as to say it was pretty awful, having the following schematic, which I don’t think should ever be used for anything other than a teaching tool, but not a practical build –

The above is almost the simplest crystal set you can build. The Ivalek also has a switch that switches in extra inductance for the long wave band, but we’ll ignore that. The main problems with the above schematic are –

  1. The antenna is not impedance-matched to the coil, so it will load it down, reducing Q and therefore, selectivity.
  2. The diode is not impedance-matched to the tank, loading down the tank, and also affecting Q, and selectivity.
  3. The headphones may not be matched to the diode affecting – yes, you guessed it, circuit Q and, therefore, selectivity.

A lot of simple “toy” crystal sets that were marketed to kids in the 50’s, 60’s, and 70’s employed this simple schematic and, as a result, we all got the idea that crystal sets were fun, but not very good, and not to be considered as a “serious” receiver for extended periods of listening. In my case, making things worse, was that I thought the telephone earpiece I was using was high impedance. 8 year-old me had no idea the impedance was actually closer to 150 ohms. The end result of all of this was that my crystal set had very broad tuning indeed. On the other hand, it was very loud, because we lived only a few miles from the BBC Droitwich transmitters. The longwave transmission, on 200KHz at the time, was 500KW in power, and covered most of the UK. The medium wave signals, though not quite as powerful, were certainly not QRP either.

The lackluster performance of my Ivalek crystal set didn’t put me off. I just thought it was the neatest thing that I could leave it on all the time, and would never have to change the batteries. Plus, I had plenty of chances to listen surreptitiously under the covers at night, when I was supposed to be sleeping!

I also had this magnificently compelling book –

The Boys Book of Crystal Sets contained construction details for 12 different sets of varying complexity and, presumably, performance. The young me spent hours and hours gazing at all the articles and schematics, and thinking how grand it would be if I had an air-spaced variable capacitor or two, some litz wire to wind a coil with, and an empty tobacco tin or chassis, to build my crystal receiver in. I’d be the king of the hill! But an 8 year-old boy living in the countryside in the early 1970’s didn’t have the means to procure such elite and specific luxuries, so I settled for reading each article a couple of hundred times, and day-dreaming.

About 10 years ago, I came across a web-site belonging to Jim Frederick W4LF. Jim is a big fan of Cushman scooters, which are uniquely American motor scooters that boast an earnest following of enthusiasts. The Cushman Scooter company was formed in Lincoln, Nebraska in 1903, and produced their last scooters in 1965. The majority of Jim’s site is given over to discussion of these machines. As you might guess, it wasn’t these that interested me, but a single page on Jim’s site that is dedicated to another of his interests – little radios and crystal sets. On this page Jim shows pictures, with brief descriptions, of the neat little radio receivers he has built over the years. They include regenerative receivers, crystal receivers, and some amplified crystal receivers. I loved not only the fact that he was using double-tuned circuits with, in many cases, adjustable capacitive coupling between the tank and the detector for greater control over the selectivity of the circuit. I also really appreciated the attention paid to the casing and overall appearance of the final product. These were some really appealing little receivers!

Recently, I had the honor of assembling a pre-production beta build of the 3rd generation of Jim W4LF’s Hobbydyne™ Crystal Set Receiver kit. I won’t go into details of the build here, but the kit should be available soon, at this site. If it is not yet active, save it in your bookmarks, and check back later. When the site is up and running, it will be the place to get more info on this kit.

I’m very happy with the end result, and I hope you’ll agree that it is a very good-looking little crystal set, with it’s African mahogany base, and garolite front panel –

From top left to top right, the knobs are – a rotary switch to add extra capacitance to the antenna tuning capacitor, for help in tuning different lengths of antenna, the variocoupler, which controls the coupling between the coils, and also the selectivity and, on the far right, the Hobbydyne™ selectivity enhancement control. The circuit of this set is heavily based on, and very similar to Jim’s original Hobbydyne™ circuit, which was featured in Dave Ingram’s column in the Nov 2005 issue of CQ Magazine.

The brass binding posts on the left are for antenna and ground connections, and those on the right are for the headphones.

The headphones are a set of Western Electric 509-W’s. They’re about 100 years old and work well, if you’re looking for a set that will plug directly into a crystal receiver without the need for impedance matching.

As soon as I had constructed Jim’s Hobbydyne™ kit, I started looking for two things in quick succession –

  1. A good set of high impedance headphones and
  2. An impedance matchbox, to experiment with different types of headsets/headphones.

While planning the construction of an impedance matchbox, to match a variety of crystal set detectors with a range of headphone impedances, I also kept an eye out on eBay for headphones, and the necessary parts to build a sound-powered headset. That is the subject of a whole new post, which will come after this one. The construction of just one crystal set, which you’d think would be a simple affair, while not quite turning into a rabbit hole, was certainly becoming quite involved!

I have a habit of over-estimating how involved I’m going to become in pursuits when still in the beginning stages. For instance, when digital photography was really starting to take hold, in the early-mid 2000’s, I decided to get back into photography, which had first grabbed my interests as a teenager. This time though, I was an adult with more disposable income. I went a bit hog-wild, buying a nice camera and a whole slew of lenses, accessories, and even some studio lighting equipment (not the cheap kind either). Although I had a lot of fun with all that gear, I realized over the next few years that I had overbought, and spent a fair bit of time selling all the photo accessories that were surplus to my needs, eventually distilling them down to only the essentials. All this is a prequel to me saying that if you want a crystal set which performs well but, being realistic, you’re not going to want to eke out the very last drop of high performance from it, you might be happy with connecting a set of high impedance headphones directly to the output of your new crystal set, and leaving it at that. I wanted to be able to test out a variety of different types of headset, headphones, and earbuds, so an option that offered a variety of output impedances was definitely on the cards for me. A selection of different input impedances would also allow experimentation with other crystal sets in the future.

Crystal set builders have used various methods to match the diode detectors on their receivers to headphones over the years, with a variety of transformers being used. Darryl Boyd’s very informative site at crystalradio.net has a section devoted to detector to headphone impedance matching, with a number of approaches detailed. One of the most recent solutions has been the very useful Bogen T725. More recently, an auto-transformer has come onto the market that is wound specifically for the needs of crystal set builders. The KPB-02 auto-transformer has both inputs and outputs (on the same terminals, being an auto-transformer) of 200KΩ, 100KΩ, 40KΩ, 20KΩ, 10KΩ, 5KΩ. 2.5KΩ, 1.5KΩ, 800Ω, 500Ω, 300Ω, 150Ω, 64Ω, 32Ω, 16Ω, 8Ω, and 4Ω. It was custom-made for our needs and, as such, has input and output impedances that satisfy any possible need a crystal set builder could conceivably want. Look for the KPB-02 on eBay, being sold by seller mkmak222. This auto-transformer formed the basis for my all-purpose crystal set impedance matchbox.

Lots of wiring to do in this impedance matchbox. It can get untidy quite fast if you’re not careful!

On the input of the box is a Benny, consisting of a 0.1µF capacitor and a 500K audio taper potentiometer. The Benny is named after Ben Tongue, who wrote a series of detailed technical articles on the subject of crystal sets, which, taken together, probably represent the most detailed analysis of this type of receiver architecture ever published. Ben is no longer with us, but you can find his articles here. You might want to save them all just in case one day, they are no longer hosted anywhere online. He talks about the Benny in article 01. Very briefly, it helps to reduce audio distortion on strong signals, by equalizing the DC and AC audio loads on the diode detector.

Both rotary switches are 12 position types but on the first one, on the input side, I only used 7 positions. Some switches have an adjustable stop, so that the switch will only rotate to the number of positions set by the user. You’re highly unlikely to encounter a detector with an impedance lower than 2.5K, so there is little point in going any lower. The last two positions, of 5K and 2.5K, are included in case a device such as a MOSFET is used as a detector; with diode detectors, the impedance is going to be somewhere in the 200K to 10K range.

There is more potential for variety when it comes to the output impedances, so you’ll probably find yourself using all of the positions of a 12 position switch. There are 20 position switches available, which would allow a builder to make all of the 17 impedance taps available. However, they are a bit pricey. On top of that, the one I found didn’t have a lug to prevent a loose switch from rotating, and I like to make use of those.

In my matchbox, all of the taps from 100K down to 1.5K were utilized. I found that range covered all of the vintage high impedance ‘phones I tried out, as well as the piezo earpieces in my collection. Kevin Smith, when building his impedance matchbox, divided his ranges a little differently from mine. His ranges were 100K down to 10K for magnetic and piezo ‘phones, 1.5K down to 300 for sound-powered headsets, and 32 to 8 for modern low impedance ‘phones and earbuds. The sound-powered headset that I put together turned out to have an AC impedance at 1KHz of about 3K, so the middle impedance range in the hundreds of ohms wasn’t needed. When describing his impedance matchbox, Kevin talks about the lack of a need for exact impedance matching, due to a listener’s inability to distinguish much of a difference in volume when the mismatch creates a volume difference of 3dB or less. He calls it “the 3dB slop”. If you build your own matchbox you will notice, when stepping through the impedance taps, how for any given set of ‘phones, there are several switch positions that give acceptable and almost equal volume. Looking at the schematic above you can see how, if you did happen to have a headset with an impedance of 800 ohms, for example, the closest tap available at the switch, is 1.5K, which would still give an acceptable match. Likewise, if your headset had an impedance of 500 ohms, the 300 ohm position would be adequate.

The KPB-02 auto-transformer doesn’t have a built-in mounting bracket. I cut a strip of flexible plastic from the top of a small storage container and used to it mount the transformer to the lid of an ABS plastic project box –

In the next photo, you can see an earlier version of the matchbox, which utilized chunkier, more modern binding posts. They are the type often marketed for speaker connections. I discovered that it is not as easy to connect the bare wire ends of the metal tips often used on vintage headphones to them, as it is with the more traditional style of brass binding post. I also ended up changing some of the impedance taps from the ones shown in this photo. There are vinyl bumper feet on two sides of the box, so it can be used in two different orientations –

Although a single pair of binding posts are used for the input, more output options are provided, in the form of a 1/4″ jack wired for mono, and a 3.5mm jack wired for stereo headphones, with the velements placed in parallel, in addition to the binding posts for the metal pins on vintage headphones as well as bare wire ends –

The internal wiring in the first version of this matchbox, before the wiring to the impedance taps was changed a little –

On realizing that traditional brass binding posts were going to work better in this application, I took out the speaker posts, made a trip to Ace Hardware, bought the appropriate brass hardware, and fitted the impedance matchbox with 2 handsome sets of brass binding posts. I also changed the wiring to some of the impedance taps on the transformer. Note the new labeling –

Unfortunately, swapping the location of the binding posts necessitated a lengthening of the wiring, and made it a bit more untidy. Nevertheless, I wanted brass binding posts on this matchbox, and am glad I added them –

The brass nuts on these binding posts are called brass flanged knurled-head thumb nuts on the McMaster Carr site, though I got mine from my local Ace. The 3.5mm jack is wired so as to place the 2 elements in parallel. I did this so that they would be fed in phase. If you use the ring and tip connections to feed them in series, you will end up feeding them 180° out of phase, though I’m not sure if that makes a noticeable difference in practice. The 1/4″ jack is wired to the sleeve and the tip only, for mono jacks. Another change I made, was to place the binding posts on the end of the enclosure that faces the operator. In the previous version, they were at the back, causing the metal tips of vintage headphones that were connected to the binding posts, to foul the two jacks. Small ergonomic details like that make quite a difference to the usability of a piece of gear –

One thing I noticed, stepping through the different output impedance positions for a given headset, was that although nearby switch positions to the optimum one produced almost exactly the same volume, the tonal quality changed. If the switch position is set higher than the headset impedance, higher audio frequencies are favored. As you rotate the switch through the optimum position to impedances that are lower than optimum, more bass response is favored. This could possibly be used with very weak signals, as a switch position that favors higher frequencies could, if copy was very marginal, perhaps improve intelligibility enough to be able to ID a station.

An impedance matchbox is a useful piece of gear in an experimental crystal set receiving station. It makes constructing subsequent crystal sets easier, as the builder doesn’t have to keep replicating the audio circuitry after the detector diode.

In the next post, I plan to show you the various vintage as well as modern headphones and headsets that I tested with the Hobbydyne™ Crystal Set and impedance matchbox combination.

In the meantime, more information on Crystal Sets, and DX’ing with them, can be found in the following, as well as the various individual blogs on the subject (I’ll let you find those!) –

The Crystal Radio DX Group on Facebook – a group founded and run by Steve VE7SL. Intended specifically for discussion of crystal set DX listening events, as well as circuits and techniques specific to DX’ing with crystal sets.

The Crystal Set Radio Group on Facebook – a larger group, for general discussion of crystal sets. If you are a newcomer to the world of crystal sets, this would be a better group for you than the previous one.

The New Radio Board – intended as a new version of the now defunct (and much missed) Radio Board Forum, this board contains discussions of construction of several different types of receivers, including solid state radios, tube radios, and crystal sets. Links to the different topics can be accessed from the lists of hashtags.

A good introduction to the subject of crystal sets can be found in this engaging talk given by Al Klase to the New Jersey Amateur Radio in 2022, titled ,“Understanding and Building Crystal Radio Sets”. The graphics to go along with the talk are here.

An LCD Retrofit and color display for the Schlumberger SI 4031 Communications Test Set

By: Unknown
2 December 2022 at 21:40

Figure 1: 
The front panel and original green monochrome screen
of the 4031.  A close look shows the "blistering" on the
screen protectors due to delamination, making the
display more difficult to read.
Click on the image for a larger version.
The Schlumberger SI 4031 is a early-mid 1990s vintage communications test set (a.k.a. "Service Monitor") - a device that is designed to test both receivers and transmitters used in the telecommunications industry.  The 4031's frequency range is 400 kHz to 999.9999 MHz making it useful as a general-purpose piece of test equipment, particularly for the testing of amateur radio gear.
Some of its built-in functions include wattmeter, signal generator with modulator for AM, FM and phase-modulated radios, spectrum analyzer, tracking generator and oscilloscope to mention but a few.

As you would expect from a device from the 1990s, the original display used a CRT (Cathode Ray Tube) based monitor operating at something "close" to PAL horizontal and vertical scan rates.  While the CRT monitor in this unit is still in reasonable shape - aside from requiring a "re-cap" (e.g. replacement of electrolytic capacitors) I decided to take on the challenge of putting a more "modern" LCD-type display in it - perhaps taking advantage of a minor savings in both weight and power consumption.

This requires no electrical modification of the 4031 itself and only minor mechanical changes to mount the LCD panel and its related hardware.  (This may also work for the 4032, a version of this unit that covers up to 2 GHz - see below for comments.)

Is it "PAL"

While the pedants would say that a monochrome-only signal cannot be PAL, the reference is, instead, to the horizontal and vertical scan rates of 15.625 kHz and 50 Hz, respectively which are close to those found in the PAL system used in Europe.  As is typical for pieces of non-consumer gear and test equipment, the horizontal and vertical synchronization signals and the video are brought out independently of each other, each being represented as a TTL signal.

Figure 2:
The horizontal sync pulse train showing 25%
D.C. pulses at 15.625 kHz, TTL level.
Click on the image for a larger version.
The video display generator of the 4031 is interesting in that it uses a UPD7220A graphics controller to facilitate interaction with the CPU (e.g. access memory, produce characters, etc.) but two separate display RAMs (8k x 16 bits) with one being used for access by the UPD7220A and the other, copied from the first during the vertical interval, for pixel read-out - the latter function being done with a combination of "glue logic" and programmable logic devices.

The forgiving nature of the CRT monitor

One nice feature of a CRT monitor is that it can be quite forgiving of deviations from standard video applied to it.  Many - but not all - all-in-one sync decoder chips used in CRT monitors are happy with taking horizontal and vertical signals that are "close" to some standard - but not exact - and lock onto it satisfactorily.  Such is the case with the 4031:  While there are separate horizontal and vertical synchronization signals, neither is quite standard, but it's "close" enough for the old monitor.

Figure 3: 
The vertical sync, showing a 10% duty cycle
pulse at about 50 Hz.
Click on the image for a larger version.

For example, the horizontal synchronization signal is simply an uninterrupted 25% duty cycle pulse train occurring at the horizontal sweep rate of about 15.625 kHz (e.g. 16uSec long) while the vertical synchronization is a 50.08 Hz 10% duty cycle (e.g. 2 msec long) pulse train.  Unlike sync signals found in other applications, the horizontal signal does not contain any sort of blanking (suppression of pulses) during the vertical interval.

Within the 4031's original CRT monitor, the horizontal and vertical synchronization signals are handled completely separately (by a TDA2593 and TDA1170, respectively) so the fact that they are non-standard is irrelevant.

Unfortunately, any modern LCD display device that is expecting a PAL-like signal (in terms of timing) isn't likely to be happy with separate, non-standard synchronization inputs.

Initial attempts:

Initially, I was hoping that an off-the-shelf LCD monitor display like the 7", 4:3 aspect CLAA070MA0ACW with a driver board could be made to work with these signals with no other hardware, but my work was thwarted by the fact that its VGA input - which might handle separate horizontal and vertical sync signals - would not function at PAL video rates - only VGA rates, which have roughly twice the horizontal and vertical frequencies.  While it may have been possible to modify the firmware on this board and re-flash it with one of the "customized" versions found in various corners of the Internet, I chose not to do this.

I then attempted to make a simple analog sync combiner circuit and apply the signal to the composite video input, but found this to be unstable - plus there was the fact that the video display board itself did not have the capability of setting the horizontal and vertical size to fully-fill the screen to the edges, something desirable to make the active screen area fully-fit the window on the front and also align with the buttons along the bottom of the screen.

After a bit more research, I decided to get a GBS-8200 video converter board (Version 4.0), a relatively inexpensive digitizing board designed to convert the myriad of video formats from CRT-based arcade video games and computer inputs to VGA which would then be inputted to a standard monitor and the CLAA070MA0ACW display driver board.  As such, I presumed that it would be far more forgiving to variations from standard video signaling - and I was, fortunately, correct

Sync (re)processor:

While I was originally hopeful that I could simply apply the horizontal and vertical sync inputs to the GBS-8200, the non-standard sync timing (pulse width, lack of a gap of horizontal sync pulses during the vertical interval) did not produce stable results, so a simple circuit had to be devised to modify the sync signal:  This basic circuit is shown below.

Figure 4:
Diagram of the sync processor itself.
This circuit will produce a sync to which the GBS-8200 board can lock.  The single video output
is connected to the RGB input of the GBS-8200 to produce a monochrome (single color)
display as seen in Figure 6.
Click on the image for a larger version.

This circuit works as follows:
 
The horizontal and vertical sync pulses are input to and buffered by sections of a 74HC14, Schmidt-trigger inverters which server to "clean up" the input signals as necessary.  An inverted version of the vertical sync pulse holds U3, a 4017 counter in reset until a vertical interval occurs.

Figure 5:
The circuit in Figure 4 built
on a prototyping board, the
results seen in Figure 6.
Click for a larger image.

During the vertical pulse U3, the counter, is clocked by the horizontal sync pulses and on the 5th count, the timer is stopped, setting the input of U2b, a 4011 NAND gate wired as a simple inverter, high.  U2d is used to "gate" the output of the counter - being only active only when the timer has stopped at the 5th count and during the vertical interval meaning that its output goes high only when the timer is actually counting - not while it's stopped at its terminal count or held in reset. The output of this gate is combined with a "re-inverted" copy of the vertical sync to produce a new version of the vertical sync that is about 225 microseconds long rather than the original 2 milliseconds as depicted in Figure 7 (below).

FWIW, I used the 4011 NAND gate because I found a rail of them in my parts bin - but I couldn't find any 74HC00s at the time which would have worked fine, albeit with a different pin-out.  Similarly, either CMOS CD4017 or 74HC4017 counter would have been fine as well considering the low frequencies present.  I would, however, recommend using only the 74HC14 (or 74HCT14) as it's plenty fast for the video data and it has fairly "strong" outputs (e.g. source/sink currents) as compared to the older and slower CD4069 or 74C14 hex Schmidt inverter.

Note that while it would theoretically be possible to use a one-shot analog timer to generate a new, shorter pulse, doing so would result in visible jitter of the video signal (I tried - it did!) as that timing would neither be consistent or its length precisely synchronous with the horizontal timing:  The use of the horizontal sync to "re-time" the duration of this new vertical pulse assures that the timing of the new pulse is synchronous with both sets of pulses and completely jitter-free.

This new, re-timed vertical sync pulse is then applied to U2a which gates it with the horizontal sync:  The output is then inverted by U1c to produce a composite sync signal (see Figure 7, below) that, while not exactly up to PAL standards, is "close enough" for the GBA-8200 video converter - configured for "RGBS" mode - to be happy.

Elsewhere in the diagram may be seen inverter sections U1d-U1f:  These are configured as buffers to condition the TTL video input and provide a drive signal to the video input of the GBA-8200.

Suitable for a monochrome image!

The circuit in Figure 4 is sufficient, by itself, to drive the GBS-8200 and produce a stable VGA version of the 4031's video signal.

Figure 6:
The monochrome output from the GBS-8200 board using the
sync processor seen in figures 4 and 5 via an external monitor.
Click on the image for a larger version.
The "VID_OUT" signal may be connected to the Red, Green and Blue video inputs of the GBS-8200 and the input potentiometers adjusted for a single color:  White will result if the individual channels' gains are set equally, but green, yellow or any other color is possible by adjustment of these controls.

Figure 6 shows the result of that:  The VGA output from the GBS-8200 was connected to an old 4:3 computer monitor that I had kicking around, producing a beautiful, stable, monochrome signal.

Full-color output from the 4031

The SI 4031's video output is a single TTL signal, meaning that there is not even any brightness information, making it capable of monochrome only.  Fortunately, it is possible to simulate context-sensitive color screens with the addition of a bit of extra circuitry and firmware as described below.

The portion of this circuit used for processing the sync pulses is based on that shown in Figure 4:  A few reassignments of pins were done in the sync re-timer, but the circuit/function is the same.  What is different is the addition of U5, a 74HC4066 quad analog switch and U6, a PIC16F88 microcontroller, and a few other components.

How it works:

The video signal is buffered by U1d-U1f and applied to R1, a 200 ohm potentiometer, the wiper of which is applied to Q1, a unity-gain follower to buffer the somewhat high-impedance video from R1 to something with a source impedance of a few ohms and, more important, constant output with varying load.  The "bottom" end of R1 is connected to U5c, on section of the 74HC4066 which, if enabled, will shunt some of the video signal to ground, reducing its intensity, adjustable via R1.  Via diode D1, this line is also connected to a pin of the microcontroller - the "MARK" pin - more on this later.

Figure 7:
Top (red) trace: The composite sync from the
circuit of Figures 4 & 8.  Bottom (yellow) trace:
The original vertical sync pulse  for comparison.
Click on the image for a larger version

The output of Q1 is then applied to U5a, U5b and U5d via 100 ohm resistors.  These analog switches will selectively pass the video to the Red, Green or Blue channels of the monitor, depending on microcontroller control.  At the outputs of each of these switches may be found a resistor and diode in series (e.g. D2/R6) and these are connected to output pins of the microcontroller:  If these pins are driven low by the microcontroller, the diode drop and series resistance of the 33 ohm resistor (e.g. R6) and the 100 ohm resistor (e.g. R3) and the output transistor of the microcontroller will shunt some of the voltage and reduce the amplitude on that channel to provide a means of brightness control, increasing the color palette.

I'd originally intended to place emitter-follower video drivers (e.g. the circuit of Q1 in Figure 8) on each of the R, G, and B outputs, but the very short lead length to the input of the GBS-8200 (e.g. no visible signal reflections) - and the ability to adjust the RGB input gain via its three potentiometers - eliminated this requirement as additional losses through the analog switches and other components could be easily compensated.

Figure 8:
Added to the sync processor of Figure 4, above, is a PIC16F88 used to analyze the video from the 4031
and "colorize" the resulting image. 
See the text for information as to how this works.
Click on the image for a larger version.

With the combination of the three 4066 gates, the "!BRITE" pin, and the three "dim" pins (e.g. "!R_DIM", "!G_DIM" and "!B_DIM") over two dozen distinctly different colors and brightness levels may be generated under processor control.

The magic of the microcontroller

U6, a PIC16F88 microcontroller, is clocked at 20 MHz, its fastest rated speed.  Because its job is to operate the four switches comprising U5 - and the three "dim" pins on the video lines - it must "know" a bit about the video signal from the 4031:

  • The "!V_SYNC" pin gets a conditioned sample of vertical sync from the output of U1a:  It is via this signal that the U6 "knows" when the scan restarts at line one.
  • The "!H_SYNC" signal from the output of U1b is applied to pin RB0, which is configured to trigger an interrupt on the falling edge (the beginning) of the horizontal sync.
  • The "!VID" signal is applied to pin RA4, which is the input of Timer 0 within the microcontroller:  This is used to analyze the content of lines of video to determine the specific content as the timer is able to "count" the number of times that the video goes from low to high on these scan lines -  In other words, a sort of "pixel count".

In operation, the start of each horizontal sync pulse triggers an interrupt in the microcontroller.  If this coincides with the start of the vertical interval, the line count is restarted.

Video content analysis:

Figure 9:
Mounted inside the 4031, the sync processor board is on the
far left, the six pins of the ICSP (In Circuit Serial
Programming) connector being easily accessed.  The buttons
and controls for the other two boards are also accessible.
Click on the image for a larger version.

Visual inspection of each of the screens on the 4031 will reveal that they contain unique attributes.  Most obvious is the title of the screen located near the top, but other content may be present midway down the screen - or very near the bottom - which may be used to reliably identify exactly which screen is being displayed, having determined the "pixel count" for certain lines on each of these screens beforehand.

For each subsequent horizontal sync pulse and corresponding interrupt, the count contained within hardware timer 0 is read - and the timer is immediately reset.  For a number of specific scan lines, their unique counts are stored in RAM.

Attention to detail is required!

Determining the pixel count consistently requires a bit of care in the coding.  As mentioned, this count is based on an interrupt-driven routine that reads the content of hardware timer 0 - but this also means that the code must be written in a way that guarantees that the time between the start of the horizontal sync pulse (and subsequent entry into the interrupt service routine) and the read and reset of timer 0 is as consistent as possible, considering the asynchronicity of the timing of this interrupt and the CPU clock.

What this implies is that the reading this timer and its resetting must not only be done in an interrupt, but that it also be the first thing done within the interrupt function prior to any other actions, particularly any conditional instructions that could cause this timing to vary, resulting in inconsistent pixel counts - something that would preclude the use of anything other than a quickly-responding interrupt.  Another implication is that this interrupt may be the only interrupt that is enabled as preemption by another one would surely disrupt our timing.

Immediately following this action is the setting of the color and brightness attributes by ANDing a copy of the current content port/pin registers to remove the brightness/color bits and then ORing that data with the pre-calculated color/brightness bit mask data into those same registers so that any changes in these attributes occur to the left of the visible pixels in the scan line.

A limitation of this hardware/software is that it is likely not possible to satisfactorily set different colors horizontally, along a scan line - it is possible only to change the color of complete scan lines:  To do this would, at a minimum, require extremely precise timing within the interrupt service routine, adding complexity to the code - and it's not certain that satisfactory results would even be possible.   To do it "properly" would certainly require more complicated hardware - possibly including the regeneration of another clock from the horizontal pixel rate - but doing this would be complicated by the fact that the pixel read-out rate is asynchronous with the sync as noted later.

Using the pixel counts:

At the beginning of the vertical interval, outside any interrupts, the previously-determined counts of low-to-high transitions is analyzed via a series of conditional statements and a variable is set indicating the operating "mode" of the 4031.  This "mode" information is then applied to another look-up table to determine the color to be used for that screen.

One complication is that like other analog video, that coming from the 4031 is interlaced meaning that for certain scan lines - particularly those with diagonal elements - that the pixel count may vary for a given scan line.  Unlike "true" video, the sync pulses from the 4031 contain no obvious timing offset (e.g. "serrations" in the sync) to offset by half a line or identify the specific video field, but with an analog monitor, this wasn't really much of an issue as it would simply paint a line on the screen in "about" the right place, anyway.

For most screens, simply looking at pixel counts of between four and six different lines - most of them on lines from 4 to 15 - was enough to uniquely identify a screen, but others - particularly the "Zoom" screens - sometimes require even a greater number of pixel counts and other techniques to reliably and uniquely identify the screen being displayed.

In particular, differentiating between the "SINAD" and "RMS-FLT" Zoom screens was problematic as both resulted in the same pixel counts for all of the lines usable for unique identification:  The only way to detect the difference was due to the fact that for some lines, the pixel count for the "SINAD" screen would vary due to the aforementioned video field differences - or possibly due to interaction between the asynchronicity of the pixel clock, the CPU clock, and the way counts are registered on a counter input without hardware prescaling.  It was the fact that the count of the SINAD screen varied that allowed it to be reliably differentiated from the "RMS-FLT" screen, which had a very consistent pixel count.

Coloration of the screen:

Many screens on the 4031 have different sections.  For many screens, the upper section contains the configured parameters (e.g. frequency, RF signal level, etc.) while the lower portion of the screen shows the measured values or an oscilloscope display:  Simply by knowing which screen type is being displayed and the current line number, those sections can be colored differently from other portions.

Deciding what color to make what is a purely aesthetic choice, so I did what I thought looked good.  Because about two-dozen different colors are possible, I chose the brightest colors for the most commonly-used screen segments, setting these colors by the function to which they were related.

Finally, all screens have, along the bottom, a set of labels for the buttons below the bottom of the screen:  These may be colored separately as well - and I chose gray (a.k.a. "dim white").

Analyzing the video to determine "pixel counts":

When writing the firmware, a few simple tools were included, notably some variables, hard coded at compile time, that would display the pixel counts.  If, for example, one needed to determine the pixel count for line #14, the pixel count display variable would then be loaded with the pixel count for line 14.  For example, the oscilloscope screen capture shows a pixel count capture:  The left-most pulse is 4 units long followed by a single-unit pulse (meaning "10") followed by a 2 unit long pulse with three more pulses - for a pixel count of 13.

Figure 10:
An example of the "pixel" count:  The 4-unit
wide pulse followed by one pulse represents 10
and the 2-unit wide pulse followed by 3 pulses
represent a pixel count of 13 on the selected line.
Click on the image for a larger version.

Another variable may be set to visually identify which scan line is being counted.  When the scan line being counted occurred, the "MARK" pin would be set high causing an on-screen indication of which line was being inspected, offering a "sanity check" and a visual reference to know which line, exactly, was being checked.

During the vertical interval, pin "RB3" would then be strobed with a series of pulses to indicate the pixel count - a "long" pulse lasting four CPU cycles followed by pulses of 1 CPU cycle, each to indicate the "tens" digit (if any) and a shorter pulse of two CPU cycles followed by the requisite number of 1 CPU-cycle pulses to indicate the "ones" digits. 

Using an oscilloscope triggered on the signal on RB3 (pin 9) these pulses could be read visually on the oscilloscope and by switching between the different screens on the 4031, the "pixel count" of this line for the various screens could be determined:  Repeating this for several different scan lines allow unique identification of all screens.  In the event that there is false detection of a mode, this "pixel count" output could also be configured to show the number of the current modes (in a "#define" statement) when they are detected to aid in debugging.

Comments:

In producing this firmware, I have only one version of the 4031 (with Duplex option) available to me.  Different versions of the 4031 - and the 4032 - may have "other" screens not included in the analysis, or slightly different layout/labeling that will foil the analysis of the scan line.
The way the firmware doing the screen analysis is written, if the scan line analysis doesn't find a match to what it already "knows" about it will cause that screen's text to be displayed in the default color of white.

At present this "scan line analysis" can only be done by setting certain variables in the source code and recompiling - but this was made easier by the inclusion of the "ICSP" connector (noted on the diagram in Figure 8 and visible in Figure 9) to allow in-circuit programming, while the unit is operating.  In theory, it may be possible to come up with some sort of user-interactive means of setting individual screens' colors which could be used to set the colors on screens of different firmware versions or with features that I don't have in my 4031, but this would require significantly more work on the firmware.

Figure 11:
The 4031 with the retrofit LCD operational.
This isn't a perfect photo because it's very difficult to take
a picture of an operational electronic display!
Click on the image for a larger version.

Color mode selection:

With the lack of the CRT monitor, there is no need for an "intensity" control, but rather than leave a hole in the front panel a momentary switch was fitted at this position.  Connected between ground and pin RB7, using the processor's internal pull-up resistor, this switch is monitored for both "short" and "long" button presses.

A "short" press (less than 1/2 second) toggles between "bright" and "dim" using the same color scheme, but a "long" press (1.5-2 seconds) changes to the next the color mode.  At the time of this writing, the color modes are:

  • Full-color screens.  The screens are colored according to mode and context as described above.
  • Green.  All components of the screen are green.
  • Yellow.  Like above, but yellow.
  • Cyan.  Like above, but cyan.
  • Pink.  Like above, but pink
  • White.  Like above, but white

In some instances (e.g. high ambient light) selecting a specific color (green or yellow) may improve readability of the screen.  These settings selected by the switch are saved in EEPROM (10 seconds after the mode was last changed) so that they are retained following a power-cycle.

* * * * * * *

The hardware

Several bits of hardware are required to do this conversion and if you are of the ilk to build your own circuits, nothing is particularly difficult.  Personally, I spent at least as much time making brackets and pieces and mounting the hardware in 4031 as I did writing the firmware.

Sync processor:

At a minimum, the "simple" sync processor mentioned above (Figure 4) is required to provide a synchronization pulse that is recognizable by the converter board.  If one doesn't wish to have different color modes available, this is certainly an option.

Having said that, the "colorized" 4031 afforded by the circuit described in Figure 8 is quite nice - perhaps a bit of an extravagance.  If the 4031 were originally equipped with a color monitor, I can imagine it looking something like the the images in the "Gallery" section of this article, below.

"Where's the PCB?"

As can be seen in Figures 9 and 21 the circuit in Figure 8 was constructed on glass-epoxy perfboard - the type with individual rings around each hole:  I did not design or lay out a PCB as I could build 2 or 3 of these in just the time that it would take to do so - and that wouldn't include the revisions or debugging.

Constructed in this way, I could easily try out new ideas - one of which was the later addition of the "D_RED", "D_GREEN" and "D_BLUE" brightness controls which were included on a whim fairly late in testing:  This was trivial to test and add to the perfboard, but I would certainly have not bothered with this significant enhancement if I'd already "frozen" the design in the embodiment of a PC board.

Unless I feel inclined to build a bunch more of these, I'm not likely to design a PCB, but if YOU do, let me know so that it may be shared. 

GBS-8200:

Figure 12:
The GBS-8200 video converter board.  This is "V4.0" of
the GBS-8200 which includes an on-board voltage regulator
allowing it to run from 5-12 volts.
Click on the image for a larger version.

There appear to be several versions of the GBS-8200 around - possibly from different manufacturers and some of these are designed to be operated from a 5 volt supply ONLY, but many have on-board voltage converters, allowing them to be operated from 5 to 12 volts:  The version that I have is the "V4.0" board with a "5-12 volt" input which eliminates the need for yet another voltage conversion step.  If you look carefully at the photo of the GBS-8200, the inductor for the buck converter is visible near the upper right-hand corner of the board, between the power connector the white video-out connector marked "P12" - but the silkscreened "DC 5V-12V" is also a big give-away!

This board, readily available via EvilBay and Amazon for well under US$40, is specifically designed to take a wide variety of RGB video formats - typically from 70s-90s video games and computers - and convert them to VGA format.  There are several connectors for video input seen along the bottom edge of the photo:  The three phono plugs for component video, an input on a VGA connector, and next to the VGA connector, two white headers for cable:  The unit that I purchased included a cable that plugs into the header between the VGA input and the three potentiometers.

At the top of the board, the VGA connector outputs the converted video - but there is also a white header next to it with these same signals.  As mentioned elsewhere, I simply soldered the six wires (R, G, B, H, V, and Ground) to the board, at this white header as I didn't happen to have another male HD-15 cable in my collection of parts.

This device can accept YUV and RGB inputs - and the latter can have either separate or composite sync inputs.  As the sync signals from the 4031 are non-standard, it's required that the sync processor described above produce a composite sync and the GBA-8200 be switched to the "RGBS" mode (using the "mode select" button) where the composite sync is fed into the "H-Sync" input and the "V-Sync" input is grounded.

The RGB inputs to the GBS-8200 come from the 4031, either as a single video source that is connected to all three inputs in the case of the "simple" (monochrome) version of the sync processor or from the RGB lines of the color version.  On board the GBA-8200 are three potentiometers visible in the photo above (near the lower-left corner) that are used to scale the input levels of the RGB signals to provide color tint/balance as desired.  In the lower-right corner can be seen the buttons used to configure the GBS-8200.

The "Splash" screen:

I've been asked how to get rid of the "splash screen" with Chinese characters when the unit is powered up.  This is from the GBS-8200 and (apparently) cannot be removed without flashing new firmware to it - which may be possible in theory.  The easiest way to suppress this screen would be to have a power-on delay of the LCD itself (or its back-light) that would wait until this screen had been displayed.  Such a device could be as simple as a 555 timer driving a relay with a 5-ish second delay.  Because this is a such a simple circuit - and a simple circuit board that can do this may be found on EvilBay and/or Amazon - I'll leave the implementation up to the reader.

External monitor:

The use of the GBS-8200 has an interesting implication:  It would be perfectly reasonable to use an external display with a VGA input (or VGA to HDMI converter) with the 4031.  This has the obvious advantage of being larger and the possibility of being placed conveniently when making adjustments where the 4031's itself may be too distant or awkwardly placed and small monitors like this are relatively inexpensive.  Additionally, it offers the possibility of being able to display to a larger group of people (e.g. teaching) and being digitized and recorded, as was done with the images at the bottom of this article.

Simply connecting a monitor to the VGA output of the GBS-8200 in parallel with the built-in LCD monitor would work - perhaps even as a short, permanent cord mounted to the rear (somewhere?) or hanging out of the 4031 should this be frequently required.  With a short (8", 20cm) "extension" cable permanently connected, any degradation caused by having an unterminated cable (when the external monitor was not connected) could likely be ignored and the rather low resolution of this display - as could be the slight diminution in brightness - when two monitors were connected at the same time (e.g. "double terminating").  Practically speaking, a buffer amplifier could be built to isolate the R, G, B and sync signals (using the simple emitter-follower circuit of Q1 see in Figure 8) to feed the external monitor.

Because there's no obvious place on the back panel to mount such a connector - and since I don't envision the frequent need for it - I did not so-equip my '4031.

Navigating the GBS-8200's menus

The four buttons used to configure the board are seen on the corner of the board at the top of the photo above.  Initially, the GBS-8200's menu system may be in Chinese, but the 4th menu allows the selection of either English or Chinese and it is changed to English with the following button-presses:

  • Menu - > UP -> Menu -> Menu 

At this point the text is now in English.

Other screens include:

  • "Display" - Which sets the output resolution:  A setting other than 640x480 is suggested.
  • "Geometry" - Which sets the position and sizes, along with how the blanking interval is to be treated.  Suggested initial settings are:
    • H position: 94
    • V position: 26
    • H size 56
    • V size: 66
    • Clamp st:  83
    • Clamp sp: 94
  • "Picture" - Which sets other display properties.  A setting of 50 is suggested for Brightness, Contrast and Saturation and a value of 05 is suggested for Sharpness.

The CLAA070MA0ACW display:

This is a 7" diagonal VGA screen of 4:3 aspect ratio and is available with a driver circuit board on EvilBay for around US$50.  Be sure that you get the version with the display controller board and not just the bare display panel, by itself. 

This unit is rated to operate from about 6 to 12 volts, and it comes with both an infrared remote and a small daughter board and interconnect cable that replicates the functions of the remote:  The remote is not required for this project as the daughter board and its pushbuttons will suffice.

Figure 13:
The driver board supplied with the CLAA070MA0A0ACW
LCD panel.  At the top is the VGA input while the TTL
to the panel is at the bottom, the back-light power connector
being in visible in the lower-right corner of the board.
Click on the image for a larger version.
The LCD panels themselves appear to be "pulls" from some consumer product (perhaps a portable DVD player?) as they have evidence of having been previously mounted, but the price is reasonable and their size is precisely that which may be used in lieu of the 4031's CRT, being a few millimeters larger than the window on the front of the 4031 in both axes making them a perfect fit by virtue of their being 4:3 aspect ratio:  It's possible that one could find a newer 16:9 that would fit horizontally in the available space, but it would likely leave a gap above and below the screen.

This unit will accept composite analog, HDMI and VGA, but it is VGA that we require, fed from the GBA-8200 via a short cable:  I constructed a very short (3", 7.5cm) cable, soldering one end directly to the GBA-8200 board itself (I could find only one 15 pin HD connector) just long enough to reach the VGA input connector of the display.  If desired, one could install a switch/distribution amplifier and provide a VGA connector to feed an external display - or likely get away with "double terminating" it as noted elsewhere.

This LCD came with a small board taped to the back of the display that is used to convert to a the flat ribbon cable supplied with the unit, used to connect to the display controller board via the "TTL OUT" connector:  This PC board should be glued to the back of the LCD panel with RTV or other rubberized glue (but not cyanoacrylate!) to mechanically secure it or else it is likely to work its way loose and tear the cable from the LCD panel.  When connecting to the "TTL OUT" connector on the main driver board, one must carefully lift up the locking lever (the black plastic piece that runs its width) from the back on the connector, slide in the cable, and push the lever back down.  The cable itself isn't marked as to which way is "up", but putting it in upside-down won't damage anything - but you'll see nothing on the screen:  Mark this cable when you determine its proper orientation.

There is also a short cable provided for powering the LCD panel's back light:  You won't likely see anything on the panel if this is not connected!

Figure 14: 
The original delaminating screen protector with EMI shield,
held in place with 10 screws and two brass angle pieces
around its perimeter.  This holds the front bezel in place.
Click on the image for a larger version.
Mounting the LCD panel:

The display is mounted "upside-down" (the wider portion of the metal border around the LCD panel being on top) to clear mechanical obstructions around the front panel of the 4031.  Fortunately, configuring for this display orientation can be accommodated via a menu on the display driver board as follows:

  • Select the "Function" menu
  • Go to "Mode"
  • Use the up/down buttons to select "SYS2"

The ONLY modification required of the 4031 to use the LCD display is mechanical.  Unlike the original CRT module - which was mounted in a large cavity behind the front panel - the LCD itself is mounted to the front panel of the 4031 while the other circuit boards (sync processor, GBA-8200,  CLAA070MA0ACW controller board) are mounted in the cavity formerly occupied by the CRT.

Figure 15:
The original screen protector (center) and copies, sitting atop
the laser cutter.  These were cut from 0.060" thick poly-
carbonate plastic.
Click on the image for a larger version.
Front screen protector: 

On the 4031s that I have, the CRT is protected by a plastic sheet containing embedded metal mesh for RFI/EMI shielding - which didn't actually seem to be grounded, anyway.

Unfortunately, over the years, this sheet tends to de-laminate and "bubble",  making viewing the screen rather difficult, so I duplicated a replacement using 0.060" polycarbonate using a laser cutter.  The use of polycarbonate over other types of clear plastic (like acrylic) is recommended due to its resiliency:  It can be bent nearly in half without breaking and is likely to stand the occasional impact from the connector of a cable or a bolt without cracking.  Acrylic, on the other hand - unless it is quite thick - would crack with such abuse.  For convenience, the dimensions of this screen protector are shown below.

While the original screens had EMI/RFI mesh embedded within them, these replacements will not.  The "need" for such shielding may be debated, but its worth noting that many similar pieces of equipment have no such shielding.  I did a bit of searching around for plastic windows with embedded mesh, but other than a few random surplus pieces here and there, a reliable source could not be found - but if you know if such a source, or even thin-wire widely-spaced mesh, please let me know.

Figure 16:
The dimensions of the screen protector - just in case
you might want to make your own!
Click on the image for a larger version.
One possible saving grace is the nature of the CRT versus the LCD:  A CRT has the potential (pun intended) to cause EMI owing to the fact that its surface is bombarded by an rapidly-changing electron beam that varies at MHz frequencies - and this can radiate a significant E-field.

The LCD, on the other hand, is a flat panel with low voltage and backed by a grounded metal plate, so the opportunity for it to radiate extraneous RF is arguably reduced.

Removing the front panel:

The front face of the 4031 comes off as a unit by removing the "Intensity" control knob, the two screws on either side that hold it into the unit's frame (the "second" screws from the top/bottom) and carefully unplugging three ribbon cables.  Inspection reveals that the screen protector is, itself, mounted to a bezel held in by several screws.

In my 4031, the original  the (de-laminated) front screen protector is extricated by removing the ten small screws around its perimeter (Figure 14)  and noting the way the pieces of brass angle that may be included are mounted - which allows it and front bezel to come out:  It looks to me like this screen protector may have been replaced in the past and it could be of slightly different construction than what was provided from the factory - but this is only a guess.

Figure 17:
After fully-tapping the 2.3mm screws, these aluminum angle
pieces with slots were attached to the aluminum bars seen
in Figure 14.  It is into these bars that the LCD panel, with
attached brackets, mount.
Click on the image for a larger version.

Removing the front screen protector will reveal two aluminum bars on either side - each with metal "finger stock" on the "inside" of the screen area - mounted to the front panel by countersunk screws hidden by the bezel that holds the screen cover.  Inspection will reveal that there are three holes along these bars that are not tapped all of the way through.  I removed these bars and purchased a 2.3mm tap and completed the threads so that I could insert 2.3mm x 6mm screws from the "other" (back) side.  It would have been about as easy to have drilled entirely new holes and tapped them for 4-40 screws (or your favorite Metric equivalent) and, in retrospect, I should have probably done so.

Using scrap pieces of aluminum, a pair of angle brackets were fashioned, held to the aluminum bars by the newly-tapped screws in those bars as seen in Figure 17.

To accommodate the momentary switch, I had to file away a portion of the bracket and bar on the left side ("behind" that in Figure 17 and this not visible) as well as countersink the back side of the plastic lens bezel so that it would accommodate the mounting hardware of the momentary switch and sit flush.

Into the brackets, slots were cut with a saw - also visible in Figure 17 - and it is into those that the angle pieces - now attached to the LCD - slide to allow adjustment of depth and very slight adjustment of axial rotation.  The LCD was located about 3/8" (10mm) behind the polycarbonate lens for clearance to protect the LCD panel itself should something be dropped on it - like a cable, RF connector or tool.

Figure 18:
The two brackets and new screen protector mounted in the
front panel assembly of the 4031.
Click on the image for a larger version.

As seen in the pictures, there is no obvious way to mount the display itself so a section of right-angle aluminum was cut and these were glued using "Shoe Goo" (a resilient rubber adhesive) to the back of the display itself, using the mounts fabricated to hold the display itself in position (described below) as a positioning guide:  It's likely that RTV (silicone) would have worked as well but I would not use an ineflexible adhesive like epoxy or cyanoacrylate ("Super Glue").

As this is done, it's very important to make sure that these brackets are installed correctly so that the display is both centered and square with the 4031's window:  I recommend actually mounting the display in place while the adhesive sets so that it perfectly fits the mechanical environment and there is no stress on the display itself as screws are tightened when it is mounted. When I did this, I put some "painters tape" on the front of the display and lightly marked it so that I could precisely set the horizontal and vertical position of the display with reference to the front bezel before the glue set.

Electrically connecting to the 4031:

Figure 19:
Two aluminum angle pieces with holes were glued to the back
of the LCD panel, now mounted in the front panel.
Click on the image for a larger version.
The connection of the original monitor to the 4031 is via an industry-standard 14 connection IDC ribbon cable/connector connected to the monitor and an exact duplicate was ordered from Digi-Key (P/N:  H1CXH-1436G-ND).  On this cable are the ground, power, sync and video connections as follows:

  • 1, 2:  +15 volts
  • 3-6:  Not connected
  • 7:  Vertical sync (positive-going pulse, TTL level, 50 Hz)
  • 8:  Ground
  • 9:  Horizontal sync (positive-going pulse, TTL level, 15.625 kHz)
  • 10:  Ground
  • 11:  Video  (positive-going, TTL level)
  • 12:  Ground
  • 13, 14:  Not connected

It's perhaps easiest to empirically determine these pins by stripping a small amount of insulation from the end of the wires and using a combination of volt/ohmmeter and oscilloscope to positively identify them, the ground pins being identifiable plugging in the other end of the cable and using continuity to the chassis with the unit powered down and then (carefully!) verifying them with the unit powered up, being very careful to avoid connecting the +15 volt wires to anything else.  Once identified, the wires that are marked as "not connected" were trimmed back slightly, the two +15 volt and three ground wires were (separately!) connected in parallel and the wires themselves colored using markers to aid in later identification.

Mounting the boards:
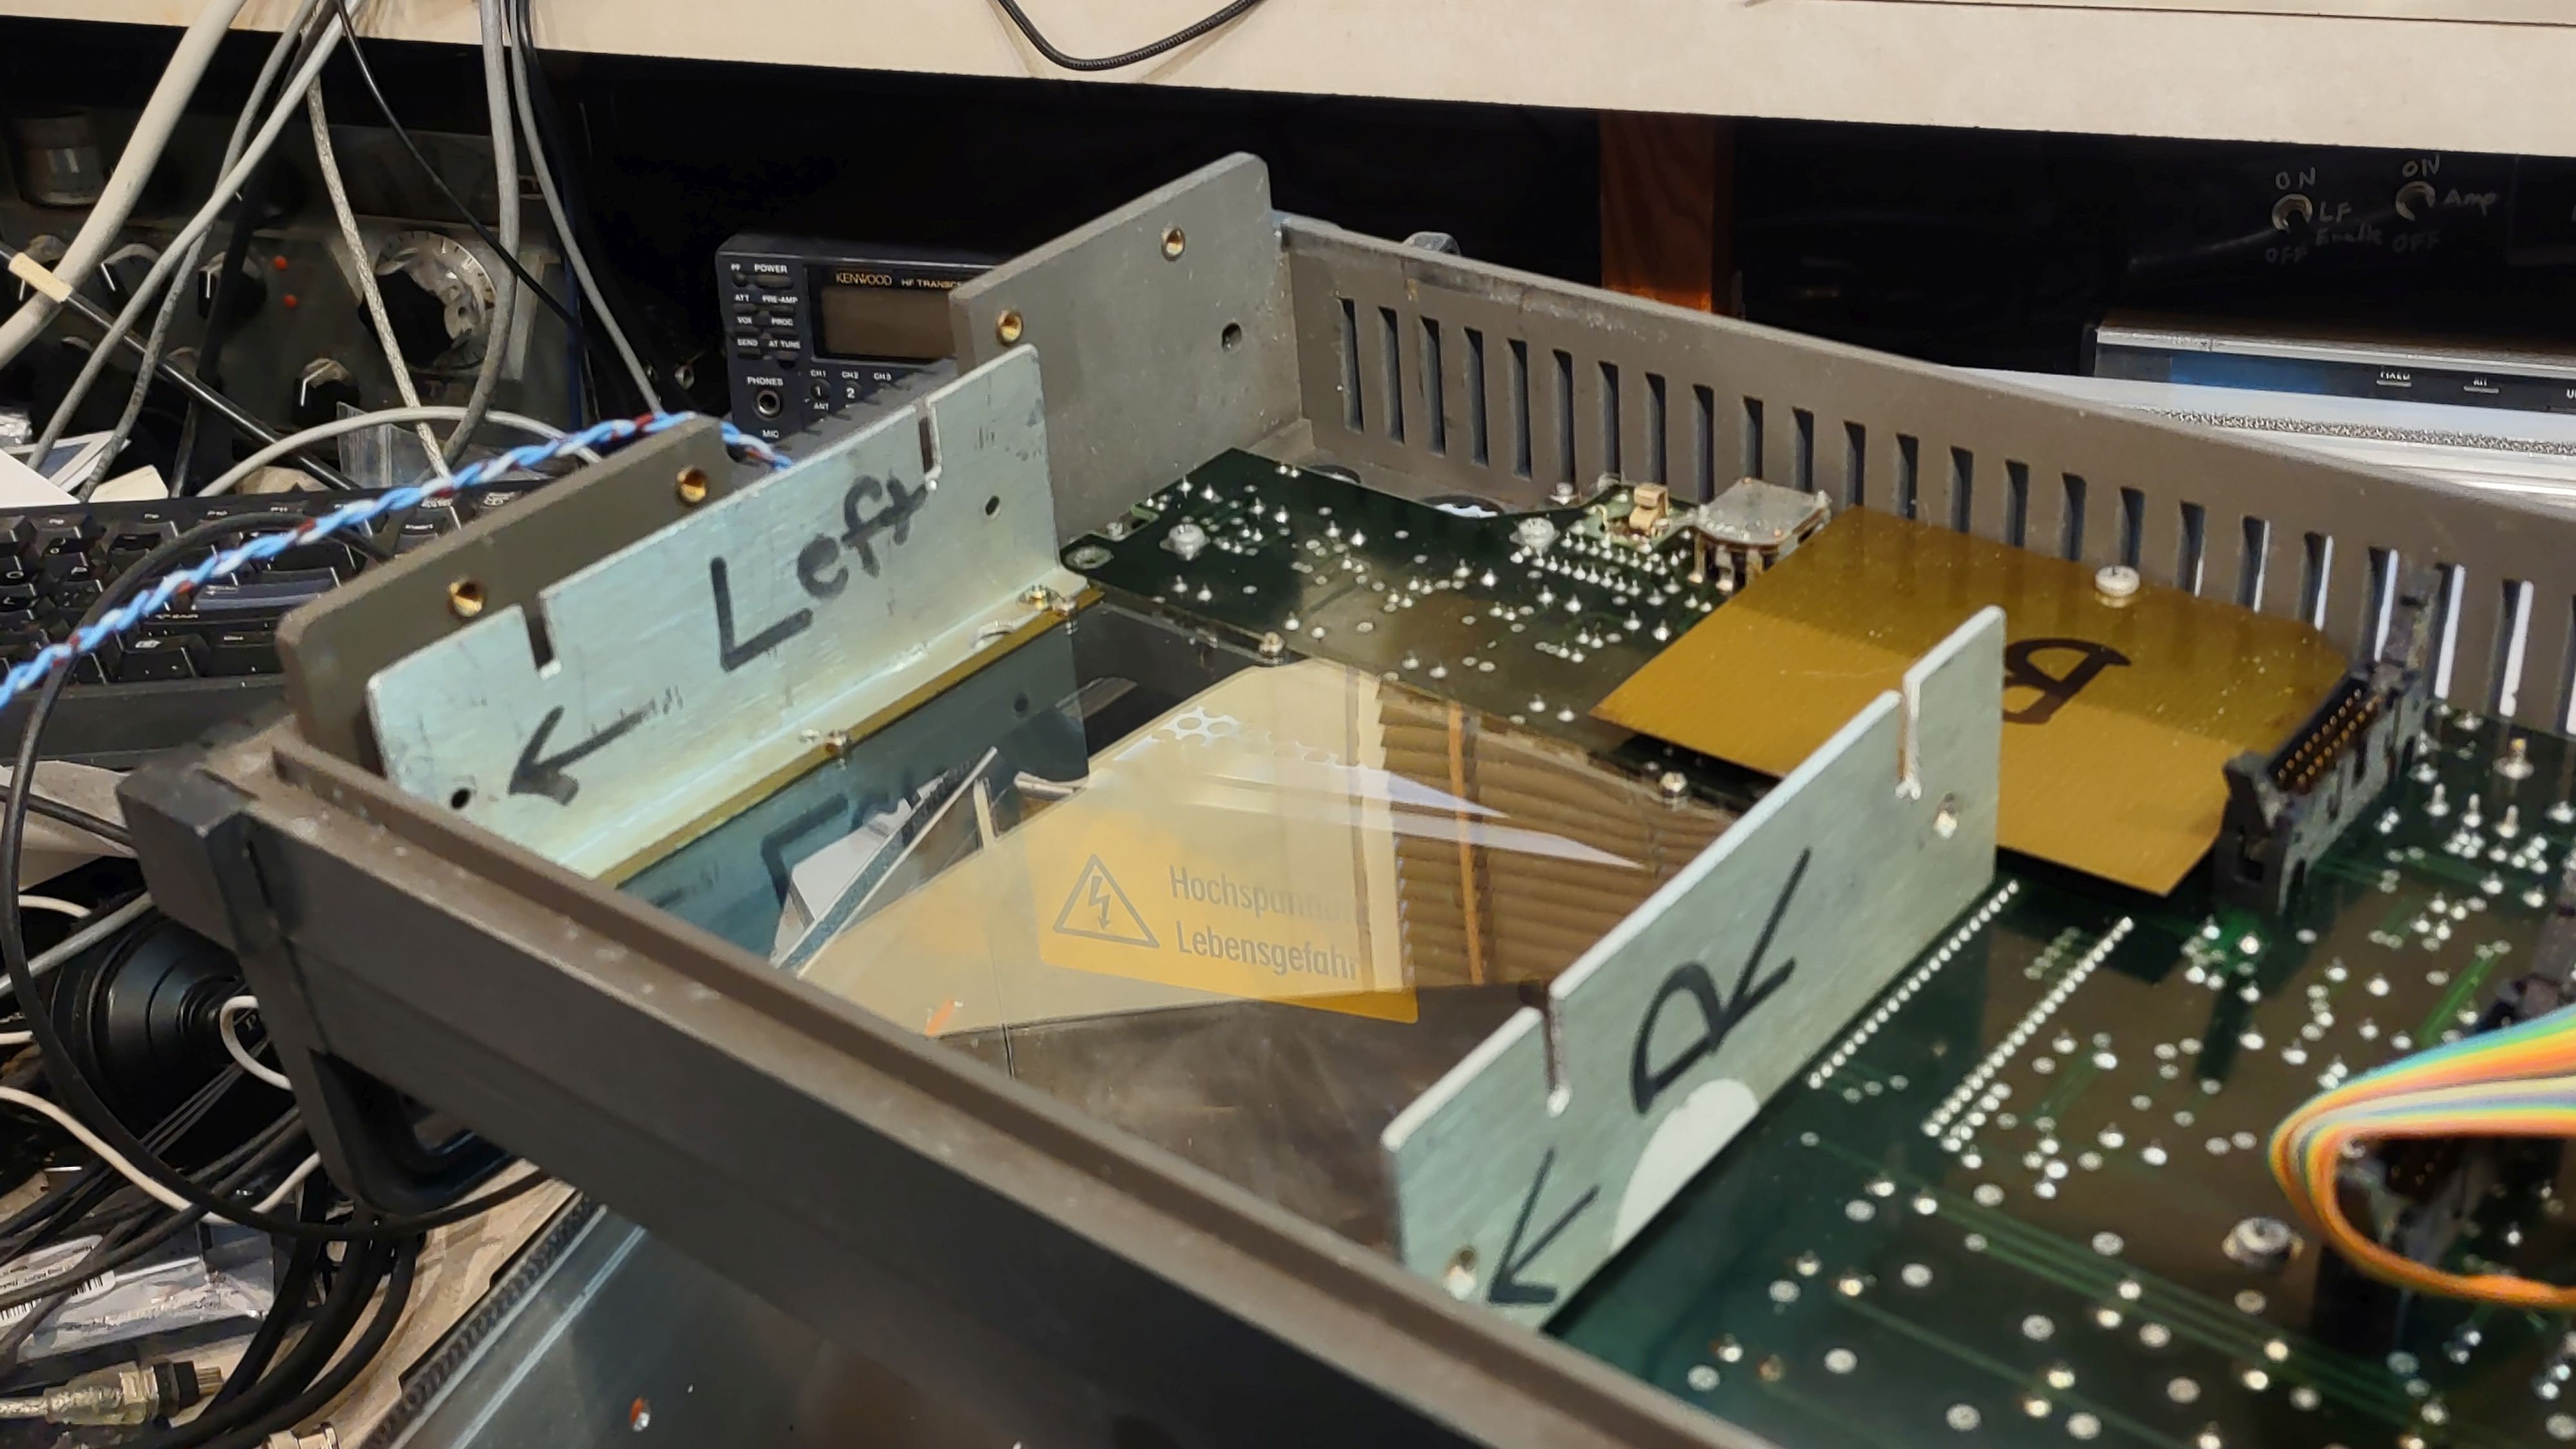
Figure 20:
The "stack-up" of the boards on the mounting sled.  Hidden
by the ribbon cable is the sync processor, above that is the
the GBS-8300 with its output VGA connector and above
that is the LCD controller with 4-button daughter board.
At the bottom, on the sled, may be seen the 7812
regulator used to drop the 15 volt supply to 12 volts.
Click on the image for a larger version.
A "sled" about 6" (155mm) wide and about 4.75" (120mm) tall - designed to be mounted to the left-hand wall (as viewed from the front panel) inside the enclosure.  This was constructed from a sheet of scrap aluminum and on it, the sync processor board, the GBS-8200 and the LCD controller were mounted using an assortment of stand-offs.  The different shapes and sizes of these boards complicated matters, so I had to be creative, resorting to mounting the LCD controller - and its daughter board (with pushbuttons and infrared receiver) to a piece of glass-epoxy PCB material that was, itself, held in place with stand-offs, seen in Figure 20 as the board on the vary top.

While I happen to have a bunch of stand-offs in my parts bins, I could have just as easily mounted the boards using long screws or "allthread" along with an assortment of nuts and washers.  These days, a more elegant custom mount could also be 3D-printed to hold these boards in place, although the metal "sled" and stand-offs offer a solid electrical connection to the chassis that may aid in RFI shielding and mitigation.

The only critical things in mounting are to provide access to the ICSP connector and R1 ("gray" adjust) on the sync processor board, the buttons on the GBS-8200, and the buttons on the daughter board on the LCD controller:  All of these should be accessible with just the top cover of the 4031 removed, without needing to disassemble anything else as depicted in Figure 21.

Figure 21:
Installed and powered- up, the stack-up of boards and
connected LCD panel.  All controls - and the ICSP
connector - are accessible simply by removing the top cover
of the 4031.
Click on the image for a larger version.
Into this "sled" were pressed self-retaining "PEM" nuts and it is mounted at four points in the same slots (using 8-32 screws) on the left side of the frame that were used to mount the original CRT monitor.

Powering the boards:

As noted above, the GBS-8200 is available in a version that may operate from 5-12 volts.  Similarly, the LCD panel's board can also accommodate up to 12 volts - but the 4031 supplies 15 volts.  During development, I ran both boards on the 4031's 15 volt supply directly with no issues, but I noted that 16 volt electrolytic capacitors were used on the inputs, so 15 volts would be pushing their maximum ratings.

Despite having no issues, I decided not to take a chance, so I added a 7812 voltage regulator, bolting it to the aluminum "sled" for heat-sinking (see Figure 20) and powering both the GBS-8200 and LCD panel from it.  As seen from the diagram above, the sync processor includes its own regulator (a 7805) and it may be powered from either 12 or 15 volts.

Overall results

Figure 22:
Under the shield of the "Monitor Control" board is R16, the
"width" adjustment that may be use to optimize video quality.
Click on the image for a larger version.

The results of all of this work look quite good as can be seen in the picture gallery below, but there are slight visual artifacts owing to the fact that the VGA conversion is from a device (the '4031) that does not have its pixel clock synchronized with the sampling clock of the GBS-8200 - or even the horizontal sync pulse.  The inevitable result is - if you look closely - that you may see some slight "glitching" on the leading or falling edge of vertical lines.

This effect can be reduce somewhat by adjusting the read-out pixel clock from the 4031's Monitor Control board.  Located on this board, under the shield, is potentiometer R16.  Nominally set to 11.0 MHz (as monitored at test point "Mp10") the frequency of this clock output may be reduced by turning this potentiometer slightly clockwise, reducing the effects of this aliasing somewhat by increasing the "width" of the display by making it output the line of video "slower".

If this adjustment is done, it should be done iteratively:  If it is set too low, the beginning of the line will start before the current line has finished drawing causing you to be able to see the left edge of the screen along the far right edge.  By adjusting the "Horizontal Width" on the GBS-8200, some of this overlap can be moved off the right edge of the screen so a balance between this and a low clock frequency must be found.  The approximate frequency set by R16 after this adjustment is between 7.75 and 8.0 MHz.

As mentioned earlier, trying to set a color horizontally across a scan line is not really practical:  The fact that, as we have seen, the pixel read-out rate is a free-running oscillator that is not synchronous with any of the the video sync pulses, so there is no "easy" way to synchronize a clock signal to set color attributes along the scan line from the video information alone.  To do so would require a sample of the pixel clock itself from the Monitor Control board!

In theory, it may be possible to tie the internal pixel clock to an already-existing clock signal on the Monitor Control board (e.g. the 8 MHz clock) to allow this and to reduce the "glitching" that is sometimes visible:  This modification is open to investigation.


Photo gallery

The following are screen captures obtained by first connecting a VGA-to-HDMI converter to the VGA output of the GBS-8200 board, and then connecting the HDMI output to a USB3 HDMI capture device meaning that the image is re-sampled several times in the process, accumulating artifacts. 


Figure 23:
The main "RX FM" screen.  The top portion is colored as light magenta to indicate an RX-FM screen while the center portion is colored in yellow.  The "soft" buttons on the bottom of the screen are given the attribute of a "gray" color.
Click on the image for a larger version.


Figure 24:
The TX FM screen, the top portion color-coded as light-cyan.
Click on the image for a larger version.


Figure 25:
The "duplex" screen, the top portion color-coded as light-green.
Click on the image for a larger version.

Figure 26:
The "oscilloscope" screen.  Because it is an "RX FM" screen, the top portion is colored with light-magenta, with the portion with the scope trace is colored light yellow.
Click on the image for a larger version.

Figure 27:
The analyzer display, color coded as light cyan as it's one of the "TX FM" modes.
Click on the image for a larger version.

Figure 28:
The Modulation Monitor "Zoom" screen, color coded as light magenta as it's one of the "RX FM" modes.
Click on the image for a larger version.


Video captured from the 4031:

Here is a short video,captured from the output of the GBS-8200, as the various screens are selected on the 4031:


At the end of the video, the monochrome modes (green, yellow, etc.) are selected in sequence.

Remember:  The video on the LCD mounted in the 4031 looks quite a bit better than is represented in the video - not only because it's a smaller screen, but the capturing of the video from the VGA output added yet another stage of analog digitization/degradation - plus there are artifacts from the YouTube video compression as well.

* * * * * * * * * * * * * * * * 

Why use a PIC?

One might ask, "Why did you do this with a PIC rather than an Arduino or a Raspberry Pi?"

First, I've been using the PIC Microcontrollers since the early 1990s, making good use of the CCS "PICC" compiler - (LINK) for much of this time:  This compiler is capable of producing fairly tight and compact code and I'm very familiar with it.  The PIC16F88 was chosen because it has the necessary hardware peripherals, it's easy to use, has plenty of RAM, program space and speed for this task, and is still available in DIP (and SMD) packages - a real plus in these days of "supply chain" issues.

The code running on the PIC uses interrupts and as such, it's possible that its same function could be done on a lower-end Arduino UNO as that processor sports similar hardware capabilities - but it's unlikely that this could be done using the typical Arduino IDE sketch environment, which does not, by default, lend itself to latency-critical interrupt processing.  You would have to get much closer to the "bare metal" and implement lower-level interrupts and some careful coding (possibly in mixed "C" and assembly) in order to have the code operate fast and consistently enough to do the pixel counting.

Another possibility is to use an ESP8266 or ESP32, but again one would need to get closer to the "bare metal" and optimize timing of the code to handle this sort of task - and you would still need to have the same sort of hardware (sync reprocessor, control of the RGB) signals.

Finally, a Raspberry Pi - if you can get one - would be overkill - and it would take MUCH longer for the RPi to boot up than the service monitor, which is up and running in under 15 seconds from power-up:  You would still need to interface the same signals (sync, video), but to 3.3 volt logic, and you would still need the same hardware (analog switches, etc.) to modify the video attributes - not to mention the time-critical code on a non-realtime operating system to do the pixel counting but this task could be done with additional hardware if needed.

Where can I get the code?

You may find the source code (for the CCS "PICC" compiler - I used version 5.018) and a compiled .HEX file for the PIC16F88 at the following links:

The .HEX code above is suitable for "burning" into a PIC16F88, and I use the PicKit3 programmer's ICSP (In Circuit Serial Programming) for this:  It's possible to reprogram the device in a powered-up 4031 - but because the code is written to detect when the ICSP is connected, it won't resume normal operation until the cable is disconnected.

As mentioned before, I have only one version of the 4031, so if your device has "different" screen signatures that result in pixel counts that don't match what's in the code, that screen will be rendered with white text.  Due to the complexity of the screen detection via pixel counting, making the recognition of the screen an automated process so that one could provide user-defined configurations would require a significant addition to the code - and likely the need for much more code space.

With the information provided it should be possible to apply this technique using other hardware platforms/microcontrollers - provided that one has either the speed to reliably count pixels at MHz rates and/or is able to get close enough to the "bare metal" of the processor to use on-chip peripherals to aid in the task.  In either case, close attention to the way the code operates - possibly a bit of optimization - will likely be required to pull off this task.

Final comments:

The most obvious change in the appearance of the 4031 after the modification - other than the colorized screen - is that of readability.  Clearly, the replacement of the degraded screen protector improved things considerably!

One advantage of the CRT - assuming that it is in good condition - is that it can be very bright, meaning that the LCD is at a slight disadvantage where high ambient light might be an issue:  In this case, one of the available "monochrome" modes may help.

The most obvious disadvantage of the LCD is that unlike the CRT, which has essentially a Lambertian emission profile from its surface (e.g. it radiates light hemispherically from the plane of the surface of the CRT), the LCD, by its very nature, has a comparatively reduced viewing angle.

When faced with viewing difficulties one would, in practice, simply relocate or reposition the 4031 so that it was more favorably oriented - and in some instances switching to one of the large "Zoom" screens may help when reading from a distance and/or awkward angle:  If you wish to do so, you could take advantage of the ability to use an external LCD monitor (small 7" units are fairly inexpensive) as described above.

Installing an LCD panel - with a blemish-free screen protector - and having "colorized" screens is a nice "refresh" of the 4031, particularly if you have been dealing with an ailing CRT for which there is no modern, drop-in equivalent.

* * * * * * * * * * *

This page stolen from ka7oei.blogspot.com


[END]


❌
❌