Via AMSAT: ANS-189 AMSAT News Service Weekly Bulletins
7 July 2024 at 04:51
In this edition: * Firefly Delivers New Amateur Satellites to Orbit * Ariane 6 Maiden...

Ham Radio With K0PIR
In this comprehensive guide, we delve into the intricacies of optimizing power settings for the Elecraft K3S and WSJT-X. From understanding the impact of power levels on signal quality to fine-tuning your setup for maximum efficiency, this guide provides invaluable insights and step-by-step instructions to enhance your digital communication experience.
The post Optimizing Power Settings for Elecraft K3S and WSJT-X: A Comprehensive Guide appeared first on Ham Radio with K0PIR - Icom 7300 and 7610 SDR Transceivers and now Elecraft!.
Meshtastic devices have really taken off in the UK over the last few months and there is now an established Mesh across a large portion of the UK mainland.
Looking to expand the device capability I stumbled across a really interesting little project that is still in the early stages of development but, is functional and worth trying out.
The TC²-BBS Meshtastic Version is a simple BBS system that runs on a RaspberryPi, Linux PC or virtual machine (VM) and can connect to a Meshtastic device via either serial, USB or TCP/IP. Having my M0AWS-1 Meshtastic node at home connected to Wifi I decided to use a TCP/IP connection to the device from a Linux VM running the Python based TC²-BBS Meshtastic BBS.
Following the instructions on how to deploy the BBS is pretty straight forward and it was up and running in no time at all. With a little editing of the code I soon had the Python based BBS software M0AWS branded and connected to my Meshtastic node-1.
The BBS system is very reminiscent of the old packet BBS systems of a bygone era but, it is ideal for the Meshtastic world as the simple menus and user interface are easily transmitted in seconds via the Mesh using minimal bandwidth.
The BBS is accessible by opening a Direct Message session with the M0AWS-1 node. Sending the letter H to the node will get you the initial help screen showing the menu above and then from there onwards it’s just a matter of selecting the menu item and following the BBS prompts to use the BBS.
The BBS also works across MQTT. I tested it with Dave, G4PPN and it worked perfectly via the Meshtastic MQTT server.
This simple but, effective BBS for the Meshtastic network will add a new message store/forward capability to the Mesh and could prove to be very important to the development of the Meshtastic mesh in the UK and the rest of the world.
More soon …
Scroll to the bottom if you are only interested in the FD checklist! Is Field Day worth it? This year, more than any other, it seems this question was popping up on ham radio forums across the internet. Other versions seem to be what is the relevance of FD in the day and age of POTA and SOTA. Discussions (disagreements) on what modes should and should not be allowed. Or even what the entire purpose of FD is (emergency communications exercise? ham radio publicity event?) I probably missed it in years past, but this was the first of my five years of both Winter and ARRL Field Days that I noticed people saying they just did not feel like doing it, or alternatively they felt they were unwelcome when they showed up at a public FD site.
I got my chops as the Field Day Coordinator for the first amateur radio club I ever belonged to. I was assigned the role less than a couple months after I received my license. Although I no longer participate in that particular club, I will forever be grateful for all I learned during that time. I took the position extremely seriously, and went from never having turned on a ham transceiver, to understanding quite deeply the variety of systems necessary for a portable multi-op radio contest. I still remember having to inquire as to whether a “tri-bander” was a name brand for an antenna, or a type of antenna. In this case, the term was referring to a 10-15-20M multi-band beam antenna. I would like to think I had been a particularly good radio event coordinator, and went on to organize quite a few group radio events particularly through the COVID-19 pandemic.
Simultaneously, I developed a tremendous love for portable radio, and in particular the Summits-On-The-Air (SOTA) program. I am proud of the fact that I can set up an antenna in nearly any condition. AA1F’s POTA Lion Award effort demonstrated this quite nicely. And, I can do it usually fast and efficiently, especially with a 20M EFHW wire antenna.
So, back to the question. Is Field Day worth it? Given that SOTA and POTA, and other versions of portable radio operations, make a Field Day-like experience possible at almost any time, is Field Day still important and relevant to the amateur radio hobby? Yes. Yes it is. Field Day is worth it. It is important. And it remains relevant.
Our FD station is shown below. It does look like a messy jumble of wires and cables, but there is a reasonable amount of organization in that jumble. My station is in front with the Yaesu FT-991A. AA1F’s station (with an FT-891) is directly across from mine, in the back. And facing toward the window is the FT8 station (FT-857D). In compliance with FD rules, this transceiver is set-up to run FT8, but is not simultaneously capable of transmitting at the same time as another station, keeping us a two bravo classification. Why am I so confident of that? If you take a look carefully at the window, you will see two coax cables feeding through…we only set up two HF antennas! We need to physically move the antennas from one station to another in order to operate. In fact, we do think some sort of antenna switching system would be an improvement for next year. This was also the first year we used a communications headsets (Heil Sound Pro 7) with foot pedals. What a tremendous pleasure!!
Our basic information from the day is in the table below. We decided to keep our antenna system to a minimum given the impending threat of thunderstorms all weekend. This meant that we would set up one 80M off-center fed dipole at about 20-25 feet off the ground and mostly horizontal with its long axis in the east-to-west direction. And then we would set up another 80M OCFD in the north-to-south direction. The choice of the 80M OCF would be so that AA1F and I would each have access to an antenna capable of getting on all bands at the same time, with reasonable resonance, although we were using external tuners on all radios. The perpendicular placement of the antennas was to optimize our directionality of propagation, as well as to hopefully limit interference from one antenna to another. It was also because of the convenience of using our property’s natural tree lines as antenna supports.
| Station ID & FD exchange | KX1Q 2B ENY |
| Operators | KM1NDY & AA1F |
| Transceivers | FT-991A, FT-891, FT-857D, FT-4X |
| Antennas | 80M-OCFD (x 2), 2M Magmount |
| # of QSOs | 362 |
| # of hours operated | 14:46 |
| # of ARRL sections worked | 68 |
| Bands worked | 2M, 10M, 15M, 20M, 40M, 80M |
| Modes worked | FT8, FT4, CW, USB, LSB, FM |
| States not worked | AK, HI, NE, MS, NM |
Weather considerations made us leave out putting up any mast structures. Not only did it rain in sheets, there were numerous thunderstorms, and even a tornado watch. Using the trees for support at least made us feel as though we would be less likely to attract lightning bolts, at least compared to a nearly 40 foot metal military mast propped up in an open field. We ran 100 foot lengths of LMR-240 coaxial cable from each of the antenna baluns back toward our operating station. Unfortunately, we needed to add another 100 feet of coax (this time of RG8X) to one antenna and 50 feet of RG8X to the other. On the desire list for next year’s field day is a couple of more runs of LMR-240 so we are not mixing and matching coax.
Below is the rain coming down in sheets, with a blue pop-up tent protecting our generator. The generator, a relatively new one that we purchased to power our newest trailer (on the right), stayed on through the entire weekend and was turned off one time only for refueling. This is a 5000W Predator Super Quiet Inverter Generator from Harbor Freight. We have the 2000W version of this generator that we have used for years. I highly recommend this brand. Remember, our entire farm operation is off-grid, so we generate all power. That includes solar panels on the top of each trailer. We propped the genny on cinderblocks to avoid water pooling underneath it.
This year we were fortunate to have acquired most of what we needed for Field Day already. We did make a couple of new purchases from Ham Radio Outlet in NH in the week prior. This included one of the 100′ LMR-240 cables and the Radiowavz 80M OCFD antenna. And Marc and I did splurge for the Heil Sounds Pro 7 communication headsets with foot pedals that I already mentioned. And I am really glad we did! It made operating SSB a joy! I also purchased a gigabit ethernet switch, and networked all 3 of our computers with it. I described that all in this post, including a how-to on networking computers with N1MM+ logging software.
And since we are talking solar panels, we did manage to sneak in a battery charge between downpours during the event to get our 100 points alternative power bonus points. That solar set-up is a SunKingdom 60W folding panel (which unfortunately does not seem to be available anymore), a Renogy Voyager 20A charge controller capable of working with LiFePo batteries, and a 15Ah 12V Bioenno battery. This set up can produce 2.5A of current in full sun.
The SunKingdom solar panel uses a SAE connector. I use an SAE-to-bare wire jumper to attach the solar panel and its native power cord with an SAE connector to the charge controller. From the output of the charge controller, I then use a bare wire-to-SAE jumper, that I then add a Thunderbolt (Harbor Freight) SAE-to-barrel connector adapter to attach to the Bioenno battery. The exact Thunderbolt product is pictured below; this is NOT any sort of affiliate link and I do not make a single penny off of this website. I have included this (and the picture is linked to the right Harbor Freight product), because it is a way to locally source a barrel connector that fits the very popular ham radio Bioenno battery. The other jumpers, especially the SAE extension cable, are nice as well and can be modified to suit your solar connection purposes.
We used standard 30A power supplies running off of the generator to power our SSB/CW stations. The FT8 station however ran entirely off of battery power, including one of which was charged with solar power in the moments of sunlight that we had.
Below we start getting into the nitty gritty of our FD contacts. I made contacts on 5 bands with SSB and CW. AA1F on the other hand made SSB contacts on 20, 40, and 80, and he also made FT8 contacts on those as well as 15M. The FT8 contacts are the ones marked “KX1Q” in the graph below.
Overall, I am quite pleased with the general performance of our Field Day set-up. We made 362 QSOs and reached the entire continental United States.
This included 68 separate ARRL sections and 45 states. AA1F made 24% more contacts than I did, with 206 QSOs compared with my 156 contacts.
It is interesting too to see how AA1F and I “specialized”. Below is a breakdown of our various modes. I did manage exactly 1 FM contact on 146.52MHz with a local ham via a 2m/70cm magmount on my van. In general AA1F took the low HF bands, and I took the higher HF bands, although we both shared 40M quite a bit. Also, I operated CW, whereas AA1F chose FT4/FT8 as his digital mode. In fact, this is the first time AA1F really used these modes beyond looking over my shoulder while I tap away on WSJT-X, and he made over a 100 contacts! Fortunately, our digital modes radio, i.e., the now discontinued Yaesu FT-857D, still works, as it was burning up by the end of FD with the workload of a full duty cycle. In order to get the 857 to play with WSJT-X, we had to run it through the Tigertronics Signalink as an audio interface. Unlike the Yaesu FT-818ND, I unfortunately could not get the Digirig to work with the 857, and scrapped it for the Signalink.
| Mode | AA1F/KX1Q | KM1NDY | TOTAL |
| FM | 1 | 1 | |
| FT4 | 62 | 62 | |
| FT8 | 39 | 39 | |
| USB | 25 | 39 | 64 |
| LSB | 80 | 3 | 83 |
| CW | 113 | 113 | |
| TOTAL | 206 | 156 | 362 |
Below is a map of our QSOs by band. The most interesting to me part of this is the very distinct propagations regions each band creates. 15M reaches the west coast and Texas. 20M is predominantly midwest. 40M is northeast and mid-Atlantic, and 80M is similar with a slightly smaller diameter. This map and the mode map below it were made by uploading the Cabrillo file to this website.
The locations of our QSOs by mode is shown below. The red pins, denoted oddly as “Standard” by the software, are CW, and they correlate to the fact that I made a lot of the CW contacts on 15M and 20M. Likewise, the yellow data pins show that most of AA1F’s FT* contacts were made on either 40M or 80M.
And let’s just talk a little bit about my CW contacts. I am not a particularly good CW operator, although I try. I needed to use a decoder. The one that I think is the best is the android app Morse Expert. It uses the same technology as CW Skimmer. All I do is rest my cell phone near the speaker of the transceiver and let the app decode the CW simply via ambient audio. It works extremely well, particularly in the type of event where nearly everyone at least to me seems to be sending CW via a machine. Now for sending CW (which I am reasonably okay at — my deficit is definitely at hearing it), I used the voice memory channels of my 991A using the “text-to-CW” mode. I programmed in “KX1Q” in channel 1 and “2B ENY” in channel 2, and made channel 1 and 2 into the soft buttons at the bottom of the Yaesu display. I also programmed in “TU” and “AGN” in channels 3 and 4, just in case I needed them. Although, usually I would just send these with the paddle if I did. With this set-up, and some reasonable knowledge of CW, I found making morse code contacts was like shooting fish in a barrel. This was the first time I used this type of semi-automated operation, and it was delightful! I expect I will get to be more efficient at it by next year. Or who knows? Maybe, I’ll get better at code by then too!
And we did also try for an FM satellite contact with a nighttime pass of SO-50. Given that it was in the middle of a thunderstorm and we were standing underneath the awning of our trailer to avoid getting soaking wet (not to mention pointing a handheld yagi at lightning bolts, hey, we wanted that contact!), it is not particularly surprising we did not make the QSO. We did hear SO-50 though, so we considered it a kind of win. We used two Yaesu FT-4X HTs to try to make the contact. The shame though was that it was otherwise a perfect 80 degree pass over our open field…
The farm is open to the public, so we did set up an information table. Oddly (surprise surprise! Look at that rain!) we did not get any visitors, but we did claim our bonus points.
…And the grill was DEFINITELY not just for show! Here is AA1F showing off his delicious meat. Yup, cooking in the downpour like the seasoned farmer that he is!
Georgie, our Field Day guard dog, watched over everything with her one eye. Including the coax. Okay, really this is just a gratuitous picture of this gorgeous mutt.
And finally, here it is! Our entire ARRL Field Day 2024 checklist (of radio gear only, you need to make your own toiletries list!) Feel free to download and adapt it as you would like!
So, successes? We made over 100 more contacts this year than last year which we consider a win. We were on the air nearly at the start of Field Day (okay, 11 minutes late, but still that is great for us!) This was because we set up nearly everything Friday night (including our antennas in a thunderstorm and by headlamp thanks to bad traffic out of Boston). The early set up meant we were less fatigued by start time. We operated 6 bands and 6 modes. We had little to no interference between our stations, made possible by using band pass filters on both operating transceivers at all times. We were never at a lack of station possibilities for contacts, and more often than not if we could hear a station, we could work a station. The use of multi-banded 80M antennas seemed like a good choice overall. Our antenna locations made working the entire United States possible, with only 5 states not contacted. I learned a way to semi-automate CW contacts and AA1F made a bunch of WSJT-X contacts for the first time. All of our computer equipment was networked and worked. In all, we considered the entire operation a success…
But of course there are always things we can do better. Quite frankly, I would like to get more contacts. I suppose we will try for at least 500 next year. Would it be beneficial to get the antennas up higher than 20-25 feet? Should we use only LMR 240 instead of mixing and matching it with RG8X coax? Should we put up a single banded resonant 40M antenna? Or maybe focus on more resonant antennas in general? We only operated for about 14 of the 24 hours in total. We did get tired fairly early in the event ( I think I turned in before 2am on Saturday; AA1F made it a bit more) and we slept a bit later than we wanted to. How can the two of us manage more on-air time given the exhaustion inherent to being a two-person FD operation? And one that needs a significant amount of travel time to reach our FD location?
And of course, the things out of our control. The bad traffic on Friday that turned a 3 hour trip into a 5 hour trip, and left us setting up in the dark and rain. The weather…thunderstorms (and tornado watches!) all weekend. And when it wasn’t raining, it was 90 degrees with air so humid you could ring it out. We also suffered from being distracted a decent amount by Georgie, who as a shepherd teenager still requires a lot of minding.
All that said, I am really happy with 2024’s ARRL Field Day. Despite what I see online, the airwaves were hopping and it was clear A LOT of hams were enjoying the event! It made me giggle a bit to think of the number of electromagnetic signals flying around the general public’s head, of which they had no clue. Don’t get me wrong, I know it is the same for cell phones, etc, but usually a giant international event would have some sort of footprint. Runners blocking streets as they raced along. Or traffic on the way to a particularly popular concert. But hams can take over the world in the quietest and least intrusive of ways, unless you know how to listen for it.
My radio friends in Beantown seemed to all have nice club Field Days as well based on the reports I have been seeing and getting. I am happy for them! I realize though, at this point in my trajectory through this hobby that I am not particularly interested in partaking in Field Day as a club event. Maybe this will change? Through the years I have done quite a bit to promote Amateur Radio. Heck, this website, although it is really for my own entertainment, does see quite a bit of traffic at least based on my standards and I would like to think it has a positive effect. And I am really glad for the club Field Days I have both organized and been a part of.
I am getting more protective though of my time. And particularly the time I get to spend on what has become one of the most important aspects of my life. Over these last five plus years, radio has burrowed its way into becoming a core component of my existence. I mean it with that intensity. When I started this journey, communication, as in the ability for one party to convey information to another, seemed to be the backdrop of this radio journey for me. In essence, it was a social experience. The ability to communicate was inherently social, and I took to radio in that manner: join a club, help provide radio experiences for others, provide a public service — a social service — in doing so. But as the wonder of the science of radio, the art of radio, and most importantly–radio for the sake of radio–seeps in, the social aspects have been fading away in some aspects. Don’t get me wrong! I love all of the real friends I have made in this hobby, and hanging out with them is not what I am talking about. Enjoying the company of other hams (which I do!) is also not what I am talking about. More so, an event like Field Day, the Super Bowl of our hobby, is something I want to do as a largely asocial experience these days, instead relishing in the marvels of RF and my own ability to tap into it. Maybe it simply comes down to the fact that I do not want to share. There are many ways in which I can share radio, and many ways that I do, but for the time being, I do not think Field Day is not going to be one of them.
And why Field Day? No other radio contest (non-contest?) has a wider range of amateur radio operator skills and stations available to pluck contacts out of. Overall, the event is not extremely competitive nor is it made out of the finest radio stations. It means you can make a lot of contacts with other stations that are also cobbled together…just like yours! It means that you can significantly improve from one year to the next, learn your equipment better, perfect your station set-up, and harden your skills. You are largely not competing with amplified multi- mult- contest stations blasting 1500 watts with giant directional antennas. In Field Day, you actually stand a chance. If used appropriately, ARRL Field Day can be a great way to become increasingly more proficient in the hobby, year over year. And it is an experience I want to grasp with both arms and not let go of for anyone.
Is Field Day still relevant? You better believe it is!
KM1NDY
We’ve recently added a new room to the Matrix HAM Radio Space for Digital Voice modes as this was an area of interest that didn’t really fit into any of the other rooms.
The new Digital Voice room has attracted a lot of attention from members, with a lot of the focus being on the AllStarLink system. Michael, DK1MI built an AllStarLink node in the cloud for us all to use for Matrix Nets and so I decided I had to get in on the fun.
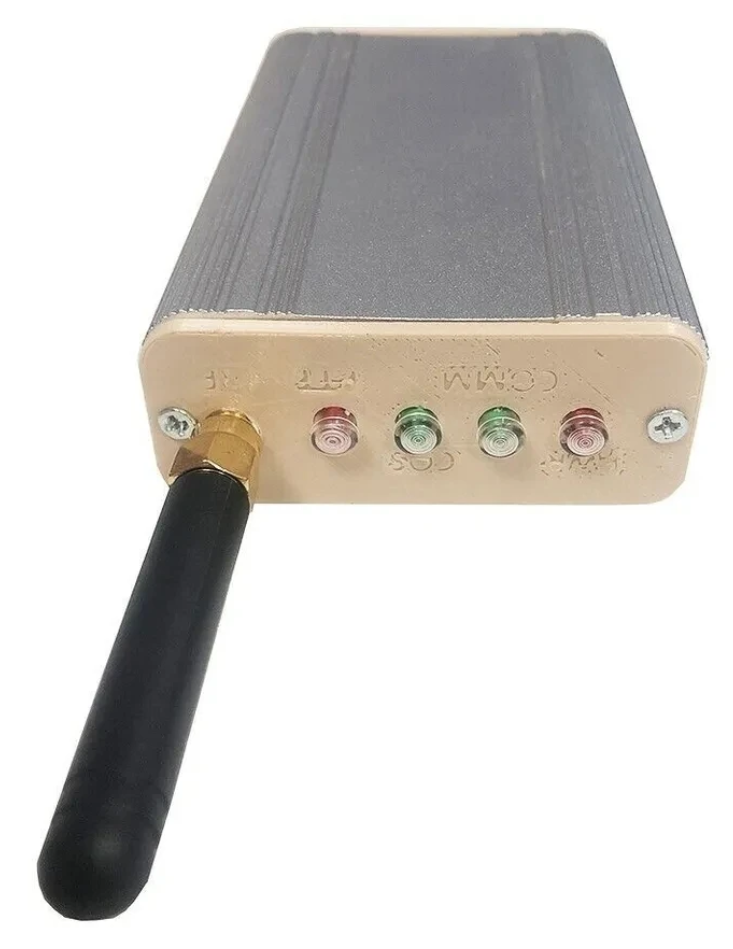
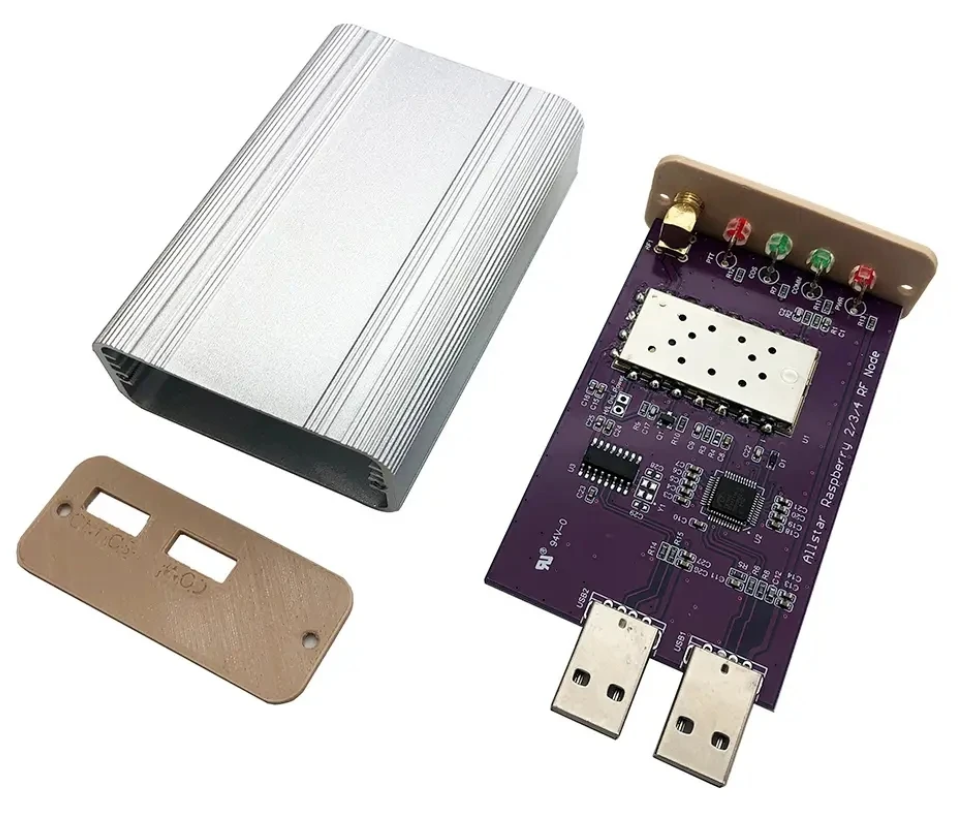
The Jumbospot SHARI SA818 Amateur Radio AllStarLink Radio Interface was originally designed by N8AR and implements a RaspberryPi 2/3/4 hosted AllStarLink node using a NiceRF SA818 embedded VHF/UHF radio module and sound card.
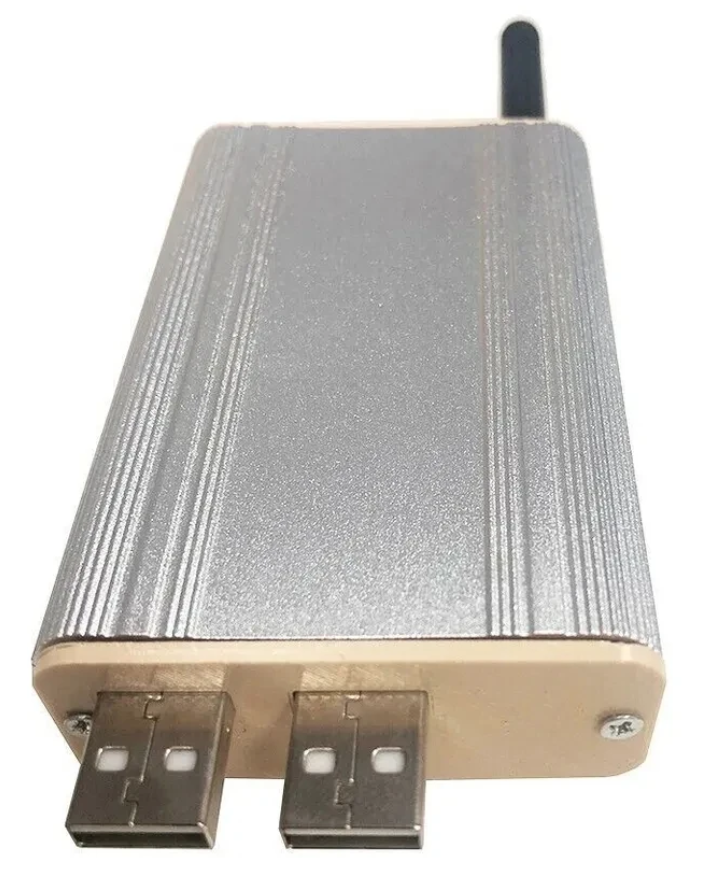
The two USB connectors on the SHARI device are position such that they plug into two of the available 4 USB ports on the RaspberryPi without the need for cables. This keeps the whole solution together in one neat package.
Before you start you will need to obtain a node number and secret (password) from the AllStarLink Portal. To get this you will need to provide proof to the AllStarLink administrators that you are a licensed Amateur Radio (HAM) operator. This is done by uploading a copy of the first page of your HAM licence to the website for the admin team to check. This can take 24hrs to be completed so make sure you get this all done before trying to build your node. You cannot build a node successfully without a node number and secret.
Of course you will also need a transceiver that can operate on the 438.800Mhz frequency or other frequency of your choice on the 2m or 70cm HAM band.
You will also need to open port 4569 on your internet router and setup port forwarding to the IP Address that you will be using on your RaspberryPi node. It’s important to use a static IP Address on your RaspberryPi.
There are quite a few different Linux based operating system (O/S) images that are available for the RaspberryPi devices that have been specifically tailored for the AllStarLink node and include all the necessary software and library packages out the box.
I decided to use the Raspbian GNU/Linux 10 (buster) based distribution as it is based on the very stable and reliable Debian Linux distro. You can download the exact version I am using from the Raspbian link above or directly from my website here.
Once downloaded you need to burn the ISO image onto a suitable SD card for your RaspberryPi. I use BalenaEtcher as it’s extremely quick and reliable at burning ISO images to SD cards.
Of course if you are a hardline Linux command line junkie you can always use dd to create the SD card.
Once you’ve got your O/S onto your SD card, slot it into your RaspberryPi making sure your SHARI device is connected to the two USB ports and then power it up. Make sure you have a good PSU for the RaspberryPi as the two devices together draw around 3A of current during the transmit cycle. (I use a 3.6A PSU from Amazon).
The default login for the Raspbian O/S is shown below. Login via SSH and configure your RaspberryPi for your local network. It’s important to use a static IP Address configured either directly on the RaspberryPi or via DHCP in your router.
Login: repeater
Passsword: allstarlink
SSH port: 22
Once you have your RaspberryPi connected to your LAN you are ready to start configuring it for AllStarLink.
The first thing you need to do is login to the raspi via SSH and then become root user using sudo as shown below:
sudo su -Once you are root user, you need to add the AllStarLink repo to the sources file and update the operating system using the following command:
curl -s http://apt.allstarlink.org/repos/repo_signing.key | apt-key add
apt update --allow-releaseinfo-change
apt dist-upgrade
Copy and paste each line one at a time into your terminal. Once the last command finishes, the system is up to date and can be rebooted as follows:
rebootOnce the raspi has rebooted, login again via SSH as user repeater and then become root user again.
You now need to install a couple of Python components that are required by the system to function. Use the commands below as user root:
apt-get install python3-dev python3-pip
pip3 install pyserial
Next you need to change directory into the asterisk config file directory using the command shown below:
cd /etc/asteriskIn this directory you will find all the default config files that come as part of the distro. For this build we’re not going to use them and so we need to move them out of the way ready for a set of config files that have already been configured correctly.
Using the following commands create a new directory, move into that new directory and then move all the unwanted configuration files into it:
mkdir ORIGINAL-CONF-FILES
cd ./ORIGINAL-CONF-FILES
mv ../*.conf ./
ls -la
cd ../
You should now be back in the /etc/asterisk directory which will now be empty apart from the custom directory which we left in place.
You now need to copy the correctly configured configuration files into the /etc/asterisk directory. Start by downloading the zip file containing the new configuration files
Once downloaded, copy the .zip file into the repeater users home directory (/home/repeater) using either scp on the Linux command line or if using Windows you can use the FileZilla Client in SFTP mode using the login details above.
Once you have the .zip file in the repeater user’s home directory you need to copy the file into the /etc/asterisk directory as user root:
cp /home/repeater/AllStarLink-Config-v3.zip /etc/asterisk/Next as user root, change directory into the /etc/asterisk directory and unzip the .zip file:
cd /etc/asterisk
unzip ./AllStarLink-Config-v3.zip
Once the file is unzipped you need to move a couple of files into the repeater users home directory using the following commands:
mv ./SA818-running.py /home/repeater
mv ./gpio /home/repeater
Once the files have been moved you need to set the correct ownership and privileges on the files using the following commands:
chown -R root:root /etc/asterisk/*.conf
chown repeater:repeater /home/repeater/gpio
chown repeater:repeater /home/repeater/SA818-running.py
chmod 755 /home/repeater/gpio
chmod 755 /home/repeater/SA818-running.py
The gpio BASH script and configuration details were supplied by Mark, G1INU in the Digital Voice room on the Matrix. It adds the COS light functionality to the setup. The COS light will now light every time the SA818 hears RF on the input.
The next thing you need to do is configure the SA818 radio device in the SHARI. The script I used was originally from https://wiki.fm-funknetz.de/doku.php?id=fm-funknetz:technik:shari-sa818 all I’ve done is change the entries to switch off CTCSS and changed the frequency to 438.800Mhz. Configuring the SA818 is done by running the SA818-running.py Python programme that you moved into the repeater user home directory. Making sure you are still user root, run the following commands:
cd /home/repeater
./SA818-running.py
At this point your SHARI SA818 device will be configured to operate on 438.800Mhz and CTCSS will be disabled.
If you want to change the frequency or enable and set a CTCSS tone to access the node you will need to edit the Python programme using your favourite text editor and change the entries accordingly. Once changed rerun the program as shown above and your SHARI will be reconfigured to your new settings.
Next you need to move the allmon.ini.php file into the correct directory so that it enables access to the Allstar Monitor web page on the device so that you can manage connecting/disconnecting nodes. Use the following commands as user root to achieve this:
cd /etc/asterisk
mv ./allmon.ini.php /var/www/html/allmon2/
chown root:root /var/www/html/allmon2/allmon.ini.php
chmod 644 /var/www/html/allmon2/allmon.ini.php
The allmon.ini.php file needs to have your node name entered into it for it to work correctly. As user root, change directory and edit the file using your favourite editor.
cd /var/www/htmlUsing your text editor, search for the line starting [XXXXX] and change the XXXXX to your node number. Save the change and exit the file.
At this point you are almost complete, all that is left to do is add your node number and node secret into the appropriate configuration files in the /etc/asterisk directory.
Since I am a Linux command line junkie I use vi to edit all the configuration files on the command line as user root, but you can use any editor of your choice.
cd /etc/asteriskStart with the extensions.conf file. Search for the line starting with NODE = and delete the XXXXX entry and insert your node number. Save the file and edit it.
Next you need to edit the iax.conf file. This time search for the line starting with
register= and change the XXXXX for your node number and the YYYYYYYYYYYY for your node secret. Be careful not to accidentally delete any other characters in the lines otherwise it will corrupt the configuration file.
In the same file search for the two lines that start with secret = and change the YYYYYYYYYYYY for your node secret. Once you have changed both of the secret entries, save and exit the file.
The final file to edit is the rpt.conf file. Once again open the file using your favourite editor and search for the line starting with XXXXX = radio@127.0.0.1:4569/XXXXX, change the XXXXX entries for your node number making sure not to delete any other characters next to the XXXXX entries.
Further down in the same file there is a line that starts with [XXXXX], once again change the XXXXX for your node number making sure to keep the square brackets at each end of the node number as you edit it.
Finally move down to the very bottom of the file and find the two lines that start with /home/repeater/gpio, once again change the XXXXX entries for your node number.
Once this is done, save and exit the file. At this point your node should be fully configured and will only require a reboot to get it working.
As user root, reboot your raspi using the reboot command.
rebootOnce your raspi comes back online, login using SSH as user repeater and then become root user using the sudo command detailed above.
You now need to create the admin user password for the Allstar Monitor web page on the device. This is done using the following commands as user root:
cd /var/www/html/
htpasswd -c .htpasswd admin
You will be asked to enter a password twice for the admin user, make sure you make a note of this password as you will need it to login to the web page.
Once this is done your configuration is complete, logout from the terminal session by entering exit twice (once to logout as user root and another to logout as user repeater).
Using your favourite web browser enter the IP Address of your raspi into the URL bar as shown below:
http://<Your-Raspi-IP>/allmon2Note: remove the <> from the URL once you have entered the required information.
Once this is done you should be presented with your node control panel as shown below.
Login using Admin and the password you set above and you are now ready to start using your node.
It’s a good idea to connect to node 55553 which is a parrot test node to check your audio levels. you can do this by entering the node into the field at the top left and pressing the connect button.
Once connected, tune your radio to 438.800Mhz FM and transmit a test message using your callsign and test123, or something similar. The parrot will then play your recording back to you so that you can hear how you sound. It will also comment on your audio level as to whether it is OK or not.
You are now connected to AllStarLink network and have the world at your finger tips. Below is a small list of nodes in the UK, Australia and America to get you started chatting with other HAMs via your node.
55553	ASL Parrot for testing
41522	M0HOY HUBNet Manchester, UK
60349	VK6CIA 439.275 Perth, Western Australia
51077	VK6SEG South West Hub B Albany WA
2167	M0JKT FreeSTAR UK HUB 2 freestar.network
53573	NWAG NW AllStar Group Lancashire, UK
27339 East Coast Hub Wilmington NC USAThanks to Michael, DK1MI for building and hosting the Matrix HAM Radio Space AllStarLink Node (57881) and getting us all kicked off into the world of AllStarLink!
We hope to be having regular Matrix Net’s on the node soon for all Matrix members and visitors. We’ll organise days/times via the Digital Voice room.
More soon …