Curious about what you can hear on shortwave ham radio? This video is a brief survey of the diverse world of communications on the shortwave spectrum. Expand your radio horizons and enhance your emergency communication preparedness by tuning in to the world of shortwave ham radio. If you’ve started delving into radio communications beyond local […]
We’ve recently added a new room to the Matrix HAM Radio Space for Digital Voice modes as this was an area of interest that didn’t really fit into any of the other rooms.
The new Digital Voice room has attracted a lot of attention from members, with a lot of the focus being on the AllStarLink system. Michael, DK1MI built an AllStarLink node in the cloud for us all to use for Matrix Nets and so I decided I had to get in on the fun.
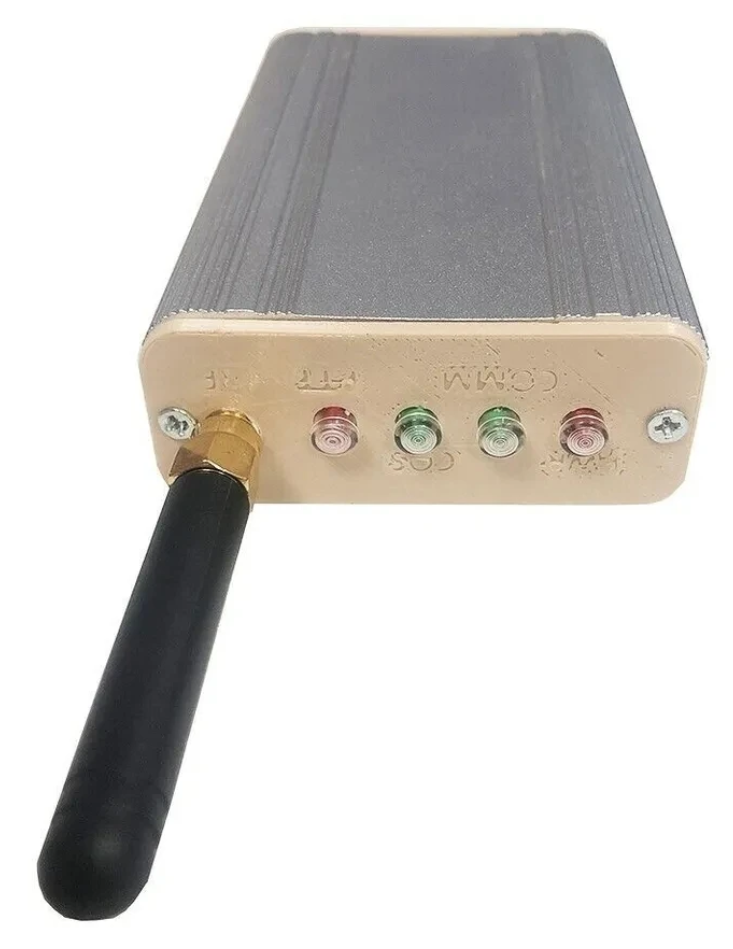
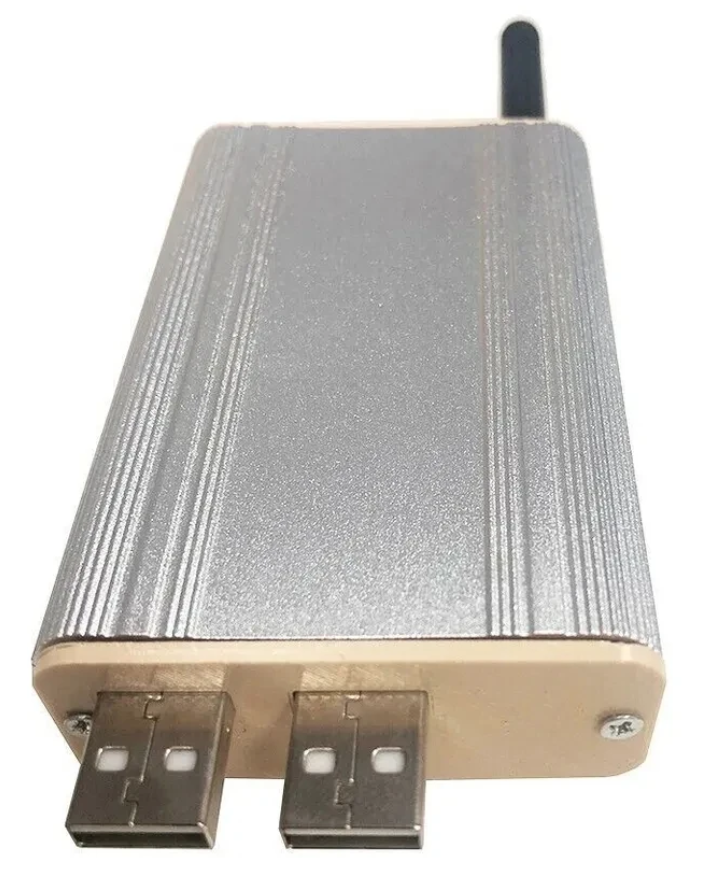
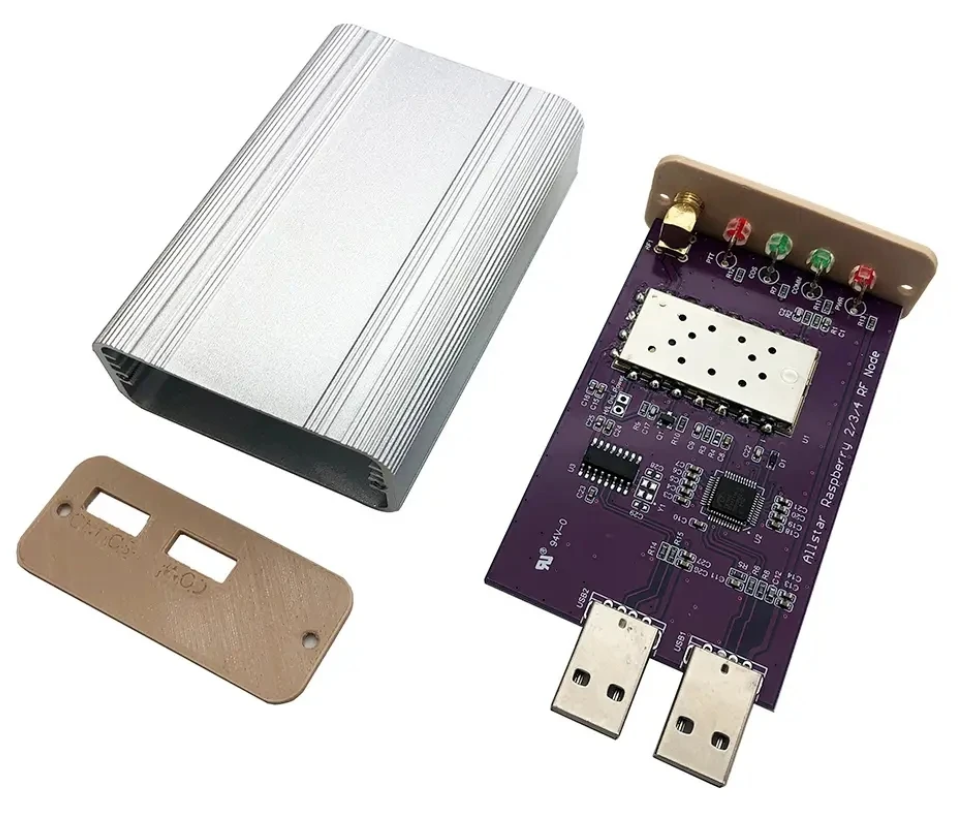
Jumbospot SHARI SA818 Amateur Radio AllStarLink Radio Interface Front Panel ViewJumbospot SHARI SA818 Amateur Radio AllStarLink Radio Interface Rear ViewJumbospot SHARI SA818 Amateur Radio AllStarLink Radio Interface stripped down View
The two USB connectors on the SHARI device are position such that they plug into two of the available 4 USB ports on the RaspberryPi without the need for cables. This keeps the whole solution together in one neat package.
Before you start you will need to obtain a node number and secret (password) from the AllStarLink Portal. To get this you will need to provide proof to the AllStarLink administrators that you are a licensed Amateur Radio (HAM) operator. This is done by uploading a copy of the first page of your HAM licence to the website for the admin team to check. This can take 24hrs to be completed so make sure you get this all done before trying to build your node. You cannot build a node successfully without a node number and secret.
Of course you will also need a transceiver that can operate on the 438.800Mhz frequency or other frequency of your choice on the 2m or 70cm HAM band.
You will also need to open port 4569 on your internet router and setup port forwarding to the IP Address that you will be using on your RaspberryPi node. It’s important to use a static IP Address on your RaspberryPi.
There are quite a few different Linux based operating system (O/S) images that are available for the RaspberryPi devices that have been specifically tailored for the AllStarLink node and include all the necessary software and library packages out the box.
Once downloaded you need to burn the ISO image onto a suitable SD card for your RaspberryPi. I use BalenaEtcher as it’s extremely quick and reliable at burning ISO images to SD cards.
Of course if you are a hardline Linux command line junkie you can always use dd to create the SD card.
Once you’ve got your O/S onto your SD card, slot it into your RaspberryPi making sure your SHARI device is connected to the two USB ports and then power it up. Make sure you have a good PSU for the RaspberryPi as the two devices together draw around 3A of current during the transmit cycle. (I use a 3.6A PSU from Amazon).
The default login for the Raspbian O/S is shown below. Login via SSH and configure your RaspberryPi for your local network. It’s important to use a static IP Address configured either directly on the RaspberryPi or via DHCP in your router.
Next you need to change directory into the asterisk config file directory using the command shown below:
cd /etc/asterisk
In this directory you will find all the default config files that come as part of the distro. For this build we’re not going to use them and so we need to move them out of the way ready for a set of config files that have already been configured correctly.
Using the following commands create a new directory, move into that new directory and then move all the unwanted configuration files into it:
mkdir ORIGINAL-CONF-FILES
cd ./ORIGINAL-CONF-FILES
mv ../*.conf ./
ls -la
cd ../
You should now be back in the /etc/asterisk directory which will now be empty apart from the custom directory which we left in place.
You now need to copy the correctly configured configuration files into the /etc/asterisk directory. Start by downloading the zip file containing the new configuration files
Once downloaded, copy the .zip file into the repeater users home directory (/home/repeater) using either scp on the Linux command line or if using Windows you can use the FileZilla Client in SFTP mode using the login details above.
Once you have the .zip file in the repeater user’s home directory you need to copy the file into the /etc/asterisk directory as user root:
The gpioBASH script and configuration details were supplied by Mark, G1INU in the Digital Voice room on the Matrix. It adds the COS light functionality to the setup. The COS light will now light every time the SA818 hears RF on the input.
The next thing you need to do is configure the SA818 radio device in the SHARI. The script I used was originally from https://wiki.fm-funknetz.de/doku.php?id=fm-funknetz:technik:shari-sa818 all I’ve done is change the entries to switch off CTCSS and changed the frequency to 438.800Mhz. Configuring the SA818 is done by running the SA818-running.pyPython programme that you moved into the repeater user home directory. Making sure you are still user root, run the following commands:
cd /home/repeater
./SA818-running.py
At this point your SHARI SA818 device will be configured to operate on 438.800Mhz and CTCSS will be disabled.
If you want to change the frequency or enable and set a CTCSS tone to access the node you will need to edit the Python programme using your favourite text editor and change the entries accordingly. Once changed rerun the program as shown above and your SHARI will be reconfigured to your new settings.
Next you need to move the allmon.ini.php file into the correct directory so that it enables access to the Allstar Monitor web page on the device so that you can manage connecting/disconnecting nodes. Use the following commands as user root to achieve this:
The allmon.ini.php file needs to have your node name entered into it for it to work correctly. As user root, change directory and edit the file using your favourite editor.
cd /var/www/html
Using your text editor, search for the line starting [XXXXX] and change the XXXXX to your node number. Save the change and exit the file.
At this point you are almost complete, all that is left to do is add your node number and node secret into the appropriate configuration files in the /etc/asterisk directory.
Since I am a Linux command line junkie I use vi to edit all the configuration files on the command line as user root, but you can use any editor of your choice.
cd /etc/asterisk
Start with the extensions.conf file. Search for the line starting with NODE = and delete the XXXXX entry and insert your node number. Save the file and edit it.
Next you need to edit the iax.conf file. This time search for the line starting with register= and change the XXXXX for your node number and the YYYYYYYYYYYY for your node secret. Be careful not to accidentally delete any other characters in the lines otherwise it will corrupt the configuration file.
In the same file search for the two lines that start with secret = and change the YYYYYYYYYYYY for your node secret. Once you have changed both of the secret entries, save and exit the file.
The final file to edit is the rpt.conf file. Once again open the file using your favourite editor and search for the line starting with XXXXX = radio@127.0.0.1:4569/XXXXX, change the XXXXX entries for your node number making sure not to delete any other characters next to the XXXXX entries.
Further down in the same file there is a line that starts with [XXXXX], once again change the XXXXX for your node number making sure to keep the square brackets at each end of the node number as you edit it.
Finally move down to the very bottom of the file and find the two lines that start with /home/repeater/gpio, once again change the XXXXX entries for your node number.
Once this is done, save and exit the file. At this point your node should be fully configured and will only require a reboot to get it working.
As user root, reboot your raspi using the reboot command.
reboot
Once your raspi comes back online, login using SSH as user repeater and then become root user using the sudo command detailed above.
You now need to create the admin user password for the Allstar Monitor web page on the device. This is done using the following commands as user root:
cd /var/www/html/
htpasswd -c .htpasswd admin
You will be asked to enter a password twice for the admin user, make sure you make a note of this password as you will need it to login to the web page.
Once this is done your configuration is complete, logout from the terminal session by entering exit twice (once to logout as user root and another to logout as user repeater).
Using your favourite web browser enter the IP Address of your raspi into the URL bar as shown below:
http://<Your-Raspi-IP>/allmon2
Note: remove the <> from the URL once you have entered the required information.
Once this is done you should be presented with your node control panel as shown below.
First visit to the AllStar Monitor Web Page
Login using Admin and the password you set above and you are now ready to start using your node.
It’s a good idea to connect to node 55553 which is a parrot test node to check your audio levels. you can do this by entering the node into the field at the top left and pressing the connect button.
M0AWS AllStarLink Node 61928 connected to 55553 Parrot
Once connected, tune your radio to 438.800Mhz FM and transmit a test message using your callsign and test123, or something similar. The parrot will then play your recording back to you so that you can hear how you sound. It will also comment on your audio level as to whether it is OK or not.
You are now connected to AllStarLink network and have the world at your finger tips. Below is a small list of nodes in the UK, Australia and America to get you started chatting with other HAMs via your node.
55553	ASL Parrot for testing
41522	M0HOY HUBNet Manchester, UK
60349	VK6CIA 439.275 Perth, Western Australia
51077	VK6SEG South West Hub B Albany WA
2167	M0JKT FreeSTAR UK HUB 2 freestar.network
53573	NWAG NW AllStar Group Lancashire, UK
27339	East Coast Hub Wilmington NC USA
M0AWS AllStarLink Node 61928 sitting on the equipment rack
Thanks to Michael, DK1MI for building and hosting the Matrix HAM Radio Space AllStarLink Node (57881) and getting us all kicked off into the world of AllStarLink!
We hope to be having regular Matrix Net’s on the node soon for all Matrix members and visitors. We’ll organise days/times via the Digital Voice room.
The Colorado Search and Rescue Association is promoting FRS (Family Radio Service) Channel 3 as “the default during backcountry search and rescue (backcountry SAR) emergencies.” FRS channel 3 is the same as GMRS (General Mobile Radio Service) channel 3. There is more GMRS info here. To keep things simple, no CTCSS (“privacy code”) is used…carrier squelch only. See the CSAR Continue reading FRS3 For Colorado Backcountry→
The Colorado Search and Rescue Association is promoting FRS (Family Radio Service) Channel 3 as “the default during backcountry search and rescue (backcountry SAR) emergencies.” FRS channel 3 is the same as GMRS (General Mobile Radio Service) channel 3. There is more GMRS info here. To keep things simple, no CTCSS (“privacy code”) is used…carrier squelch only. See the CSAR Continue reading FRS3 For Colorado Backcountry→
I don’t need much but I do need a reason to get on the air. This can take many forms as I wrote in this blog post some time ago. I see quite a few new hams struggling with the problem of “I got this license but now what?” Operating goals or awards are a fun way to keep focused Continue reading A Reason To Get On The Air→
The Colorado Search and Rescue Association is promoting FRS (Family Radio Service) Channel 3 as “the default during backcountry search and rescue (backcountry SAR) emergencies.” FRS channel 3 is the same as GMRS (General Mobile Radio Service) channel 3. There is more GMRS info here. To keep things simple, no CTCSS (“privacy code”) is used…carrier squelch only. See the CSAR announcement here: FRS Radio Use for Backcountry.
For backcountry exploring, it is important to emphasize self-sufficiency and to avoid reliance on electronic gizmos that may fail. Avoiding an emergency situation is way better than having a device to call for help, which may be many hours away. See this article for a discussion of The Ten Essentials for Hiking.
Still, the FRS3 concept has merit. Many backcountry hikers already carry FRS or GMRS radios, so designating a preferred channel makes sense. My read on this is that randomly calling for help on FRS3 will not be very effective due to the limited range of FRS radios. However, it does not hurt to try. More likely, FRS3 can be used for local comms once Search and Rescue crews have been deployed and are within a few miles of the party in distress.
Ham radio operators may want to carry a handheld transceiver capable of transmitting on 462.6125 MHz. For emergency use only, of course.
One commenter questioned why we went with the more expensive Starlink system. The simple answer is that it is just better, faster, and more reliable than the alternatives. Many people here are clamoring for this sytem, and they are doing this for a reason. On speed tests I am showing downloads of about 150 Mbps. That is fast. The truth is that my wife is more of an innovator than I am -- she was the one who decided on Starlink.
When we were installing this system, I didn't even know what they meant by "Dishy." I didn't know there were motors in the antenna. And I certainly didn't know about the complicated software and hardware that allow the Dishy antenna to track the Starlink low earth orbit satellites without the use of the motors. The above video explains it all very well.
This is all a great demonstration of what can be done with digital technology, microchips, software and UHF.
Yesterday I did something I rarely do. As I was travelling home, I heard the NJ2SP repeater identify while I was in a location still pretty far away from South Plainfield. I picked up the microphone and announced that I was listening. Marv K2VHW came back to me and we had a nice conversation while I drove the rest of the way home.
What was so satisfying about it was when Marv told me my audio was rock solid and that I was making it into the repeater quite well. What a difference between this Hustler Hy-Gain antenna I'm using now and the cheap piece of ______ that I had been using before!
Our repeater is low profile by intent. It's mainly used for CERT activity , as well as for club activity throughout South Plainfield and the immediate surrounding area. For me to hit the repeater so well from Greenbrook, which is three towns away meant that my signal was travelling through North Plainfield, Plainfield and into South Plainfield. I was pleased to say the least.
As a Ham for 45 years, I know (in my head) that you should never skimp on the antenna and that it's the most important link in the whole radio station chain. But sometimes you just get frugal (read that as "cheap"), hoping that something less expensive will work just as well. This is especially true for mobile VHF/UHF antennas ----- most times it doesn't work that way, and you only end up spending more money to fix your mistake. Don't be like W2LJ, don't be tempted to go the cheap route!
Homebrew HF antennas, on the other hand, are a whole other story that I won't get into right now. Suffice it to say that many times you can roll your own skyhook that will will perform just as well as a commercial antenna for a lot less money.
I don’t need much but I do need a reason to get on the air. This can take many forms as I wrote in this blog post some time ago. I see quite a few new hams struggling with the problem of “I got this license but now what?”
Operating goals or awards are a fun way to keep focused on accomplishing something via ham radio. Really, it’s a specific reason to get on the air and make radio contacts. I am not big on idle chit chat via the radio (“the weather here is 65 deg and raining”) so having a reason to make contacts helps me get on the air. I’ve tended to pursue awards in a serial manner…once I hit some level of accomplishment, I usually declare victory and move on to something else.
Way back in the wayback machine, the first award I pursued was Worked All States (WAS). It does take some effort but I was pretty active on the HF bands at the time, so many of the states just showed up in my log. But to really drive it home, I kept track of which states I still needed and actively looked for opportunities to work them. Later, I pursued Worked All Continents (WAC), which obviously requires working some DX. But then I decided that if I had any DX cred at all, I needed to get DX Century Club (DXCC). Recently, the popularity of FT8 has been a game changer and I currently have about 175 entities confirmed (thank you, Logbook of The World). I don’t chase paper QSL cards anymore, which is just too much trouble for a Slacker DXer.
The VHF and higher bands have always been a passion for me, so I pursued the VHF/UHF Century Club (VUCC) awards. First, it was 6 meter VUCC, the easiest one to get. A really good run during the ARRL June VHF contest can produce the 100 grids you need for the award in one weekend. Later, some mountaintop activity resulted in 10 GHz VUCC. At one point, I got into working the LEO satellites and confirmed the required 100 grids for satellite VUCC. (Hey, Technicians, this is something you can do right now!) I still don’t have very many grids confirmed on 2 meters, so that one is still calling to me.
Summits On The Air
If you read my blog, you know that Summits On The Air (SOTA) is my number one activity lately, both activating and chasing summits. This is a natural fit for me as I’ve enjoyed mountaintop operating in various forms, mostly on VHF and UHF. (See my SOTA blog postings.) My hiking partner and wife, Joyce/K0JJW is almost always activating with me. Her #1 ham radio activity is also SOTA. We both achieved Mountain Goat status (1000 activator points) using only VHF and higher frequencies. (Technicians can have a lot of fun with SOTA on VHF!)
The SOTA program has a wide variety of awards, supported by a comprehensive database used to record SOTA radio contacts and keep track of the scores. It is not really a competition but there is friendly rivalry between SOTA enthusiasts as they monitor each other’s posted scores. Here are the “badges” that pop up when I check my SOTA info.
Parks On The Air
In the past few years, we have added the Parks On The Air (POTA) program. It turns out that not all regions of the country have interesting SOTA summits but they all have state or national parks. This fits nicely into our outdoor hiking/camping/4WD activities.
Many of our SOTA activations are in parks (national forests, national parks and state parks), so we usually try to make the SOTA activation count for both programs. This means that many of our POTA activations are done using VHF/UHF only, if from a summit. More commonly, we use the HF bands for POTA activations. Our standard POTA setup is a Yaesu FT-991 driving an endfed wire antenna, usually on SSB or FT8.
POTA also has a great database, good tools and plenty of awards available. Here’s what shows up on my POTA awards page. Just like SOTA, POTA is not a competition but it is interesting to see what other hams are doing and compare you level of activity.
So those are my thoughts.
What motivates you to get on the air?
I don’t need much but I do need a reason to get on the air. This can take many forms as I wrote in this blog post some time ago. I see quite a few new hams struggling with the problem of “I got this license but now what?” Operating goals or awards are a fun way to keep focused Continue reading A Reason To Get On The Air→
I awoke at about 2:30 AM, like many men of my age do, with the necessity to make a trip to the bathroom. I made my way downstairs and when I got to the kitchen I heard a tiny voice saying something. The voice was so low and tiny, I couldn't make out what was being said. I was able to discern that whatever it was, it was coming from the rec room, and it was repeating every 15 seconds or so.
We have a Warner Brothers clock hanging on the wall in there. Each hour, a different Looney Tunes character announces the time. My first inclination was that the clock was broken and that I'd have to remove the batteries and all would be well. But that was not it. Except for the "tick-tock", there were no sounds coming from the clock.
The voice reappeared again, and this time it sounded like it was coming from behind me. I turned my attention to the bookcase. That's where the cordless phone resides as well as where all my HT's live.. I put all my drop-in chargers on one shelf and I have them all plugged into a power strip, this way everything is centralized. The power strip was off as all my batteries were up to charge. Or so I thought.
Again, at first I thought the cordless phone went bonkers and perhaps it was announcing that I had voice mail? No, it turned out that the tiny voice was coming from my Baofeng UV-5R. When I returned it to the shelf the other day, I must have forgotten to turn it off. About every 15 seconds or so, the HT was announcing "Low Voltage! Low Voltage!"
I didn't even know it could do that!
So if some day you wake up in the middle of the night, and you hear a tiny voice calling out to you from seemingly nowhere, it's not a demon, ghost or hob-goblin. It just might be your handheld radio telling you that it needs more juice!
I was supposed to run the South Plainfield ARES/RACES Net last night at 7:00 PM local time. We hold it on the third Tuesday of the month. I went down to the basement and turned on my VHF/UHF radio that sits on the bench and ........nothing!
By rights, I should have run upstairs for an HT, or out to the car and used my mobile rig, but I still have enough Service Manager (stubbornness) in me that when something like this happens - I have to trouble shoot it - right away.
I was getting 13.8 Volts out from the power supply, but nothing at the radio. I checked the in-line fuses and they were fine. I checked the voltage at the transceiver end of the power cable and that was not fine. What the heck?
I checked all the connections at the fuse holders, made sure all the Ohm reading were zero from power supply to cable end and then hooked everything back up, turned on the radio - again nothing. Argh!
Something told me to take a closer look at the Molex connector again. I swung the bench light over for more brightness, and sure enough, it looked like the blade on the one side looked a little bent, possibly not making contact with it's mate. I straightened it out, and snapped the Molex back together, the radio came on!
So here's the big question - how did this happen? I mean the radio was just sitting there. I don't remember moving it around or playing around with the cable in any way. I must have dome something without realizing it, because things like this don't "just happen". Do they? Molex connector innards just don't warp on their own and break contact. This one has me baffled. but it's fixed now (at least for now) so I won't beat my head against the wall trying to figure it out.
On the flip side, the Hustler VHF/UHF antenna on the car is really performing nicely. I can hear repeaters from a much greater distance than I was able to using that piece-of-crud-cheapie-antenna-that-I-should-have-known-better-than-to-ever-consider-using. I was able to talk to Marv K2VHW on the drive home yesterday via a repeater that was a good 20 or so miles away from where I was stuck in traffic.
The moral of the stories? Take wins wherever you can find them.
To Hamvention and FDIM next year! God willing and the creek don't rise and I'm in good health and there are no family emergencies. I mentioned to Marianne that I'd like to go and that attending FDIM is on my bucket list and she had no problems.
May is always a busy month for us as both out birthdays are in May, Mother's Day is in May, but there are no more graduations to worry about missing ...........so hopefully it's a go for next year. I've been wanting to go for so long to actually meet some of the people I've talked to on the radio for years. So I will start saving my shekels now.
I got on the air for the Run For The Bacon last night. The K index was 2, and the solar flux was 200. According to the solar weather sites, that meant decent conditions, but I thought they were "meh" at best. Signals were so low on 20 Meters as to be deep in the noise and pretty much unintelligible. 40 Meters wasn't much better. I made three or four contacts and pulled the big switch. Maybe June will ne better.
The rest of the weekend was jam packed with house chores, so other than hunting a few POTA stations, there wasn't much on the air time. I spent a little time on Facebook, hoping to catch some big news from Hamvention, but it appears there wasn't any. Icom rolled out some circuit boards to keep everyone guessing about their next big deal, while Kenwood and Yaesu were silent. Elecraft is still rolling in the wake of the KH1 introduction, so nothing new was expected from them.
I guess from a QRP standpoint the biggest news was QRP Labs QMX+. Attendance seemed to be good and the weather cooperated on Saturday, so I guess everyone is happy.
Outside, the weather was decent this weekend. That afforded me the chance to put the Hustler 2 Meter/440 antenna on the car that Joseph and Marianne gifted to me for my birthday. Wow! What a difference from the piece of (be nice, W2LJ!) that I had on there. The only drawback is that the radiator is 36" tall, so no more parking in the deck at work. I started parking in the regular lot this morning. Not a big deal when the weather is nice, right? But when the weather is nasty, it goes to show what Hams are willing to put up with for the sake of Amateur Radio.
Amateur radio transceivers have improved dramatically over the decades and they pack a lot of capability into relatively compact radios. In this post, we will take a look at the typical configurations and how they may impact setting up a flexible amateur radio station today. This discussion is focused on currently available new gear, with 50 to 100 watts of Continue reading Common Ham Shack Radio Configurations→
I looked at the QMX order list yesterday. I am # 670 in line. If QRP Labs continues to manufacture around 200 pieces a month, I figure I should see mine maybe in August or September. I can live with that.
For my birthday, Joseph and Marianne asked me what I wanted. My no name cheapie bargain basement mobile VHF/UHF antenna just isn't doing the job. I was coming home from a club meeting a few weeks ago and tried hooking up with Marv K2VHW on the way home. He was in and out and I was in and out and neither of us should have been. I had to chalk it up to poor performance from my off brand bargain basement purchase. I sent Joseph a link for a Hustler MX-270 antenna from GigaParts. It arrived last Sunday? Who delivers on Sunday besides Amazon? Anyway, it arrived late last Sunday and I'll put it on my car this weekend, if weather permits.
This means that I'll have to park in the parking lot at work, going forward, as the 36" radiator is just too tall for the parking deck. I bought the smaller antenna that's on the Jeep now, specifically because it doesn't hit the ceiling of the parking deck. However, it doesn't perform nearly as well as I had hoped ..... so I'll deal with the inconvenience of parking outside in order to get better antenna performance.
First World problem, right? But it's nice not having to get into a car that's been baking in the sun all day during the summer; or brushing off snow in the winter.
Other than that, not much new radio-wise. We're having typical May weather here, where it's sizzling one day and chilly the next - which of course makes the possibilities of thunderstorms a daily event. The antennas have been disconnected since the weekend. I'm at the point in life where replacing expensive Ham Radio gear is not an option, so I have to be super careful with what I have.
I've always marveled at guys who change rigs like they change underwear. I've never been fortunate enough to be able to do that. And I guess that helps me to appreciate what I have maybe a bit more than most.
Today's "Blondie" comic strip kind of sums up my situation:
Amateur radio transceivers have improved dramatically over the decades and they pack a lot of capability into relatively compact radios. In this post, we will take a look at the typical configurations and how they may impact setting up a flexible amateur radio station today. This discussion is focused on currently available new gear, with 50 to 100 watts of Continue reading Common Ham Shack Radio Configurations→
Amateur radio transceivers have improved dramatically over the decades and they pack a lot of capability into relatively compact radios. In this post, we will take a look at the typical configurations and how they may impact setting up a flexible amateur radio station today. This discussion is focused on currently available new gear, with 50 to 100 watts of RF power.
The Kenwood TS-430S was a popular HF transceiver in the 1980s.
The most common HF radio configuration used to be a 5-band model that offered CW, AM, and SSB on 80 meters, 40 meters, 20 meters, 15 meters, and 10 meters. In the early 1980s, the WARC bands were added (named for the World Administrative Radio Conference of 1979) that authorized these new bands. The WARC bands are 30 meters, 17 meters, and 12 meters. These attractive new bands were soon added to the standard HF rig. Most HF radios include 160 meters (actually a Medium Frequency or MF band) on the low end and a general coverage receiver for 150 kHz to 30 MHz. So these days, the typical HF transceiver handles 9 bands and many different modes. (Actually, most of these rigs now include 6 meters, more on that later.)
Dominant Design
In the world of product development, the concept of a dominant design often emerges. This generally accepted approach dominates a particular market and is considered the standard way of doing things in a particular product category.
Dominant design is a technology management concept introduced by James M. Utterback and William J. Abernathy in 1975, identifying key technological features that become a de facto standard. A dominant design is the one that wins the allegiance of the marketplace, the one to which competitors and innovators must adhere if they hope to command significant market following.
We will see that most ham radio gear conforms to the concept of a dominant design. That is, certain product configurations become standard, especially in terms of frequency bands and modes. Manufacturers still innovate by adding new features in an attempt to differentiate and obtain competitive advantage but the basic capabilities are standard. The dominant design for HF transceivers is the 100-watt radio that covers 160m through 6m.
VHF/UHF Radios
For VHF/UHF, the situation is a bit more scattered. 2-meter FM is the most popular band and back in the olden days, it was common to just have a single-band 2m FM rig in the shack. To cover 70 cm FM, a radio ham needed a second radio but later dual-band radios showed up that covered 2m and 70 cm. Today, the dominant design for VHF/UHF is the dual-band FM transceiver (typically 50 watts of output power) and there are so many of these available I won’t attempt to list them.
The IC-2730A is a basic 2m and 70cm transceiver with dual receivers.
VHF FM is the utility mode for amateur radio and many hams are just fine using FM (or one of the digital voice modes) on VHF/UHF. Those who want to stretch the limits of VHF/UHF operating usually go for all-mode rigs that offer CW, SSB, FM and various WSJT digital modes. Again, back in the olden days, a VHF+ enthusiast would acquire single-band all-mode radios for the bands of interest. A ham really into VHF/UHF might have single-band radios for 6m, 2m, 1.25m, and 70 cm stacked up in the ham shack. The 1.25-meter band has always been a bit neglected in terms of equipment availability because that band is not available worldwide. Transverters are another option to get all-mode capability on these bands using an HF transceiver to transvert to a single VHF or UHF band.
HF Plus 6 Meters
One important addition to the standard HF rig is that the 6m band is often included. Now this may not sound quite right because we all know that 6 meters is a VHF band, so what is it doing in an HF radio? It actually makes a lot of sense because a lot of 6-meter operating is similar to HF. (6 meters is the VHF band that often emulates HF.) There is FM activity on 6 meters but most of the action is on SSB, CW, and, yes, FT8. In fact, FT8 is seeing a lot of action on the band, so if you want to participate on 6m, you should consider that mode. Anyway, this all means you probably need an all-mode radio for 6 meters, and having it as a bonus band on an HF radio without a huge increase in cost is a good approach. (These radios usually support FM for the 10m and 6m bands.)
The IC-7300 transceiver covers all the HF bands and 6 meters (50 MHz).
There are many great HF/6m radios to choose from so I won’t try to list them all. Some of the more popular ones in the $1k to $1.5k range are: Icom IC-7300, Yaesu FT-710, and Yaesu FT-DX10.
All-Band All-Mode Rigs
Another common transceiver configuration is the All-Band All-Mode radio available from several manufacturers. A great example of this type of radio is the Yaesu FT-991A, which includes 160m through 10m plus 6m, 2m, and 70cm. Once again, 1.25m is passed over. This radio configuration has a lot of appeal because it covers pretty much everything with all-mode capability. (It also has a built-in sound card and USB connection which is handy for the WSJT digital modes.)
The Yaesu FT-991A covers 160m through 10m, plus 6m, 2m and 70cm.
The FT-991A is a good choice for the ham shack or operating portable but it is a bit large for a mobile installation. Icom offers the IC-7100 in a mobile form factor, with a novel sloping detachable front panel. Yaesu used to offer mobile products in this space such as the very popular FT-857D transceiver. However, the FT-857D is no longer made and its apparent replacement is the FT-891 which has only the HF + 6m bands.
The Icom IC-7100 is a mobile rig with HF, 6m, 2m, and 70 cm.
The main disadvantage of this type of radio is that it can only do one frequency at a time. Often, I want to be able to work HF while still monitoring the local 2m FM repeater and simplex channels. Or maybe I’d like to keep listening for 6 meter activity while working 2m SSB, especially during a contest. However, this type of radio is my first choice for portable operating for Parks On The Air because it covers all the bands and modes. This article is focused on 100-watt radios but note that there are all-mode all-band QRP radios such as the IC-705.
All Mode VHF/UHF Radios
One interesting and disappointing trend that has emerged is the distinct lack of VHF/UHF all-mode transceivers. There is only one such radio on the market today, the Icom IC-9700 which does all modes on 2m, 70cm, and 23 cm (1.2 GHz). It seems that Icom decided that if they are going to offer a VHF/UHF radio, they would go full-featured and include 23 cm. Note that if you pair this radio with an HF plus 6m radio, you can cover all the popular bands with all modes using two radios. This radio is not inexpensive, currently selling new for about $1800.
The Icom IC-9700 is a VHF/UHF transceiver that offers all modes on 2m, 70cm and 23cm.
I suppose we can declare this the dominant design for VHF/UHF but it is a lone product in this space. I have written previously about an all-mode dual-band portable radio for 2m/70cm that I desire. I own an IC-9700 and like it a lot but I would give up the 23 cm band to have a radio that is more portable and less expensive. I suspect that Icom is happily making good profit margins on the IC-9700 given that they have essentially no competition in this space. Yaesu has the technology to do something here but has been content to let the FT-991A cover the all-mode 2m/70cm space for them.
Common Ham Shack Setups
Now let’s take a look at some common ham shack configurations that consider these different radio configurations. When I say “ham shack” that may include your mobile or portable station, too.
Setup 1: FM VHF/UHF Only A Technician might decide they want to focus on 2m and 70cm, with FM being just fine for working simplex and repeaters on those bands. A basic dual-band FM transceiver will handle this nicely, see A VHF FM Station at Home. For some hams, their dual-band handheld radio serves this purpose.
Setup 2: All-Band All-Mode Transceiver As mentioned earlier, All-Band All-Mode radios cover the most popular ham bands and modes with one rig. They are a good way to get one radio that does everything. The disadvantage is not being able to monitor VHF/UHF at the same time as working HF.
Setup 3: HF/6m radio plus 2m/70cm FM radio This is a very common configuration for a ham shack because it separates the HF bands (and 6m) from the 2m/70cm FM operating. The FM rig can be left monitoring your favorite repeater or simplex frequency while you chase DX on 15 meters. If your 2m/70cm needs are basic, the FM radio might even be a handheld transceiver.
Setup 4: HF/6m radio plus all-mode VHF/UHF radio This is the setup for the ham that wants to cover all the bands and be able to do all modes on VHF/UHF. The band/mode coverage is similar to Setup 2 but we have two radios available which provides the monitoring flexibility associated with Setup 3. This configuration allows for having a really good HF/6m radio and a really good VHF/UHF radio.
Conclusions
The ham radio transceivers being offered tend to follow certain patterns consistent with the dominant design theory. If you buy a modern HF transceiver, you will likely get all of the HF bands plus the 6m bonus band. These radios vary in features and performance but they all have good band/mode coverage. The VHF/UHF situation is perhaps not quite as simple. The standard 2m/70cm FM rig is a popular option but is limited to FM only. The VHF/UHF weak-signal enthusiast does not have many choices beyond the IC-9700, which may represent an opportunity for another manufacturer to jump in with a more cost-effective 2m/70cm all-mode radio. The 1.25m band continues to be neglected and may be a good additional band to add to 2m/70cm radios.
Pikes Peak is a great summit for a SOTA activation. You can hike up, drive up, or take the cog railway to get to the top. Pikes towers over eastern Colorado and has an excellent radio horizon in all directions. It is easy to work a bunch of stations on 2m FM. With a bit of effort, you can work Continue reading Fraser Does Pikes Peak→
N9SAB sent over a care package filed with lightweight, efficient, stealthy antennas for portable and fixed station ham radio use. Let's unbox them together!


.JPG)


