In diesem Beitrag erklären wir euch Schritt für Schritt, wie ihr die Firmware eures Connect Systems CS800D Plus updaten könnt. In unseren bisherigen Beiträgen zum Connect Systems CS800D Plus haben wir euch das Gerät ausführlich vorgestellt, es ausgepackt und einem erstem Test unterzogen. In diesem Beitrag beschreiben wir euch, wie ihr die Firmware eures CS800D … CS800D Plus – Firmware Update durchführen weiterlesen
Mit Version 1.03 ist nun das erste Firmware-Update seit Erscheinen des TH-D75 erschienen und Kenwood kündigt bereits das nächste Firmware-Update an. Das ist neu. Das Kenwood TH-D75 ist hierzulande Anfang 2024 bei den Amateurfunk-Händlern erhältlich und wurde mit der Firmware-Version 1.02 ausgeliefert. Seitdem ist einige Zeit vergangen und nun bietet Kenwood mit Version 1.03 eine … KENWOOD TH-D75 – Neue Firmware erhältlich weiterlesen
The loading of the Meshtastic firmware on the Heltec ESP32 v3 devices is really simple if done via a Linux PC/RaspberryPi. There are of course other ways to load the firmware using a web browser that supports USB/Serial devices and this method is preferred by many however, being a Linux command line junkie I far prefer the simplicity of using the Linux command line to do the job.
So, how much experience with the Linux command line do you need?
In all honesty none at all. If you know how to use copy and paste then all you have to do is follow the simple steps I’ve detailed below. In reality it will only take a few minutes to do so, don’t be put off by the long article, I’ve just tried to cover everything and provide screen shots along the way.
To get started fire up your Linux PC/RaspberryPi and get yourself to the desktop. Next you will need to open a Linux command line terminal. This is often just called “Terminal” on most Linux desktop installations.
The first thing you need to do is check to see if you have python3 installed. This is done using the following command:
python3 --version
Running the above command you should see a result something like what is shown below.
Python3 command showing installed version
Next we need to check if pip3 is installed using the following command:
pip3 --version
If pip3 is installed then you should get a result similar to that shown below.
Pip3 command showing installed version
If your computer doesn’t have Python3 or Pip3 installed they can be easily installed from the command line. To install Python3 enter the following command into your terminal:
sudo apt install python3
You will be asked to enter your login password and then the installation will begin. You should see output in your terminal similar to that shown below.
Installing python3
To install Pip3 enter the following command into your terminal:
sudo apt-get install python3-pip
This will detail a long list of packages that will be installed on your computer, Enter Y to answer Yes and let the packages install.
M0AWS – Installing Pip3
You will see many messages scroll up the terminal screen such as getting, selecting, preparing, unpacking and setting up, this is all normal.
Once Pip3 is installed you should be dropped back at the command line with a terminal screen that looks something like the one below.
M0AWS – Pip3 install complete
At this point you will now have Python3 and Pip3 available on your computer.
You are now ready to install the tool we are going to use to check your Meshtastic device is connected to your PC and install the firmware to it. (Do not connect your Meshtastic device to your PC just yet!)
Run the following command in your terminal to install the ESP Tool:
pip3 install --upgrade esptool
You will see an output from the installation process similar to that shown below.
M0AWS – Installing the ESP Tool
Now that we have the ESP tool installed plug your Meshtastic device into your USB port on your computer and then run the following command to interrogate the device to find out what kind of device it is.
esptool chip_id
You should see the information about your device that looks similar to that shown below. This information should confirm the device type (ESP32) and which USB port it is connected on (/dev/tty/USB0).
M0AWS – Expected output from the ESPTool command showing device information
Once you have this information you will need to download the firmware for your device from Github using the following URL:
https://github.com/meshtastic/firmware/releases
At the time of writing this I downloaded and used the v2.2.22.404d firmware which I have found to be extremely reliable.
In your terminal you now need to change directory (cd) into the Downloads directory where your downloaded firmware should be. (If you downloaded your firmware into another directory then you will need to cd into that directory). Use the following command to change directory into the Downloads directory.
cd ~/Downloads
Now we need to find the filename of the firmware we have just downloaded, we can use the list directory contents command to find the file using the simple command below.
ls -la firm*.zip
M0AWS – List firmware file name from the Linux command line
In the screenshot above we can see that the filename is called firmware-2.2.22.404d0dd.zip. We now need to unzip the file using the unzip command.
unzip firmware-2.2.22.404d0dd.zip
You’ll see lots of output from the unzip command about inflating files etc, this is normal.
Once the file has been unzipped you are ready to load the firmware onto your Heltec device. First you need to find the .bin file for your Heltec device. Use the following ls command to list the files available.
ls -la firmware-heltec*
This will list out all the firmware file options for the Heltec device as shown below.
M0AWS – List of Heltec firmware files
The file you need to use for a new firmware installation on a Heltec v3 device is firmware-heltec-v3-2.2.22.404d0dd.bin. (If you downloaded a different version then the version number in the file will be different).
Using the filename you found above enter the following command into your terminal.
This will now clear down your Heltec device and will load the Meshtastic firmware. This will take a little time especially on slower computers like the RaspberryPi so, just let it run until it finishes. Do not interrupt the process whilst it is running.
Installing the Meshtastic firmware onto my Heltec ESP32 v3 using the Python command line tool
Once the firmware is loaded the Heltec device will reboot and you will see the Meshtastic banner on the OLED screen. Your device is now ready for configuration.
Now that you have Python3 and Pip3 installed you can load the firmware onto other devices just by downloading the firmware and then running the device-install.sh script file, you won’t need to install Python3 or Pip3 again.
If you want to update your device in the future to a newer version of the firmware then just use the update script and update binary file as shown below.
Meshtastic is a relatively new thing in the internet of things (IOT) world and is gaining traction in the U.K. at the moment.
So what is Meshtastic?
Meshtastic is an open source, off-grid, decentralised mesh network built to run on affordable, low-power devices on the 868Mhz industrial, scientific, and medical (ISM) band. (Some devices can also run on the 433Mhz 70cm HAM band.)
The ISM band is licence free but, has limits on the RF power levels that can be used. The one plus over the HAM bands is that you can legally transfer encrypted messages over the ISM band making it secure.
The best way to think of Meshtastic is a radio version of the online decentralised Matrix chat system but, without the large server requirements and ever growing database!
Heltec ESP32 v3 Wifi, Bluetooth and 868Mhz device for Meshtastic
There are quite a few Meshtastic compatible devices on the market today with many costing around the £20 mark whilst others like the LillyGo T-Echo costing over £100 in the U.K. even though they are less than half the price in the USA.
Since I’m just starting out on my Meshtastic adventure I thought I’d start with a pair of Heltec ESP32 v3 devices that are normally readily available on Amazon but, due to the current push to build a U.K. wide mesh, they are currently out of stock pretty much everywhere.
Loading the Meshtastic firmware onto the devices is fairly straight forward and can be done using the web installer via either the Edge or Chromium web browsers. (Note: If using Windows O/S you will need to install some drivers from the Meshtastic website to be able to communicate with the devices)
Having neither of the two browsers and being a Linux command line junkie I decided to use the Python programme to load the firmware onto the two devices. It’s worth noting that you don’t need any drivers to be able to communicate with the devices if you’re using either Debian or one of the many Ubuntu flavours of Linux O/S.
Using the Python command line program sounds like a more complicated approach but, in reality it’s super simple, extremely reliable, quick and if like me you use a Linux PC in the radio shack then you most likely already have most of what you need to get the job done. Just follow the simple steps as laid out on the Meshtastic web site and you’ll have the firmware loaded in no time at all.
Installing the Meshtastic firmware onto my Heltec ESP32 v3 using the Python command line tool
The firmware takes less than a minute to copy across to the Heltec device and is automatically rebooted ready for configuration once the transfer has completed.
It is possible to configure the device via the command line tool however, since there is a nice GUI app for both Apple iOS and Android devices I decided to install the Meshtastic app on my iPad and connect to the device via Bluetooth to configure it.
Once you’ve got the Meshtastic app installed on your device and have connected via Bluetooth you’ll be ready to start configuring the device to join the mesh. The first thing you want to do is set the region. This is different in each country but, in the UK we use the EU_868 region settings. This will set the device to use the 868Mhz ISM band which is the band being used to build the U.K. wide mesh.
View of the Meshtastic app on iOS showing the configuration options for the Heltec ESP32 v3
There is a multitude of configuration options within the app which I will go into in greater detail in a series of articles at a later date.
Heltec ESP32 v3 running Meshtastic Firmware
For those of you that, like me aren’t near any other nodes you can connect the devices to the internet and use the Meshtastic MQTT server to communicate with other nodes. This of course isn’t off-grid but, it will get you started until the mesh grows into your local area at which point your device will automatically start communicating with the other nodes over radio.
Meshtastic MQTT connectivity
Once you are connected to either the MQTT server or other nodes via radio you will see the other node details appear in the Meshtastic app. It’s interesting to look at the information and see signal strengths and traffic levels etc for each node.
View of the Meshtastic app on iOS showing Nodes in the Mesh and Device Metrics for the M0AWS-1 Node
There are a multitude of cases available for the Heltec v3 devices, especially if you have access to a 3D printer. One of the nicest cases I have seen is the Bender from IKB3D (I know, it’s a strange name!) but, it really is a super little case for the Heltec series of devices.
Bender case for Heltec ESP32 v3 devices
You can either buy the 3D print files for £8.99 and print it yourself or just order a pre-printed and assembled case directly from the website although, due to demand there is a long lead time currently.
Upgrading Icom 7300 Firmware You do not have to do upgrades serially now. Long ago there was once a requirement for an intermediate step. Rob, NC0B One should always keep one's firmware current so as to benefit from undocumented...
Discover the new firmware and its enhancements to the Quansheng UV-K5(8) HT. In addition to the standard UV frequencies, you can listen to shortwave broadcast and the ham bands while viewing signals with the new spectrumscope.
Learn how to update the firmware on your ATS 25 radio with this step-by-step guide. Follow the tips and resources provided by a radio repair expert to successfully navigate the process.
The ATS 25 Firmware Update: A Step-by-Step Guide
Are you a radio enthusiast looking to update the firmware on your ATS 25 radio? In this video, the creator takes us through his own experience of updating the firmware, sharing some useful tips and resources to help you navigate the process successfully.
About the Creator
This video was created by Radio Workshop, a YouTube channel dedicated to radio repair and restoration. The creator of the channel shares his experience and knowledge with viewers, providing useful tips and tutorials on how to repair and maintain a range of radios.
Key Takeaways
Here are some key takeaways from the video:
Updating the firmware on your ATS 25 can be a challenging process, but with the right resources and guidance, it is achievable.
Follow the links provided in the video description to access a useful video tutorial and firmware files for the ATS 25.
The updated firmware offers new features and changes to the radio’s display and performance.
The firmware update can make the radio work more efficiently, with changes such as a more responsive S-meter and a new scanning function.
Use the up and down buttons to scan the radio quickly.
Step-by-Step Process
Here is a step-by-step process for updating the firmware on your ATS 25 radio:
Follow the link provided in the video description to download the firmware file.
Read the instructions carefully before beginning the update process.
Use the Arduino software to upload the firmware to your radio.
Once the firmware is uploaded, power on your radio and explore the new features and changes.
The creator advises viewers to be patient and to take their time with the process, as it can be challenging, but ultimately rewarding.
Resources
The following resources are mentioned in the video:
The YouTube tutorial [1] provides a step-by-step guide on how to update the ATS-25 firmware, while the SWLing Post article [3] provides some information about the new ATS-25 SI4732 receiver, which might be useful when updating the firmware. The GitHub repository [5] contains the firmware update code and instructions on how to perform the update.
My Best Advice
Take your time with the process of updating the firmware on your ATS 25. Follow the instructions carefully, and if you encounter any difficulties, refer to the video tutorial and firmware files provided in the video description.
FAQ:
Q: Is updating the firmware on an ATS-25 radio worth it?
A: Yes, updating the firmware can improve the radio’s efficiency and add new features.
Q: Is updating the firmware on an ATS-25 radio difficult?
A: Yes, it can be challenging, but if you follow the instructions provided in the resources carefully, you should be able to do it.
Q: Where can I find the firmware file for the ATS-25?
A: You can find the firmware file on 9ew’s website, which is linked in the video description.
Q: How long does it take to update the firmware on an ATS-25 radio?
A: The process can take anywhere from a few minutes to an hour, depending on your level of experience.
Q: Can updating the firmware on an ATS-25 radio damage the radio?
A: If you follow the instructions carefully, the risk of damaging the radio is minimal.
Release EU1KY AA Firmware CEC Version 0.71 ( V1.0 Candidate)
Changed from Version 0.70 to Version 0.71 At the request of the testers, the tuneSWR source code was restored to Version 0.53 code. All functions are the same as V0.70. Only tuneSWR has changed.
This version is a development version and may be unstable, and some of the features included in this version may be removed from V1.0, Stabilized version V0.53 has been released, and stabilized version is posted separately.
If this version is confirmed to be stabilized by testers, it will be changed to Version 1.0.
The firmware that was created by EU1KY and improved by DH1AKF was already great.
I just added a little extra to the already great firmware.
Some of the features I had planned are not yet implemented. To implement these functions, we must remove the existing functionality because of STM32F746's small memory.
1.2 About New project - HamToolKit Based STM32F746G-Disco
So I decided to convert Version 0.7 to Version 1.0 and create a separate Ham Tool Kit based STM32F746G-Disco. It's probably a Swiss Army knife for Ham. Since the antenna analyzer function is not included, Audio In can be used, so various functions can be implemented and the price will be lower.
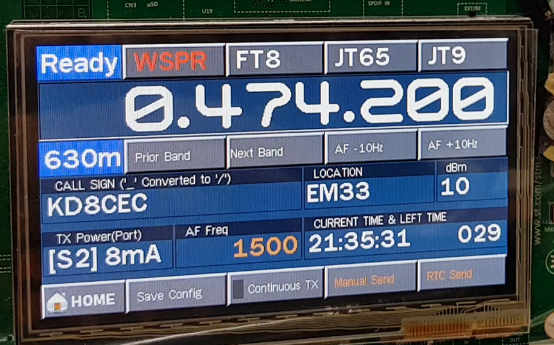
The STM32F746G-Disco board has an excellent sound chip built in. I used this to send the WSPR beacon signal to the sound.
if you have a good antenna, you can use WSPR with 'AA' without any tools. 'AA' transmits its own output 10dBm.
But if you want to send a little bit more signal, you can use this function. This may be used to test the transmit function of your radio.
TX Start
TX WSPR Protocol via Phone output
Decoded by Wsjt-x
Test Video
2.2 Added FT4 protocol test function
The FT4 Protocol is a nice new protocol. There is no official release yet.
To officially release the FT4 protocol, the Wsjt-X team is in testing.
You can try FT4 in advance using Wsjt-x 2.1.0 RC5.
In V0.7, I added the ability to transmit the FT4 protocol.
Because there is not enough screen, JT65 and JT9 can be selected with one button.
Touch JT65 -> Selected JT65
Touch again JT65 -> Select JT9
FT4 frequency based on Wsjt-x 2.1.0 RC5.
FT4 can be used from 3Mhz to 144Mhz without any hardware modification.
Test on 14Mhz
TX : FT4 Protocol
RX : Wsjtx2.10 RC5, Decoded
Test on 144Mhz
TX : FT4 Protocol
RX : Wsjtx2.10 RC5, Decoded
Test Video
A separate post will be posted soon for FT4.
2.3 Added Voice Keyer & Voice Recorder
Voice Keyer (or Voice Recorder) function was added in Version 0.7.
If you only want to use it as a voice recorder, you do not need any modifications, Just need update the firmware. If you want to use it as a Voice Keyer, you need a very simple modification.
Added 'Voice Keyer' button
Voice Keyer Screen (Slot1 ~ Slot 14)
Record (Slot 2)
Play Slot1 with PTT Control
For more information, please visit the link below.
At the request of the testers, the tuneSWR source code was restored to Version 0.53 code.
All functions are the same as V0.70. Only tuneSWR has changed.
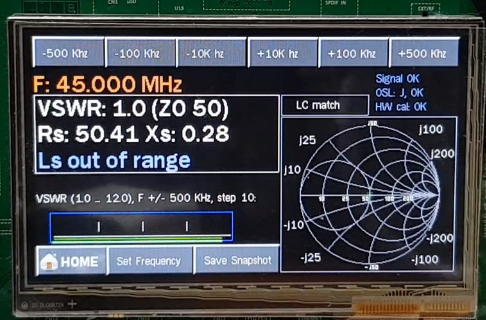
2.4 Modify Tune SWR (Version 0.70)
Several bugs were found from the beta tester for Tune SWR.
- If SWR is not changed when moving to 'Tune SWR' screen after measuring SWR on other screen, it does not work
- If you do not change the SWR when you press the SWR2, SWR3 button, the operation will not start.
I modified the code to always switch the measured 'SWR' to Beep sound.
2.5 Removed oscillator support other than si5351 and other minors
Although it did exist on the menu, it was not actually implemented in the source code in most cases. To save the memory, I keep 'SI5351' and remove the rest.
I would appreciate it if you test and give feedback.
If there is no problem after 1 week ~ 2 weeks test, version name will be changed to stable version. (maybe version 1.0)
If you want a stable version, please use the link below.
How to use Voice Keyer in EU1KY with CEC Firmware V0.7
Version 0.7 is being prepared for deployment.
Voice Keyer (or Voice Recorder) function was added in Version 0.7.
If you only want to use it as a voice recorder, you do not need any modifications, Just need update the firmware.
If you want to use it as a Voice Keyer, you need a very simple modification.
1.Modifications for use as a voice keyer 1.1 PTT Control
Below is just one example.
Only the part with PC817 is shown below.
1.2 MIC Input
It uses a push switch to switch between microphone and AA.
It is recommended to pass a small transformer between the transceiver and the AA.
Please use only one (Left or Right) because the speaker jack of AA is stereo.
Recording and playback will operate in stereo. You can use either the left or the right one for you.
2.How to use Voice Keyer
2.1 Use Voice recorder
Touch the 'Voice Keyer'
The 'USB Host' menu has been moved to the Configuration section.
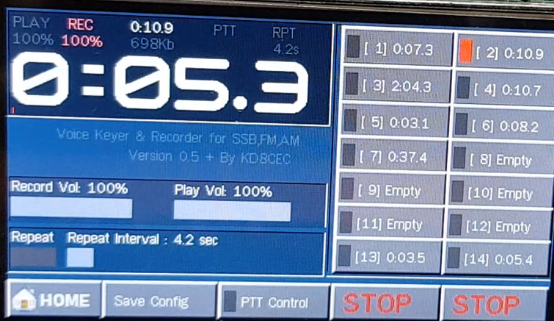
The screen below is the Voice Keyer screen.
A: Display Window
B: Slot buttons
C: Volume adjust
D: Repeat enable and Repeat (rx time) adjust
E: Menu buttons
Select one of the Slot buttons on the right to select the Slot you will use.
Up to 14 slots can be used.
Touch the 'Record' button on the bottom right to record to the selected Slot.
When recording is completed, touch 'Stop' button.
The number of text in the Slot button changes as shown below. this is Play Time of the recorded file.
The display window shows the play time of the selected Slot.
To record to slot2, select the Slot2 button and touch the Record button. When recording is completed, touch 'Stop' button.
To play the recorded file, touch the 'Play' button.
To play the recorded file of another Slot, select Slot and press 'Play' button.
2.1 Use Voice Keyer
If you have recorded a 'CQ' Message, you can transfer it to your transceiver.
At this time, it must be modified for PTT control.
Select the Slot where your 'CQ' message is recorded.
Touch the 'PTT control' button to activate the 'PTT' function.
Touch the "Play" button. The 'CQ' message you recorded will be sent over the transceiver.
If you want to continue sending 'CQ' until the other station answers, touch the 'Repeat' button to activate the 'Repeat' function.
After 'Play', wait for 'Repeat Delay' time and resend.
The progress bar will move in gray color.
You can set the Repeat Delay Time (RX Time) to check the response of the other station.
This version is a development version and may be unstable, and some of the features included in this version may be removed from V1.0, Stabilized version V0.40 has been released, and stabilized version is posted separately.
I would appreciate it if you test and give feedback.
If there is no problem after 1 week ~ 2 weeks test, version name will be changed to stable version.
If you want a stable version, please use the link below.
How to use Audio DSP on Antenna Analyzer (Features included after CEC V0.5)
Audio DSP is a function that filters the sound coming from the transceiver into a desired range.
You do not need any hardware changes to use this feature. Just prepare your headphones. If you want to make a little bit better, you can add a very small $ 1 speaker to your board.
I am preparing to distribute the test firmware (V0.52). Please wait 1 ~ 2 days. 1.Required Hardware
EU1KY AA and Headphone.
The STM32F746 board has two sound inputs. However, Mic Jack is already using the EU1KY RF board.
Another sound input method of the STM32F746 is two microphones mounted on the board.
I use only one of the two microphones. (Right)
Put AA near the transceiver speaker and plug your headphone into the phone jack and you're all set.
Below is a picture of my development board. I put a very small speaker on Mic for testing.
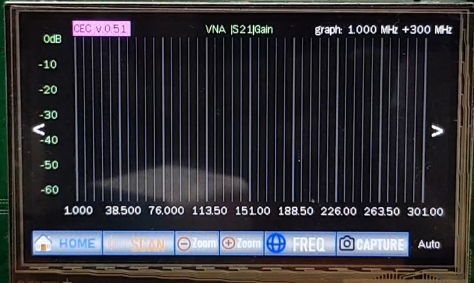
On the main screen, touch 'Audo DSP' button.
If you turn on your transceiver, you will probably see fft spectrum and waterfall graphs as shown below.
In the first run, it operates in 'Pass Through' mode.
May be too loud, so make sure the volume of the transceiver is very small in 'Pass through' mode.
Touch the desired filter button.
If you are filtering a fairly narrow area, please select BPF.
BPF supports 50Hz, 100Hz and 150Hz filtering.
Continue to touch the BPF button to change the filtering bandwidth.
Touch the red squares (B) below to move the center frequency.
The yellow squares(A) is the area to adjust the bandwidth in User Filter mode.
Move the center frequency to the area you want to hear.
If you hear a small noise when moving to the area you want to hear, increase the volume of the transceiver.
Since most of the other areas are removed, if you raise the volume, you will hear what you want to qso. Volume control is important.
If you have selected User Filter, you can select the range you want to hear by dragging the L and R areas below.
Since the center frequency is maintained even if you touch the BPF and the User filter alternately, it can be used alternately according to the communication status.
3.Test Video
Please refer to the video below for an example of use.