This solution has worked incredibly well from the outset and over time I’ve added extra functionality that I’ve found to be useful to enhance the overall setup.
The latest addition to the ground station solution is a Sennheiser Headset that I picked up for just £56 on Amazon (Much cheaper than the Heil equivalents at the HAM stores!) and have found it to be excellent. The audio quality from both the mic and the headphones is extremely good whilst being light and comfortable to wear for extended periods.
M0AWS – Sennheiser SC 165 Headset
To incorporate this into the ground station the headset is connected to my Kubuntu PC and the audio chain to the IC-705 is sent wirelessly using the latest version of WFView. This works extremely well. The receive audio comes directly from the GQRX SDR software to the headphones so that I have a full duplex headset combination.
Audio routing is done via pulse audio on the Kubuntu PC and is very easy to setup.
Since I no longer have a mic connected to the IC-705 directly I found that I needed a way to operate the PTT wirelessly and this is where the latest addition to my NodeRed QO-100 Dashboard comes in.
Adding a little functionality to the NodeRed flow I was able to create a button that toggles the IC-705 PTT state on and off giving me the ability to easily switch between receive and transmit using a simple XMLRPC node without the need for a physical PTT button.
M0AWS – Additional NodeRed PTT Flow
The PTT state and PTT button colour change is handled by the Toggle PTT function node shown in the above flow. The code to do this is relatively simple as shown below.
M0AWS – NodeRed Toggle PTT Function to change button colour
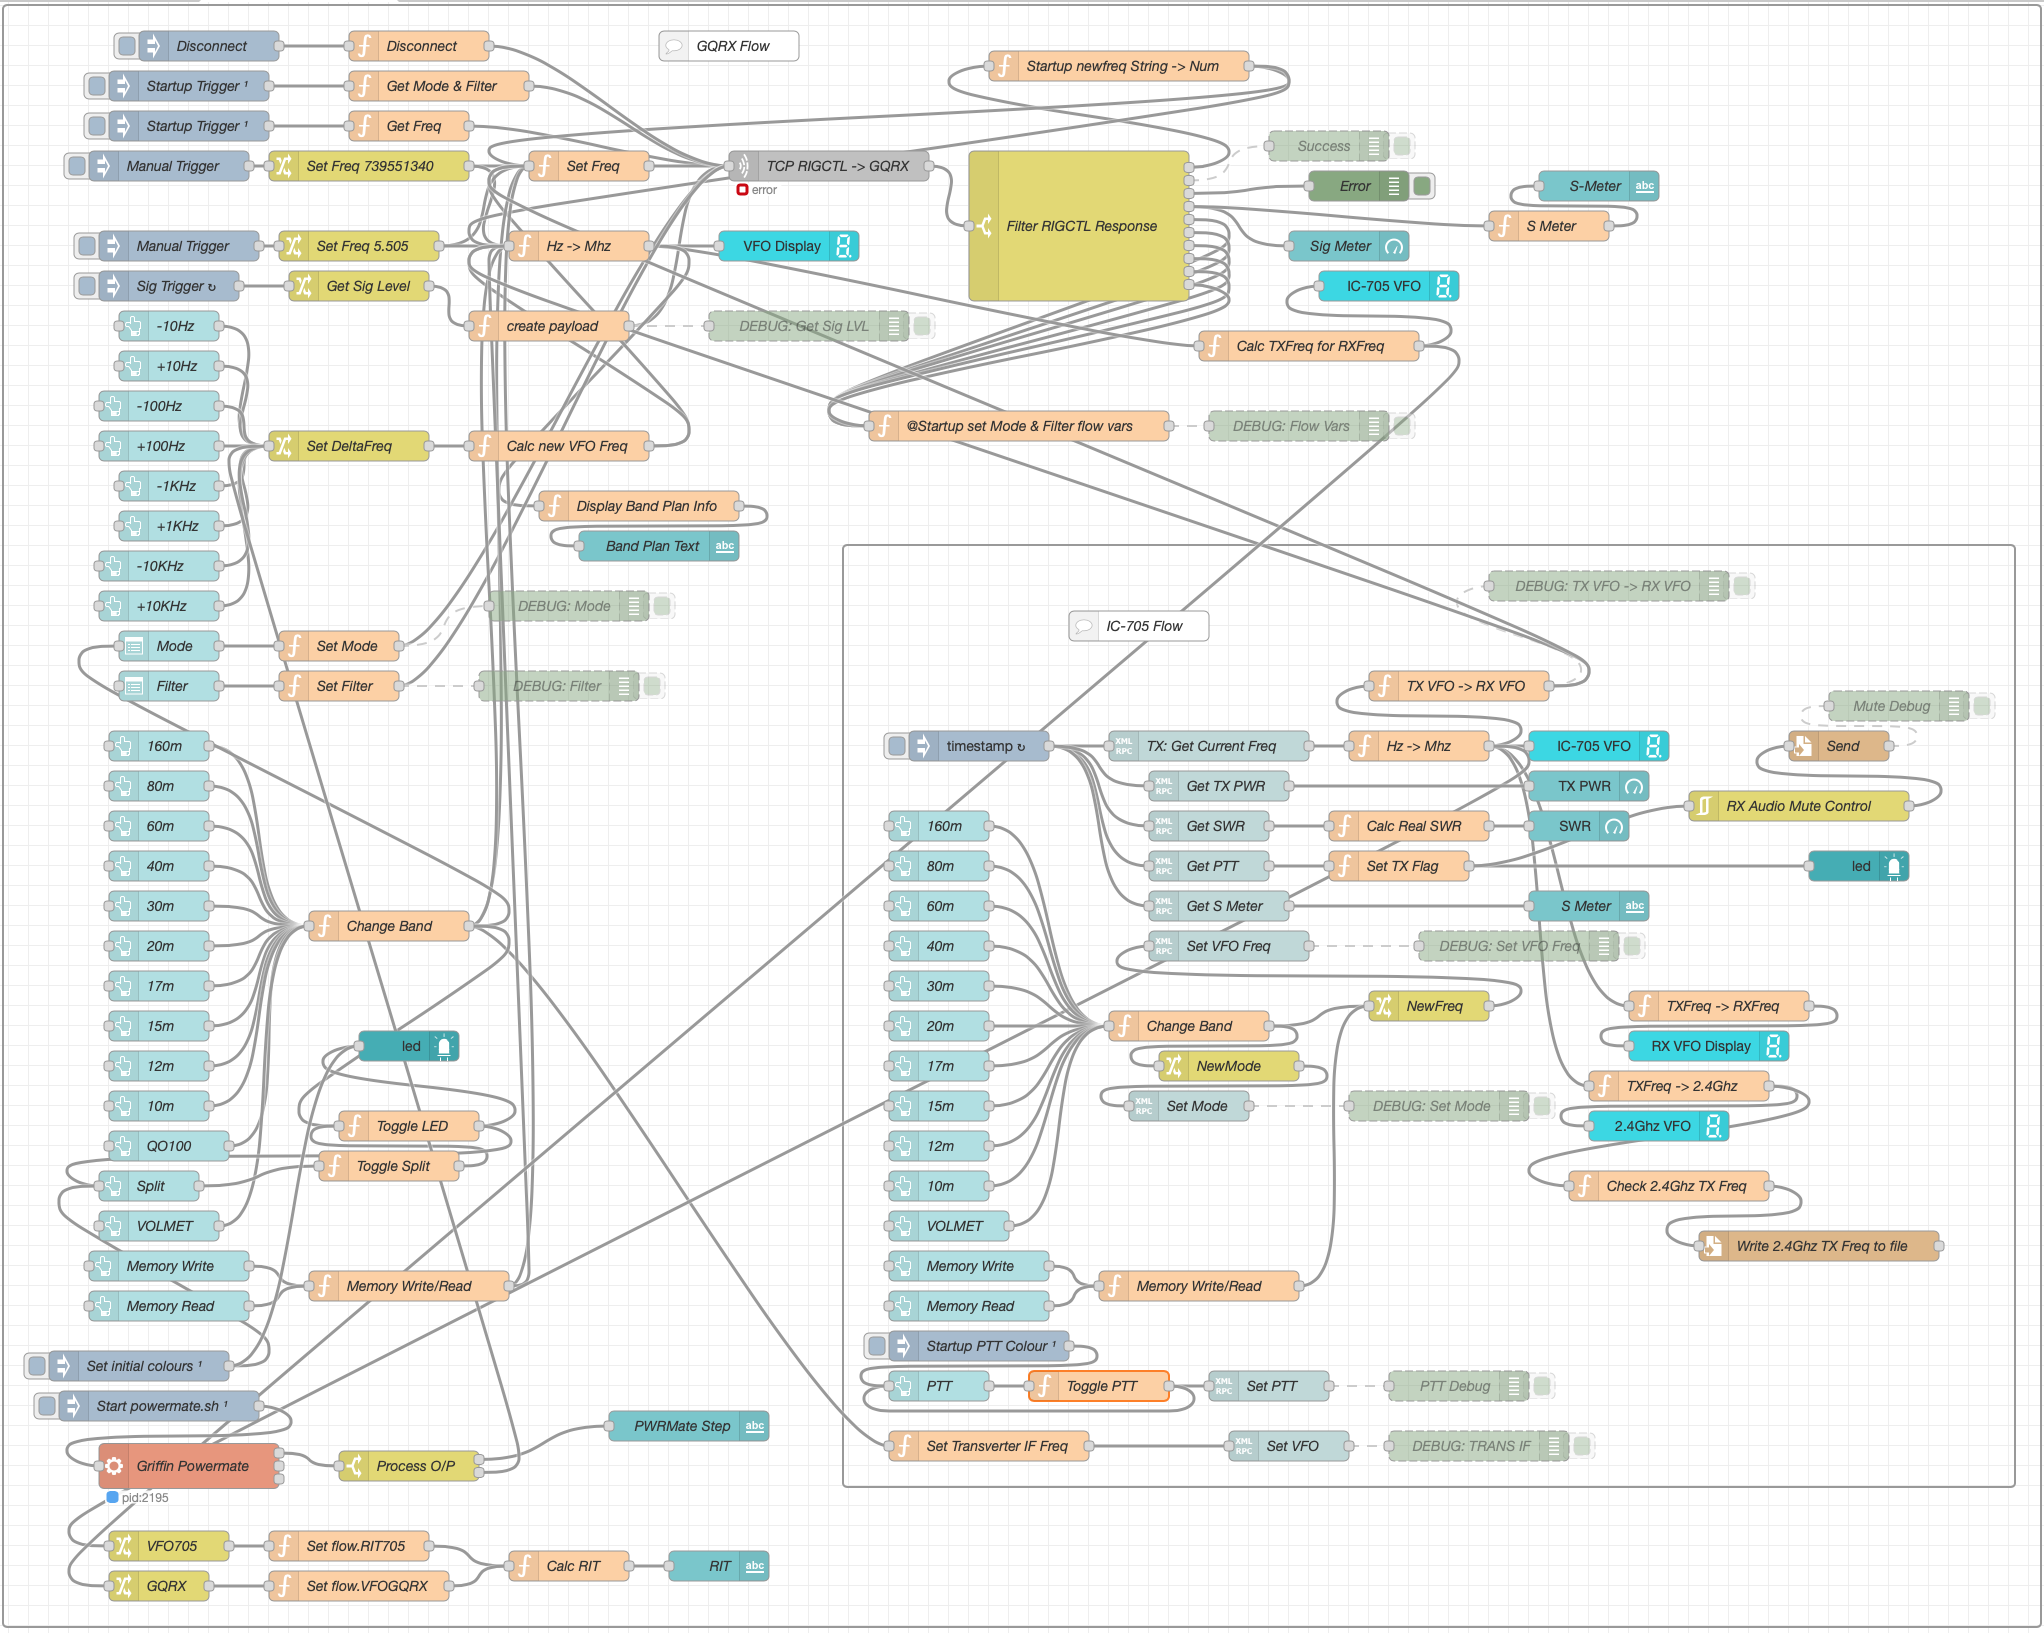
The entire QO-100 Dashboard flow has grown somewhat from it’s initial conception but, it provides all the functionality that I require to operate a full duplex station on the QO-100 satellite.
M0AWS – NodeRed QO-100 Dashboard complete flow
This simple but, effective PTT solution works great and leaves me hands free whilst talking on the satellite or the HF bands when using the IC-705. This also means that when using my IC-705 it only requires the coax to be connected, everything else is done via Wifi keeping things nice and tidy in the radio shack.
M0AWS – Updated NodeRed QO-100 Dashboard with PTT button
The image above shows the QO-100 ground station in receive cycle with the RX/TX VFO’s in split mode as the DX station was slightly off frequency to me. The PTT button goes red when in TX mode just like the split button shown above for visual reference.
As you can probably tell, I’m a huge fan of NodeRed and have put together quite a few projects using it, including my HF Bands Live Monitoring web page.
This blog exists for me to catalog sucesses and failures. The other thing it does is provide me with a place to put things so that I can get to them no matter where I am assuming – an internet connection. The topic for today is a refresher on my setup for my portable digital operations.
The Gear and Software
This discussion centers around the use of the IC-705 and the Microsoft Surface GO 2. I have no reason to believe that changing the computer will make any difference as I have gotten this working on other laptops, but the operating system will require some attention.
I’m running Ubuntu as my Linux distro on this device. There is pre-reading required to make this all work and we’ll get to that in a second.
Software includes the following from the Ubuntu repository:
wfview
fldigi
WSJT-X
Pat
I am currently using the fork of ardop known as – ardopcf from pflarue on GitHub. New and exciting things are happening here in the world of ardop.
The Pre-Work – wfview
There is a great set of instructions on how to get ALSA loopback devices set up appropriately for wfview in their well-written user manual. Start here:
With all of that done and in place, there are a few things to look at in wfview for rig control to make life a little easier. At the bottom of this page of the wfview manual there is some good information on setting up wfview to do what flrig would do. That’s what I do. Why? Because it’s working and keeps things simple. The important thing, in my experience, is to set the port number to something other than 4532 which is the flrig default. I set it to 4533 because that’s a safe port number.
Here is what my wfview External Control tab looks like:
The screen for External Control in the wfview application.
It should be noted that I’m using the Virtual Serial Port. This is a mapping to /dev/pty/NUMBER and it takes care of itself once set up.
fldigi
With wfview up and running, setting up fldigi is relatively simple. The following configurations for audio and rig control are currently working.
fldigi audio settings with the PortAudio section selected, Loopback PCM (hw:10,1) set for Capture and Loopback PCM (hw:11,1) set for Playback.
The rig control settings are set on the HamLib segment of the Rig Control section in the configuration dialogue.
Use hamlib is selected. Rig is set to Hamlib NET rigctl (stable) Device is set to 127.0.0.1:4553 (as found in wfview) Baud rate is set to 115200
All other settings are defaults.
The fldigi rig control settings configured with the values defined above.
With this complete, save and initialize the connection and then go to the main fldigi window to tune or send a station ID. Rig control and audio should function as expected.
WSJT-X
WSJT-X is the odd duck. My dad and I have the rig control configured differently, but it still works for both of us. What does that mean? There might be more than one successful configuration so maybe find what works and don’t touch it after that. What I use is listed here.
The Radio settings tab is configured as follows.
Rig: Icom IC-705 Serial Port: /home/jcw/rig-pty-1 Baud Rate: 115200 PTT Method: CAT Data Bits: Default Stop Bits: Default Handshake: Default Mode: Data/Pkt Split Operation: None
The WSJT-X Radio configuration window with the values set as detailed above.
The Audio setup matches the devices that are set in wfview but in reverse.
Note: I find the labeling in wfview to be counterintuitive. It’s probably just my broken brain, but I have to remind myself to flip things around and think about it as source/destination pairs. It’s probably just me.
The WSJT-X Audio configuration window with the values set as detailed above.
With this configuration in place, one can test the rig control on the Radio tab or by going to the main window and changing frequencies. Running a tuning cycle briefly will test audio output.
ARDOP – ardopcf
ardopcf is available on GitHub as a binary. Simply download it and put it in /usr/local/bin, run a quick chmod+x on it, and it should be good to go. That’s all that it required of me.
With ardopcf in place, lauching ardop is fairly simple. I put it in a little script so that I don’t have to type out the arguments each time. I named the script “startardop.sh” and dumped it in my home directory. Creative, huh? Here’s what it looks like:
When you start ardopcf, you should start to see pairs of numbers in the terminal showing you audio input levels. If you’re getting a lot of 0,0 then you might have a problem or wfview might not be running. Maybe your rig is off? Check your signal chain. If, on the other hand, you’re seeing numbers pop up every 4 seconds or so, then you’re in good shape.
Wow. That’s a lot of stuff. That is the configuration that is currently working for me for sending Winlink email using ARDOP or telnet.
What a lot of people seem to miss is that Pat has a web gui that will run on localhost:8080. It makes using Pat a lot easier and gives a fresh, modern GUI to Winlink email. And yes, it handles forms and everything. It’s pretty darned cool!
To get that up and running, I use yet another creatively named script: startpat.sh. The contents of that are:
pat-winlink --listen "ardop,ax25,telnet" http
What does that do? It starts up Pat listening for connections on ardop, ax25, or telnet. I didn’t detail ax25 here because, well, I’m not done playing with that just yet. And telnet should always be there so that you can use Pat if you have a good internet connection and NEED to check your Winlink email. The http argument starts the application listening on 8080 for the web UI. With Pat running, all you have to do is go to https://localhost:8080/ui and you’ll see the web UI. You’re now free to explore Pat and send/receive Winlink email.
Final
This is the setup that is currently working for me. I will update this as I add other modes, etc.