via Hackaday: A Clean Linux Installation For an Android TV Box
18 September 2024 at 08:45

Ever since I built my RaspberryPi/SHARI AllStarLink node I’ve had to manage connecting/disconnecting to/from other nodes using the Allmon2 or Supermon web admin interfaces. These work fairly well albeit, a bit clunky and buggy. It’s impossible to use from a mobile device though and so I have to get my Macbook out each time I want to connect/disconnect nodes.
Being a Node-RED fanatic I decided that I should put something together that was more portable, mobile friendly and much easier to use. A simple user interface is all that is required and can be achieved very easily using the standard Node-RED dashboard nodes.
Initially I started investigating the Linux command-line interface for Asterisk, the VOIP system that underpins AllStarLink (ASL). I very quickly discovered that the ASL node can be very easily controlled directly from the command-line and that this would be an ideal interface to use to enable node management via a Node-RED dashboard.
In very little time at all I had an experimental control dashboard working with the ASL node and was able to connect/disconnect to/from a single node. All that was required now was to extend this so that I could connect to a number of nodes with nothing more than a push of a button.
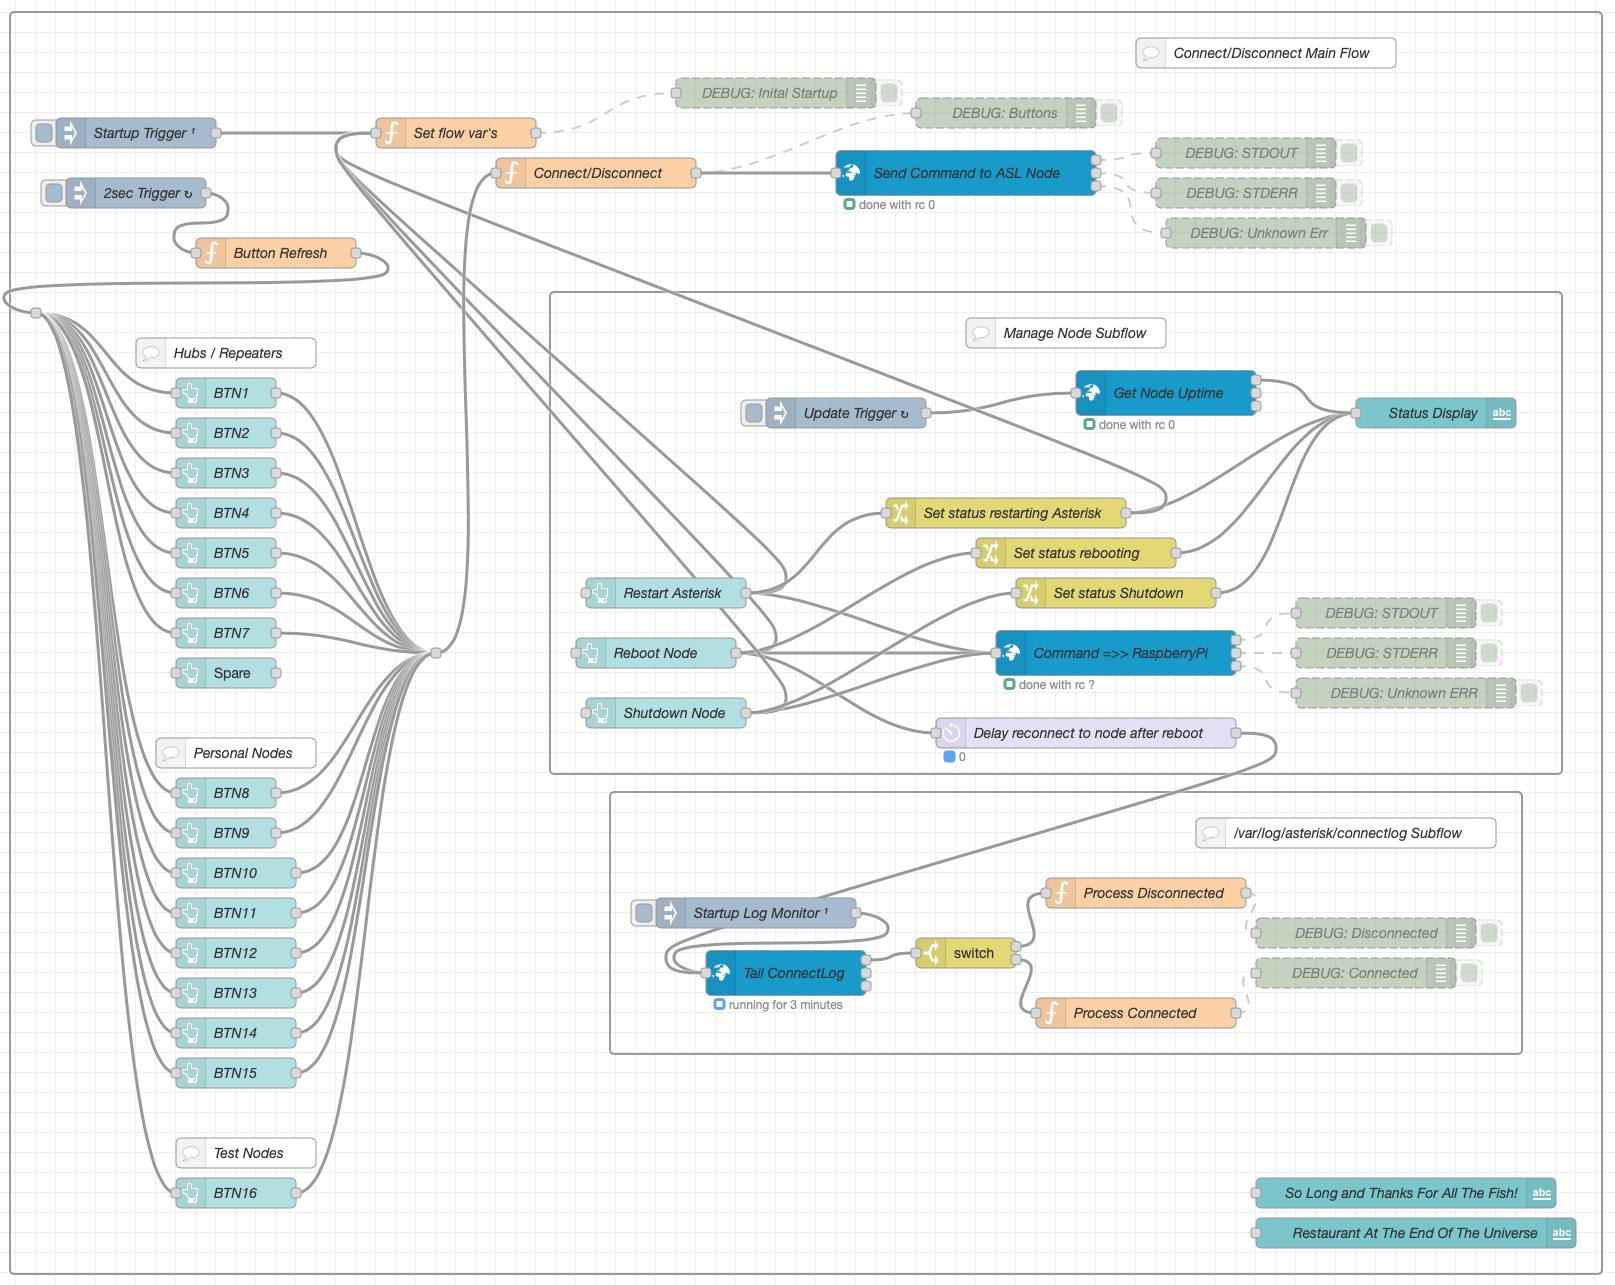
The resultant flow consists of 3 sections, Connect/Disconnect Main Flow, Manage Node Subflow and /var/log/asterisk/connectlog Subflow.
The Connect/Disconnect Main Flow handles all the input from the buttons on the dashboard and the communication to the underlying Asterisk VOIP system.
The button status is denoted by 3 colours, green (Ready to connect), orange (Transitioning to/from connect) and red (Connected). Each button is updated automatically by the button refresh function that is triggered every 2 seconds.
The Manage Node Subflow provides a simple interface to restart the Asterisk VOIP system, reboot the RaspberryPi and shutdown the RaspberryPi. The node status is automatically updated every 45 seconds and will show when the Asterisk subsystem is being restarted or the node is being rebooted or shutdown.
Finally the var/log/asterisk/connectlog Subflow monitors the Asterisk connectlog looking for connect/disconnect messages so that it can signal to update each button status.
Each section of the dashboard can be collapsed/opened by touching/clicking the little blue arrows on the right of the dashboard. The dashboard works fine on Android, iOS, Windows, MacOS and Linux.
If you’re not familiar with Node-RED and haven’t yet installed it to your PC, take a look at the Node-RED Getting Started Page. The information takes you through installing Node-RED onto a multitude of devices including PC and RaspberryPi devices.
Once you have Node-RED installed all you need to do is download the AllStarLink Control Dashboard Flow and import it to your Node-RED flow editor.
Once downloaded, select Import from the burger menu icon on the right-hand side of the flow editor as shown below and import the flow file.
Once imported you will find that some of the nodes in the flow are not available. This is because you need to add them to the flow editor palette before being able to deploy the flow.
Drop down the same menu as shown above but, this time select Manage Palette. This will open another window where you will need to select the Install tab as shown below.
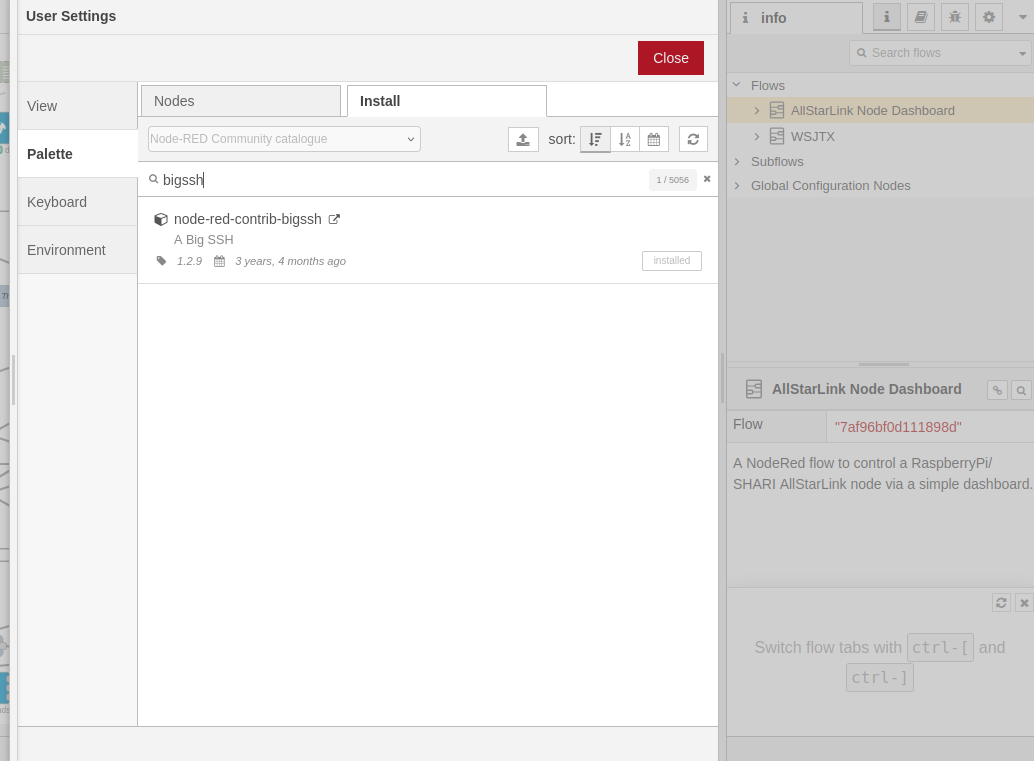
You need to install two node sets to complete the flow, node-red-contrib-bigssh and node-red-dashboard. Type in the name of each package one at a time in the search bar and then click the Install button.
Once the two packages are installed you then need to configure the credentials for logging into your RaspberryPi. This is simply done by double clicking the blue Send Command to ASL node at the top of the main flow and then clicking the Pencil button at the end of the Credentials field. This will open another window where you will need to type in the IP Address of your ASL RaspberryPi into the Host field, then enter 22 into the port field, add repeater into the Username field (repeater is the default username, if you have changed this then you will need to add the new username name in instead) and then the password associated with the repeater login into the Password field. (Normally allstarlink)
Once this is done, do the same on the other blue nodes, namely “Get Node Uptime“, “Command =>> RaspberryPi” and “Tail ConnectLog”.
The final thing to setup is the dashboard size. Click on the downward pointing triangle at the top right of the menu bar (under the burger menu) and select dashboard. Check that the sizes are set the same as in the image below. For some reason, these settings aren’t always imported (Possible bug?) so, if your dashboard layout isn’t like shown above it will be because these settings failed to import.
You are now ready to deploy your AllStarLink Control Dashboard!
Press the red Deploy button at the top of the flow editor window.
To access the dashboard from any device, open your favourite web browser and enter the following URL: http://IP-Address-of-Node-RED-Computer:1880/ui
Finally, if you want to change the nodes that each button connects/disconnects you will need to edit the set flow var’s function at the top of the main flow. All you will need to do is replace the existing node numbers taking care not to alter the rest of the code in any way otherwise, it could stop the flow from working.
Once you’ve edited the node numbers, double click on the associated button node and change its Label to show the new node name.
Once your changes are complete, Deploy the flow again and your changes will be live.
This is version 1 of the ASL Dashboard, I already have ideas for version 2 that will also have the ability to enter a node number into a field and connect to it without the need to program it into a button.
More soon …
Meshtastic is a relatively new thing in the internet of things (IOT) world and is gaining traction in the U.K. at the moment.
So what is Meshtastic?
Meshtastic is an open source, off-grid, decentralised mesh network built to run on affordable, low-power devices on the 868Mhz industrial, scientific, and medical (ISM) band. (Some devices can also run on the 433Mhz 70cm HAM band.)
The ISM band is licence free but, has limits on the RF power levels that can be used. The one plus over the HAM bands is that you can legally transfer encrypted messages over the ISM band making it secure.
The best way to think of Meshtastic is a radio version of the online decentralised Matrix chat system but, without the large server requirements and ever growing database!
There are quite a few Meshtastic compatible devices on the market today with many costing around the £20 mark whilst others like the LillyGo T-Echo costing over £100 in the U.K. even though they are less than half the price in the USA.
Since I’m just starting out on my Meshtastic adventure I thought I’d start with a pair of Heltec ESP32 v3 devices that are normally readily available on Amazon but, due to the current push to build a U.K. wide mesh, they are currently out of stock pretty much everywhere.
Loading the Meshtastic firmware onto the devices is fairly straight forward and can be done using the web installer via either the Edge or Chromium web browsers.
(Note: If using Windows O/S you will need to install some drivers from the Meshtastic website to be able to communicate with the devices)
Having neither of the two browsers and being a Linux command line junkie I decided to use the Python programme to load the firmware onto the two devices. It’s worth noting that you don’t need any drivers to be able to communicate with the devices if you’re using either Debian or one of the many Ubuntu flavours of Linux O/S.
Using the Python command line program sounds like a more complicated approach but, in reality it’s super simple, extremely reliable, quick and if like me you use a Linux PC in the radio shack then you most likely already have most of what you need to get the job done. Just follow the simple steps as laid out on the Meshtastic web site and you’ll have the firmware loaded in no time at all.
The firmware takes less than a minute to copy across to the Heltec device and is automatically rebooted ready for configuration once the transfer has completed.
It is possible to configure the device via the command line tool however, since there is a nice GUI app for both Apple iOS and Android devices I decided to install the Meshtastic app on my iPad and connect to the device via Bluetooth to configure it.
Once you’ve got the Meshtastic app installed on your device and have connected via Bluetooth you’ll be ready to start configuring the device to join the mesh. The first thing you want to do is set the region. This is different in each country but, in the UK we use the EU_868 region settings. This will set the device to use the 868Mhz ISM band which is the band being used to build the U.K. wide mesh.
There is a multitude of configuration options within the app which I will go into in greater detail in a series of articles at a later date.
For those of you that, like me aren’t near any other nodes you can connect the devices to the internet and use the Meshtastic MQTT server to communicate with other nodes. This of course isn’t off-grid but, it will get you started until the mesh grows into your local area at which point your device will automatically start communicating with the other nodes over radio.
Once you are connected to either the MQTT server or other nodes via radio you will see the other node details appear in the Meshtastic app. It’s interesting to look at the information and see signal strengths and traffic levels etc for each node.
There are a multitude of cases available for the Heltec v3 devices, especially if you have access to a 3D printer. One of the nicest cases I have seen is the Bender from IKB3D (I know, it’s a strange name!) but, it really is a super little case for the Heltec series of devices.
You can either buy the 3D print files for £8.99 and print it yourself or just order a pre-printed and assembled case directly from the website although, due to demand there is a long lead time currently.
More soon …
Satellite tracking applications play an important part in using the transponders available to radio amateurs, of course, experiences of them all vary and are very subjective however we are going to explore what is available on the Android platform.
Play Store: https://play.google.com/store/apps/details?id=uk.me.g4dpz.HamSatDroid
AMSATDroid Free has been the staple choice for most keen AMSAT operators, created by David G4DPZ and provided free to the community it allows you to see the next passes for individual satellites for a period of time when you select a pass it gives you a graphical display of the pass on a compass style view or a map view which includes the track of where it’s going to be.
The application hasn’t received many updates but recently got made open source and is available on Github https://github.com/g4dpz/AmsatDroidFree
Play Store: https://play.google.com/store/apps/details?id=com.heavens_above.viewer_pro
Heavens-Above Pro has been my favourite satellite tracking app when on the move, its amateur radio features allow you to search for an amateur satellite you’re after, it then gives you passes for the next couple of days along with pass times and a rough guide for the uplink and downlink.
On selecting the pass of interest you get a compass view which updates in real time showing where the satellite is, it also gives a detailed break down of a pass from the start (AOS) to the end (LOS) including the time the satellite is at its maximum elevation.
A useful function in Heavens-Above is that it allows you to create calendar entries for the pass, thus helping you plan your trip. Within the settings, you can also define some of the options like the minimum elevation so if you can’t work below 10 degrees elevation you can set that.
Play Store: https://play.google.com/store/apps/details?id=com.runar.issdetector
ISS Detector has become the most popular application for satellite tracking in recent months with its huge range of features it offers, although you have to buy the Amateur Radio Extensions which cost around £1.09 via an in-app purchase it’s well worth it.
Once you have purchased the addon you can create a filter to include the active ham radio satellites that you are interested in and set a minimum elevation plus whether you want ISS Detector to popup a notification when the pass is due within 5 minutes which is useful.
Returning to the main screen you a full list of next passes based on your filters these are in chronological order. When you select the pass you get a wealth of information displayed in the RADAR tab you get a compass view of the pass you help you with antenna pointing, selecting the details tab gives you a finer display of the pass times and its elevations along with a live Google Map of the satellites current position.
The interesting part of this tab is when you scroll down it gives you doppler information, for a linear satellite you get doppler corrections for the top and bottom edges of the transponder, on FM passes you get the uplink and downlink, this can be a useful guide on where you should be listening and transmitting.
Within the satellite view, you also have the option to create a calendar entry if you’re planning a day trip or even share the pass with friends.
As with any application, there’s a huge selection of settings options to go through and adjust to your liking but once you have it set up it’s straightforward to use.
Hopefully, this gave an insight into some of the options available, I’ve not been paid to recommend any of them and paid apps were bought with my own money, I will say that ISS Detector is my main go-to application for planning passes whether at home or even portable the notifications, calendar and filters just make it simple.
The post Android Satellite Tracking Applications appeared first on 2M0SQL.