Over on the Tech Minds YouTube channel, Matt has uploaded a video where he reviews a new book by Elektor titled "Raspberry Pi 5 For Radio Amateurs" (€5 off coupon code "Techminds"). The book is all about projects for the Raspberry Pi 5 that can be done with RTL-SDR Blog V3 and V4 software defined radios.
In the video Matt explores the books contents, showing off the various possible projects. Matt also shows how to get started with the book by installing Raspbian, and the RTL-SDR drivers, and then goes on to show how examples of the various software programs mentioned in the book such as SDR++, flrig, chirp, dump1090, predict, HamClock, rtl_tcp, rtl_433, qsstv, fldigi, Xdx and more.
Back in April of this year, we posted about the FobosSDR, an upcoming software defined radio product from the Ukrainian company RigExpert. FobosSDR is an RX-only USB 3.0 device, with a 100 kHz to 6 GHz tuning range, 50 MHz of bandwidth, and 14-bit ADC resolution. At the time of the previous post, FobosSDR was not yet for sale, but now we see that it is available from some European distributors with a price of 495,00 € (~US$544).
Recently 'Radio Bunker' has uploaded a video review of the FobosSDR on his YouTube channel. Note that the video is in Spanish, however, you can use the YouTube auto-translate function.
In the video, Radio Bunker unboxes the FobosSDR and explains its specs and features, then goes on to show how to install the drivers and get it up and running with SDR#. He then shows the SDR receiving some signals like broadcast AM, FM, shortwave, DAB, and WiFi in SDR# with 50 MHz bandwidth.
Over on YouTube The Comms Channel has uploaded a video showing how they used a KrakenSDR to track down the location of an ATIS transmission tower.
If you weren't already aware, KrakenSDR is our 5-channel coherent radio based on RTL-SDRs, and it can be used for applications like radio direction finding. It can be purchased on Crowd Supply.
Airports typically have an ATIS (Automatic Terminal Information Service) transmission tower that broadcasts audio of recorded information such as weather, runway conditions, and any important notices.
In the video, they use the KrakenSDR to track down the location of an ATIS transmission tower at their local airport. In the future, they intend on using the KrakenSDR to help track down Meshtastic radios.
Over on hackster.io we've seen a story about how maker Jon Dawson designed a self-contained software-defined radio based on the Raspberry Pi Pico that can receive 0 - 30 MHz, with up to 250 kHz of bandwidth. The Raspberry Pi Pico is a microcontroller board based on the Raspberry Pi Foundation's own RP2040 chip.
The Pi Pico Rx's front end consists of a Tayloe Quadrature Sampling Detector (QSD) mixer which makes use of the PIO (Programmable Input/Output) feature on the RP2040. The circuit also has an encoder knob for tuning and a small OLED screen.
Jon had originally created the Pi Pico Rx on a custom PCB, however, his latest work brings the cost down by showing that it can just as easily be implemented on a breadboard with through-hole components.
The full writeup can be found on Jon's blog "101 Things", as can the open source firmware. He has also uploaded a YouTube video explaining and demonstrating the project which we've embedded below.
The LibreSDR is a relatively new software defined radio on the market. It is based on the AD9363 radio transceiver chip and an AMD XC7Z020 FPGA, and appears to be an upgraded/modified Chinese clone of the PlutoSDR. It can be found on marketplace sites like Banggood for US$319.99. (The Tech Minds YouTube description box also notes coupon code BG91c241, Exp:8/31, which brings it down to US$$259.99)
In his video, Matt from the Tech Minds YouTube channel introduces the LibreSDR / ZynqSDR, and explains how to set up the LibreSDR firmware, which is an unofficial port of the PlutoSDR firmware.
He then tested the SDR with SDR++ on Windows for receiving the air-band and found that it worked well, except that it only worked over USB, and did not work with the ethernet connection. Next, he tries SDR-Console V3, and finds that he is able to connect to the LibreSDR via ethernet with this software. Matt goes on to test his QO-100 setup, replacing his PlutoSDR with the LibreSDR, noting that the VCTXO in the LibreSDR works great to prevent any signal drift.
Finally, Matt tests transmission of DATV with the LibreSDR, but finds an issue with a center spike causing issues with decoding. He notes that the center spike does not occur with his PlutoSDR.
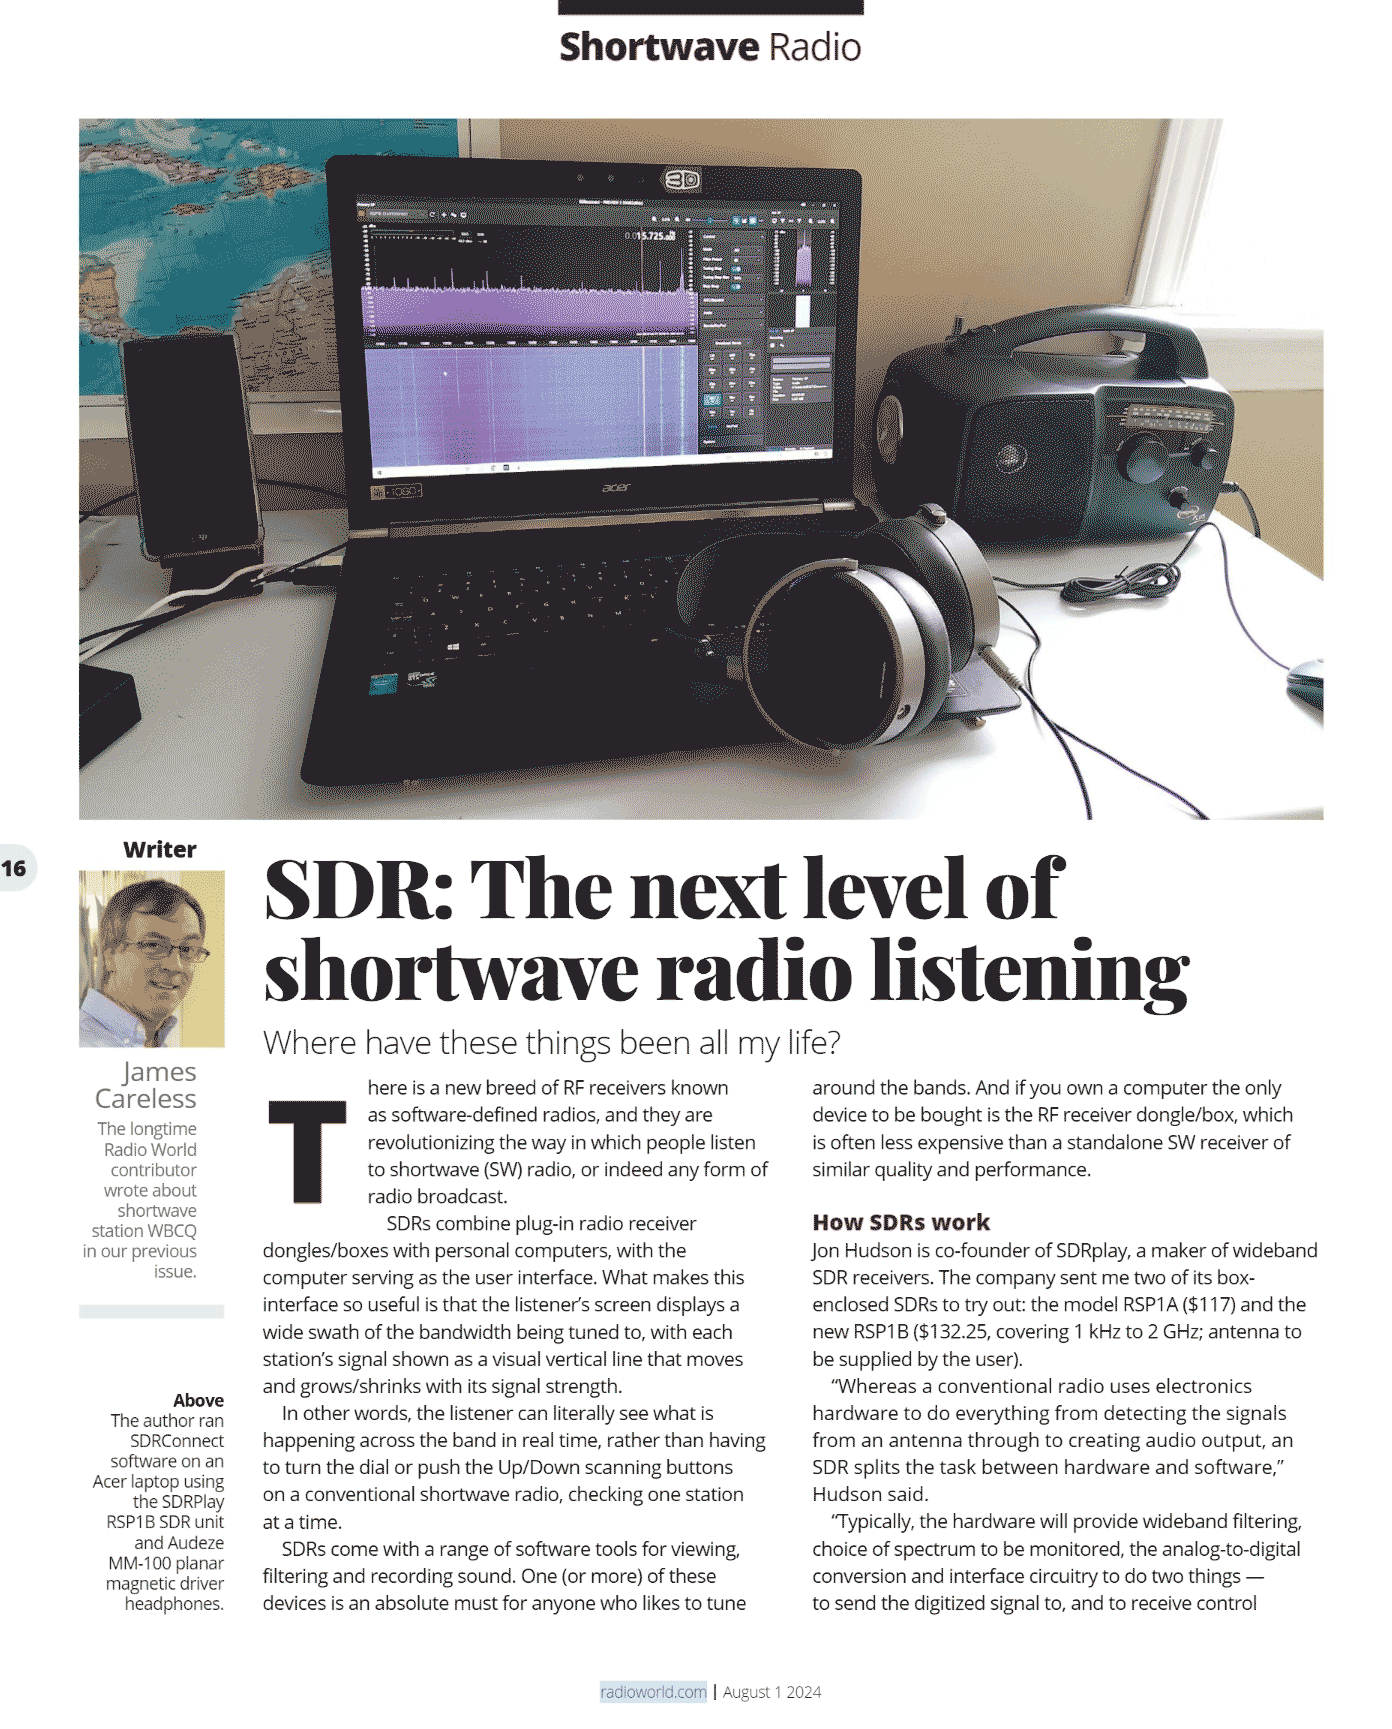
The latest August edition of the RadioWorld Magazine has included an article by James Careless about the use of software defined radios for shortwave radio listening. RadioWorld is a magazine targeted towards radio broadcast owners, managers and engineers all over the world. The article explores SDRplay and RTL-SDR Blog V4 units from the perspective of a shortwave listener new to software defined radios, comparing them to his high-end Sangean ATS-909X2 shortwave digital receiver.
Over on her YouTube channel SignalsEverywhere, Sarah has uploaded a new video showing how to use a program called 'hacktv-gui' to transmit analog TV signals using a HackRF software defined radio. Analog TV standards such as PAL and NTSC have been phased out in most of the world in favor of digital TV standards instead. However, transmitting these yourself can be a fun experiment that may help breathe life into old television sets.
In the video Sarah explains how to use the hacktv-gui and hacktv software, and how to create a video transmission. She mentions how hacktv also supports the use of a FL2K device, which is a cheap VGA adapter that can be used to transmit signals.
The RTL-SDR hardware began its life as a DVB-T TV receiver USB stick, but these days it is rarely used for this purpose. However, in countries where DVB-T hasn't been upgraded to DVB-T2 it is still possible to use the RTL-SDR for TV reception.
Recently, RADIOTO bg from DXing.org wrote in and wanted to share with us his video showing how to use the RTL-SDR V3 for DVB-T reception in OpenPli Enigma2. OpenPli is an open-source Linux distribution for TV set-top boxes and Enigma2 is the TV application it runs.
RADIOTO's video shows a step-by-step guide to setting up the RTL-SDR in OpenPli. The procedure is relatively simple, just requiring the user to select the correct driver for the RTL-SDR via the set-top menu.
Recently on the Tech Minds YouTube channel, Matt uploaded a video explaining how to set up and use the Radioberry HF SDR Transceiver Pi Hat. The Radioberry is an HF SDR transceiver based on the AD9866 chip. It has an operating frequency between 0 - 30 MHz, a 12-bit ADC, a maximum bandwidth of up to 384 kHz, and one RX and one TX channel. It is designed as a 'Pi hat' which means that it needs to be connected and sit on top of a Raspberry Pi single-board computer.
In his video Matt shows how to set up the Radioberry Raspberry Pi software. The process begins with installing the Raspbian OS, logging into SSH, and running the Radioberry installation script. He then shows how to connect to the Radioberry over a local network using SDR-Console V3. Later he shows how to install the pihpsdr software which gives the Radioberry a desktop control app that can be used with a LCD screen connected to the Raspberry Pi.
Matt goes on to show how he was also able to use the Radioberry TX function to make WSPR contacts across Europe from with his home location in the UK, despite its very low 150 mW output power.
Over on his YouTube channel, Simon has uploaded a video showing how while on holiday he was able to explore the various HD Radio stations available around the USA.
If you are in the USA, you might recognize HD Radio (aka NRSC-5) signals as the rectangular looking bars on the frequency spectrum that surround common broadcast FM radio signals. These signals only exist in the USA and they carry digital audio data which can be received by special HD Radio receivers. Earlier in 2017 a breakthrough in HD Radio decoding for SDRs like the RTL-SDR was achieved by Theori when he was able to piece together a full HD Radio software audio decoder that works in real-time. Nowadays you can use software like HDFM - HD Radio GUI to easily receive HD Radio with an RTL-SDR.
In his video Simon shows the various HD Radio signals he found while on holiday, and also shows some of their secondary features, including traffic data, and weather radar maps. Interestingly he also spots HD Radio in the AM bands, but finds his signal is not strong enough to decode.
The rest of the video explores other signals he finds such as a studio link, and TV audio signals.
This post is about the KrakenSDR, one of our products from our sister company KrakenRF. If you weren't already aware, KrakenSDR is our 5-channel coherent radio based on RTL-SDRs, and it can be used for applications like radio direction finding. It can be purchased on Crowd Supply.
In this update we'd like to share some of the KrakenSDR projects we've been working on, as well as various projects we've seen from our customers.
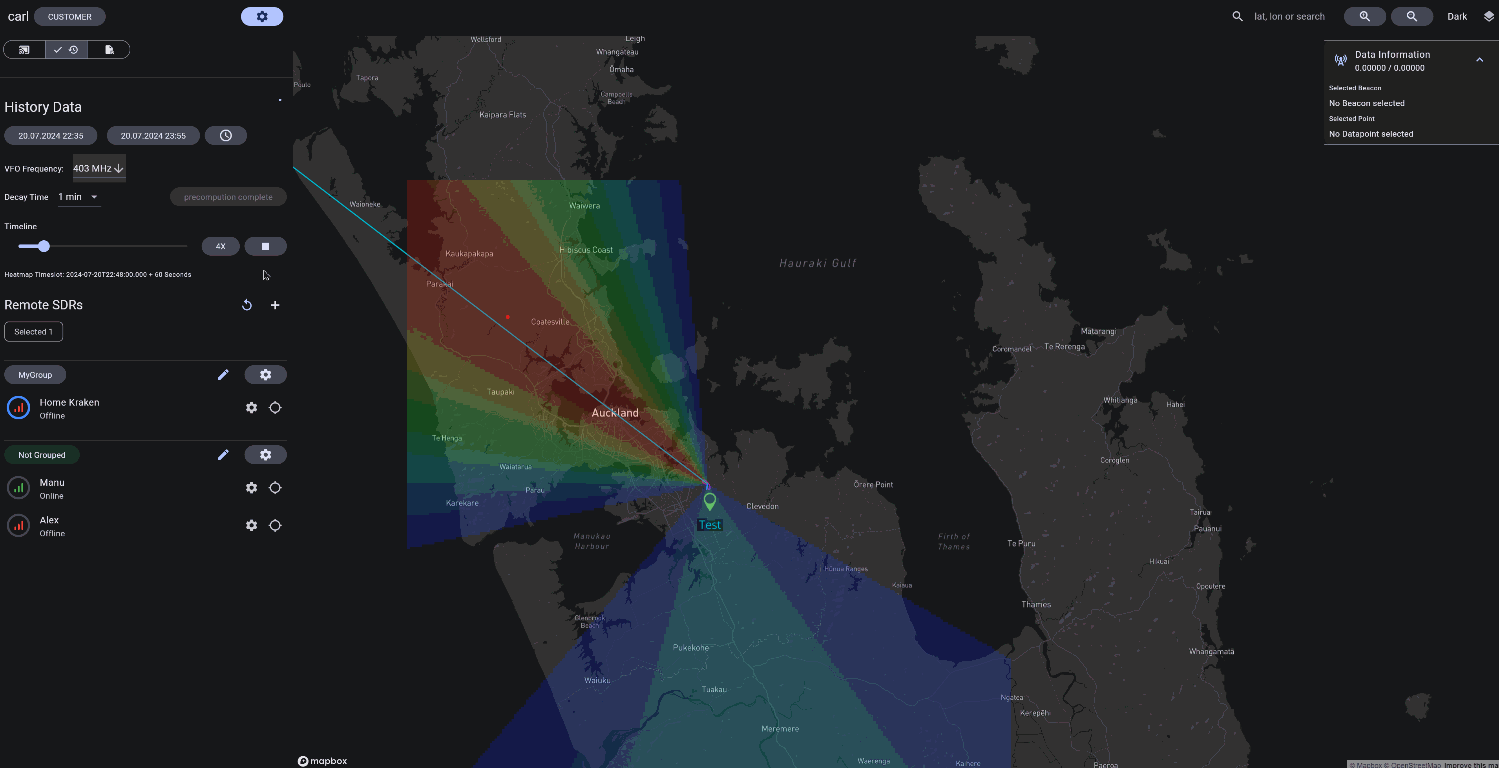
Kraken Pro Cloud Online Mapper Updates
Recently we've been working hard at improving the 'Kraken Pro Cloud' online mapper service at map.krakenrf.com. If you were unaware, this service is an online mapping application that can be used together with one or more KrakenSDRs to display their generated bearings on a map. This is useful if you have multiple KrakenSDRs at fixed sites spread out over a wide area, as it allows you to instantly triangulate. The features include:
Multiple Kraken's displaying on a single map
Display a Heatmap just like the Android App
Ability to remote control the Kraken's individually, or all together from a single interface
Ability to share your Kraken with other users
Display log files collected from the Android App or Kraken Web GUI
Recently we've added multiple new features and improved several points:
Ability to plot multi-VFO (multi frequency) data coming from a KrakenSDR
Ability to put Kraken's into groups
Improved heatmap calculation and rendering speed
Fixed a memory leak that caused the mapper to crash after several hours
Improved the history feature (see further below)
Improved the interface
We'd like to especially highlight the improvements to the history feature. The history feature allows you to look back in time and see what the bearings and heatmap at that time looked like. This is useful if you are tracking something, but don't know exactly when the transmissions occur, or are tracking a moving object, and want to be able to review data at a later time.
Currently, we are supporting up to a week of free history, but this may change depending on how much history affects server load. For full disclosure, we eventually plan on making longer history recording available, but this will likely be a paid subscription feature. The timeframe of free history provided may change in the future too.
We also added the ability to play back history at faster speeds, kind of like a timelapse. To do this the heatmaps for each interval need to be precomputed first so that the playback is smooth, and so a 'precompute' button has been added.
We also want to note again that Kraken Pro Cloud is currently in beta, and there may still be some bugs. We also do not guarantee any uptime or privacy so please do not use the service for mission critical tasks. If you encounter bugs, please report them on our forums at https://forum.krakenrf.com, or via email to thekraken@krakenrf.com.
The gif animation below shows heatmap playback at 4x speed while the KrakenSDR was tracking the bearing towards a weather balloon.
Kraken Pro Cloud Mapper History Playback
KrakenSDR Core Updates
Since the last update we have made various bug fixes and a few minor changes to the core software. We highlight some changes below:
Our images have been updated to include SignalMedic's TAK server. (More on this in a section below)
(Beta feature) Added the ability to demodulate narrowband FM to audio files. This is in beta as the audio files don't come out particularly clean sounding, but it may be useful for some.
With the release of the Raspberry Pi 5, we have now also added a Raspberry Pi 5 ready-to-use image as well. The Raspberry Pi 5 runs the KrakenSDR software very smoothly and makes the GUI very responsive. Performance is similar to the Orange Pi 5. If are are new and choosing a platform to run the KrakenSDR on, we would highly recommend the Raspberry Pi 5 now.
Recently we have been working on getting an iOS version of the KrakenSDR app out. The app is close to completing development and should be out within about a month. Once released we will update our Wiki with links to the app, or you can simply search on the iOS app store for 'KrakenSDR'
KrakenSDR Crowdsupply Conference Workshop
One of the members of our team, Syed, recently ran a workshop on KrakenSDR. The workshop had attendees put together a KrakenSDR set on a large pizza pan and had teams go out into a local park to find a hand held radio transmitter. Photos of the day can be found here.
KrakenSDR Workshop at the Crowd Supply Conference
Highlights from Customers
KrakenSDR YouTube Tutorial from Skyler F
Over on YouTube user 'Skyler F' has uploaded a great video that demonstrates and shows how to set up KrakenSDR. In the video he demonstrates him finding some cellular phone towers.
KrakenSDR Talk by KO4CEQ
We've also seen a great talk by KO4CEQ about KrakenSDR which has been uploaded to YouTube. In the talk he discusses KrakenSDR and shows his very neat car based setup.
Elektor Review of the KrakenSDR
Online store and magazine Elektor has uploaded to their blog a great review of the KrakenSDR. In the review they explain the KrakenSDR specs, and how it can be used as a regular SDR, and then go out to show how they created an antenna array and used the DoA software.
Elektor's Review of the KrakenSDR
Signal Medi's TAK Server
Thanks to 'SignalMedic' who had coded up a TAK server for KrakenSDR. TAK (Tactical Assault Kit) is software used by the military and other organizations for visualizing geospatial information such as enemy and friendly positions. Civilian versions of TAK also exist, such as ATAK for Android.
The TAK server allows for a KrakenSDR cursor to appear on a TAK map. TAK only allows for a single bearing line to show, so it's not as effective as our own mapping app, but this may be useful for customers who are only using TAK.
SignalMedic has made two implementations. One based on NodeRED, and the other based on Python. As mentioned previously, our image files now include the Python TAK server.
KrakenSDR TAK Server by SignalMedic
Aaron (aka cemaxcuter, aka creator of DragonOS) has also uploaded a video showing the TAK server in action.
Adrian's 3D Printed Antenna Spacer Arm
In the past we've highlighted Adrian's excellent 3D printed antenna spacer. The files for the 3D printed antenna spacer are available on Thingiverse.
Adrian has recently created a modified version of the arm that is significantly longer and should be able to cover 150 MHz to 1766 MHz. He also notes that he's updated the original arm to include files for laser cutting.
Dbvanhorn 3D Printed Antenna Spacer
We've also seen another 3D printed antenna spacer uploaded to Thingiverse. This file is based on OpenSCAD and allows you to customize the length to be printed.
Over the years we've posted several times about the TEMPEST applications of software-defined radio. TEMPEST aka (Van Eck Phreaking) is when you listen to the unintentional RF emissions of electronics and are able to recover information from that. In the past, we posted about TempestSDR, an RTL-SDR compatible program that allows you to view images from a computer monitor or TV simply by picking up the unintentional RF emissions from it.
Usually, the images received are fuzzy and it can be difficult to recover any information from them. However recently there has been work on combining Tempest techniques with deep learning AI for improving image quality.
Deep-tempest has recently been released on GitHub and from their demonstrations, the ability to recover the true image with deep learning is very impressive. From a fuzzy grey screen, they show how they were able to recover clear text which looks almost exactly like the original monitor image.
Deep-tempest is based on gr-tempest, and requires GNU Radio, Python 3.10 and a Conda environment. Instructions for installing it are on the GitHub.
The whitepaper on the University research done to implement Deep-Tempest can be found freely on arxiv at https://arxiv.org/pdf/2407.09717.
In one of his recent videos, Matt from the Tech Minds YouTube channel reviews the SV4401A Vector Network Analyzer (VNA). A VNA is a powerful tool that can be used for analyzing and tuning antennas, as well as other RF components such as filters and cables.
Typically we recommend the NanoVNA V2 and Nano V2 Plus 4 as low-cost VNA's that most hobbyist users will be happy with. However, the SV4401A comes with a much larger 7-inch touch screen, a nicer UI, built-in signal generator, and large frequency range spanning from 50 kHz - 4400 MHz. The price is similar to that of the Nano V2 Plus4, coming in at US$322, versus $299 for the NanoVNA V2 Plus4.
The concept behind DME is simple: the aircraft broadcasts a signal pulse, and a ground station receives and repeats the pulse back at another frequency. The aircraft receives the return pulse, and from the time it has taken to receive that return pulse, the distance to the ground station can be determined. The frequencies used are between 960 MHz and 1215 MHz, and the aircraft and ground station pulses are always spaced apart by 63 MHz.
In his post, Daniel explains how he records the two signals spaced 63 MHz apart using his LimeSDR. Recording this large bandwidth has some challenges since typically the LimeSDR only supports a bandwidth of 61.44 MHz, which is too small for the 63 MHz spacing. However, Daniel explains in his post how he got around this limitation by using the two RX channels on the LimeSDR, sampling at a higher 80 MSPS sample rate, and then using the LimeSDR DSP to downconvert and decimate each DME channel to 2.5 MSPS, making the final sample rate small enough to be sent over USB.
The rest of the post details his experiments, analysis, and results when receiving the two DME channels through GNU Radio.
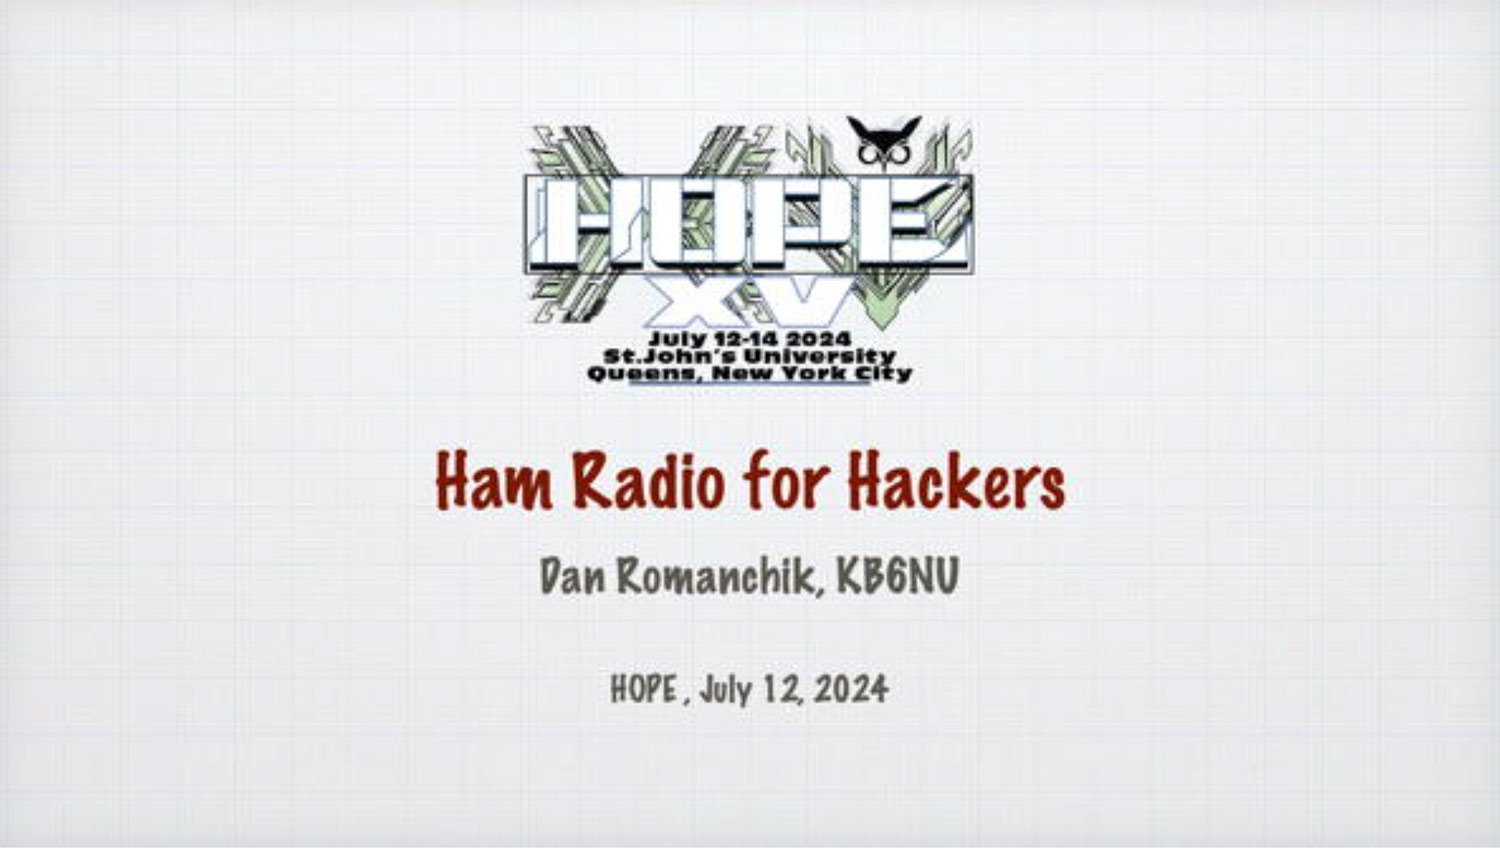
Over on Hackaday we've seen a post about Dan's (KB6NU) talk at the HOPE (Hackers of Planet Earth) conference about how Ham radio can be for hackers, and how hackers are the future of ham radio. Hackers in this context mean people who enjoy experimenting with electronics, building stuff, and understanding how things work.
Dan's slides have been uploaded on his blog. The slides emphasize how ham radio is not only about the traditional thought of making contacts which is probably in most people's heads, but also about hacking radios, antennas, microcontrollers, satellites, pico balloons, digital communications, GNU Radio and more. Dan mentions his goal is to promote ham radio to the much younger hacker crowd, where he believes it is underrepresented.
Last year the RFNM (RF Not Magic) software-defined radio was announced and opened up for pre-orders. RFNM is an SDR based on the new 12-bit LA9310 baseband processor chip, and together with either a 'Granita' or 'Lime' daughter board it is capable of tuning from 10 - 7200 MHz or 5 - 3500 MHz respectively. It is also capable of wide bandwidth - up to 153.6 MHz on a host device like a PC. The RFNM is affordable, costing US$299 for the motherboard, US$179 for the Lime board, and US$249 for the Granita board. Currently, the second production batch is available for preorder.
Recently we received our RFNM order, with both Granita and Lime boards. This is a review of our initial impressions and tests on it. Note that while the RFNM is capable of transmitting, in this review we did not test that capability.
Physical Review
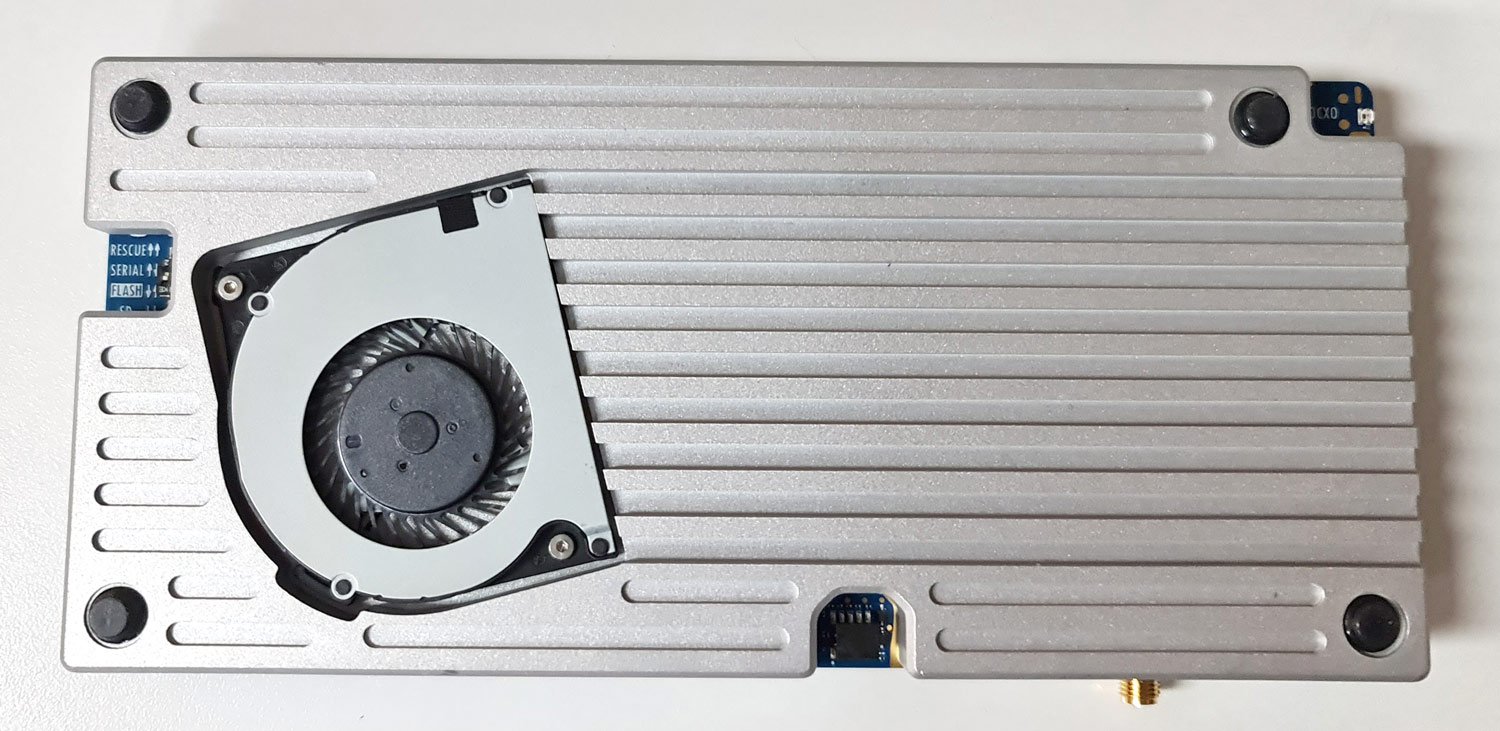
The RFNM motherboard comes as a PCB with a large heatsink on the bottom and a very quiet inline fan. The daughterboards connect to the motherboard with a board-to-board connector and are secured in place via seven screws. There is another board-to-board connector for a second daughterboard to be connected, but in this review we did not test it.
On the right side there is a 4-18V DC barrel power jack and USB-A, USB-C, HDMI and Ethernet connectors. There is also a SIM card and SD card slot on the side. On the left of the board are MMCX connectors for external reference clock, and clock out. There are also various header pinouts for PPS OUT/IN, UART, I2C, GPIO and PWM. On the heatsink side there is a JTAG connector, jumpers for resetting the firmware, and pads to solder on an OCXO.
RFNM Motherboard and DaughterboardsRFNM bottom with heatsink, fan and rubber feet.
The device feels solid but there are a few exposed SMT components on the rear that have the potential to be knocked off with rough handling. All the main connectors are through-hole soldered and will not break off easily. During operation, the heatsink stays warm to the touch, and does not get too hot. The fan blades are exposed but should be safe from fingers and debris being on the bottom.
Initial Firmware Download
The device requires power from a 4 - 18V DC barrel jack and connects to a PC via a USB-C or USB-A port. According to the developer, it requires a 10-15W capable supply. In the tests below we used a 9V 2000mA switch mode supply, and a 12V 3000mA capable linear supply.
The device comes shipped without firmware, and the first setup step involves plugging in an internet-connected ethernet cable to automatically download and install the latest firmware. If you don't have an internet connected ethernet cable, an alternative is to plug in a USB stick with the latest firmware installed on it. The firmware installation took only a couple of minutes and went smoothly.
Initial Tests with SDR++
The easiest way to get something working with the RFNM is to use the custom SDR++ build included on the RFNM itself. When you plug in the RFNM it shows up on your PC as a disk drive, with an SDR++ folder. Getting started is as easy as running that SDR++ exe and clicking Play.
Initially, we encountered an issue where the RFNM wouldn't show up in SDR++, and wouldn't show up as a disk either. However, after flipping the USB-C connector it worked. This is an issue that continued throughout, and sometimes flipping wouldn't even work, but it always connected after a few reconnection attempts, and once the board was connected it was stable.
Lime Daughterboard Tests
We first tested the RFNM with the Lime daughter board. This is a board based on the Lime LMS7002 chip which is the same chip used in the LimeSDR. Here only the IQ output of the Lime chip is used, not the ADCs.
At this point, it's important to note that software support for the RFNM is still in the very early stages and SDR++ currently has no gain controls implemented. SDR++ is third-party software to RFNM so it's not any fault of the RFNM team. (NOTE: In the last few days after having already written this review, there have been several commits to SDR++ regarding RFNM, so this may already be resolved)
However, it is possible to SSH into the Linux OS system running on the RFNM system and change the gain setting through a bash command. To connect to SSH a network-connected ethernet cable needs to be connected to the board (alternatively you can use the UART port on the side of the board with an adapter). Once logged in via SSH we can browse to "/sys/kernel/rfnm_primary/rx0" and edit the value in the 'gain' text file. Then to activate the changes, simply set the value in the 'apply' text file to 1. This allowed us to optimize the gain settings for best reception.
cd /sys/kernel/rfnm_primary/rx0
echo 30 > gain && echo 1 > apply
RFNM with Lime daughterboard on the WiFi bandsRFNM with Lime daughterboard receiving mobile basestation signals.
With the ability to set the gain, the Lime board works great. Signals are strong in the VHF and UHF bands where sensitivity is approximately -135 dBm, and there is little sign of imaging with appropriate gain settings. In the 2.4 GHz band, the sensitivity remains good at around -130 dBm too. Although the advertised max frequency range is 3500 MHz, we were able to receive up to about 3.85 GHz with reduced sensitivity.
On HF, however, the Lime board performs very poorly. We start to see a drop off at around 50 MHz where the sensitivity is roughly -93 dBm, at 30 MHz about -58 dBm, and 15 MHz about -37 dBm.
Granita Daughterboard Tests
In the second test, we removed the Lime board from the RFNM motherboard and installed the Granita daughterboard. The Granita daughterboard is based on an Arctic Semiconductor 'Granita' chip, an RFFC2071A mixer, and several preselectors.
Unfortunately, we are very disappointed in the performance of Granita as there is very significant imaging of signals, and this wipes out the ability to cleanly receive almost every band. According to Davide, this problem is a firmware issue with the Arctic Semiconductor Granita chip that can maybe be fixed in the future, but there is no guarantee that it is fixable, as any fix is at the mercy of the Arctic Semiconductor, who don't seem to be very responsive to the issue. Davide (creator of the RFNM) writes:
In the Lime board, the IQ LPF works properly. For granita, it doesn’t work at all, like the -3 dB point of the 20 MHz LPF option is 100 MHz+. The manufacturer of the RFIC kept saying that this is a firmware bug, so I gave them a devkit to replicate, but they never fixed it over the last month. I don’t know at this point if this is a software problem or if they discovered it’s something more.
We confirmed that adjusting the gain settings on Granita did not help with the imaging problem either.
Heavy imaging was experienced with Granita (compare this to the true WiFi spectrum shown previously with the Lime board).
We also noticed that Granita was picking up or internally generating significant noise spikes. We initially assumed this was from the 9V SMPS, but even with a 12V linear power supply similar spikes were seen. The same noise was not visible with the Lime board.
Granita unknown noise spikes
Sensitivity in the bands above 600 MHz was good, at around -135 dBm. Below 600 MHz where the mixer is used, sensitivity was a bit poorer at around -123 dBm. The highest frequency we could receive was around 5900, but after about 5 GHz signals started to become very weak. The Granita board is advertised as receiving 10 - 6300 MHz, however, the documentation notes that the current batch is only capable of tuning to around 5 GHz. They note that the next batch should reach 6.3 GHz.
The Granita board was able to receive broadcast AM, shortwave, and ham frequencies with good signal strength. At 15 - 50 MHz the sensitivity is roughly -115 dBm.
Granita receiving the 0 - 15 MHz.
At the time of this review, we cannot recommend that anyone purchase the Granita board unless they are working in a very controlled environment. We hope that in the near future the IQ LPF problem can be fixed to make the Granita board usable.
GNU Radio Tests (Windows)
The file drive on the RFNM also comes with a Soapy driver available. We copied the RFNMSupport.dll file from the RFNM drive over to our GNU Radio radioconda installation's SoapySDR folder at C:\Users\proje\radioconda\Library\lib\SoapySDR\modules0.8. Then we opened GNU Radio and opened the gnuradio_example.grc file. This brings up a FFT and waterfall display like in SDR++ and with the Gain controls exposed. With the gain controls exposed the Lime + RFNM combination works great.
The daughterboards also have built-in antennas that can be switched in or out using a drop down box in the GNU Radio UI. The built-in antenna on both boards is a Pulse W3796 which has an advertised range of 698 MHz to 2.7 GHz. While the built-in antenna works well for nearby bench reception, we preferred to still use our outdoor dipole antenna for better reception.
153.6 MHz Bandwidth Mode
It's possible to set the RFNM to provide even more bandwidth by connecting two USB cables to the PC. That gives us up to 153.6 MHz of 12-bit data. Enabling this mode requires editing a variable via the terminal
Once this was set we were able to edit the samp_rate block in the GNU Radio example, and set it to 153.6 MHz. At the moment the current SDR++ does not support the 153.6 MHz sample rate.
RFNM Running 153.6MHz in GNU Radio.
Conclusion
It's clear that the RFNM is cutting edge, yet affordable, and has great potential and excellent features and specifications. The built-in processor, DSP and GPU capabilities on the RFNM could be game changers in the near future. However, at the time of this review, the software support is still in its very early stages, documentation is lacking, and it's not yet recommended for mainstream users who just want to plug in and get started with an SDR for listening and decoding signals.
Regarding the Granita daughterboard, we would probably hold off on purchasing this until there is some clarification on the IQ LPF fix.
If you are an advanced SDR user who is comfortable with GNU Radio, Linux and advanced applications like setting up and running mobile basestations, then the RFNM may be a good choice. We are looking forward to applications that make use of the onboard DSP and GPU capabilities.
In one of her latest videos on YouTube, Sarah from the SignalsEverywhere channel shows how we can use a program called "IZ8BLY Phase 3D (AO-4) Satellite Decoder" to decode the 'Mid-Beacon' on the QO-100 satellite. QO-100 is a commercial geostationary communications satellite that also contains a popular transponder for amateur radio.
However, there is also an interesting beacon called the mid-beacon that can be decoded, which provides some information about the satellite. In the video, Sarah shows how this beacon can be decoded with the software from IZ8BLY. As QO-100 is only visible from Europe, the Middle East and Africa, Sarah uses a WebSDR to receive the signal from the USA, then pipes the audio into the IZ8BLY decoder via Virtual Audio Cable.
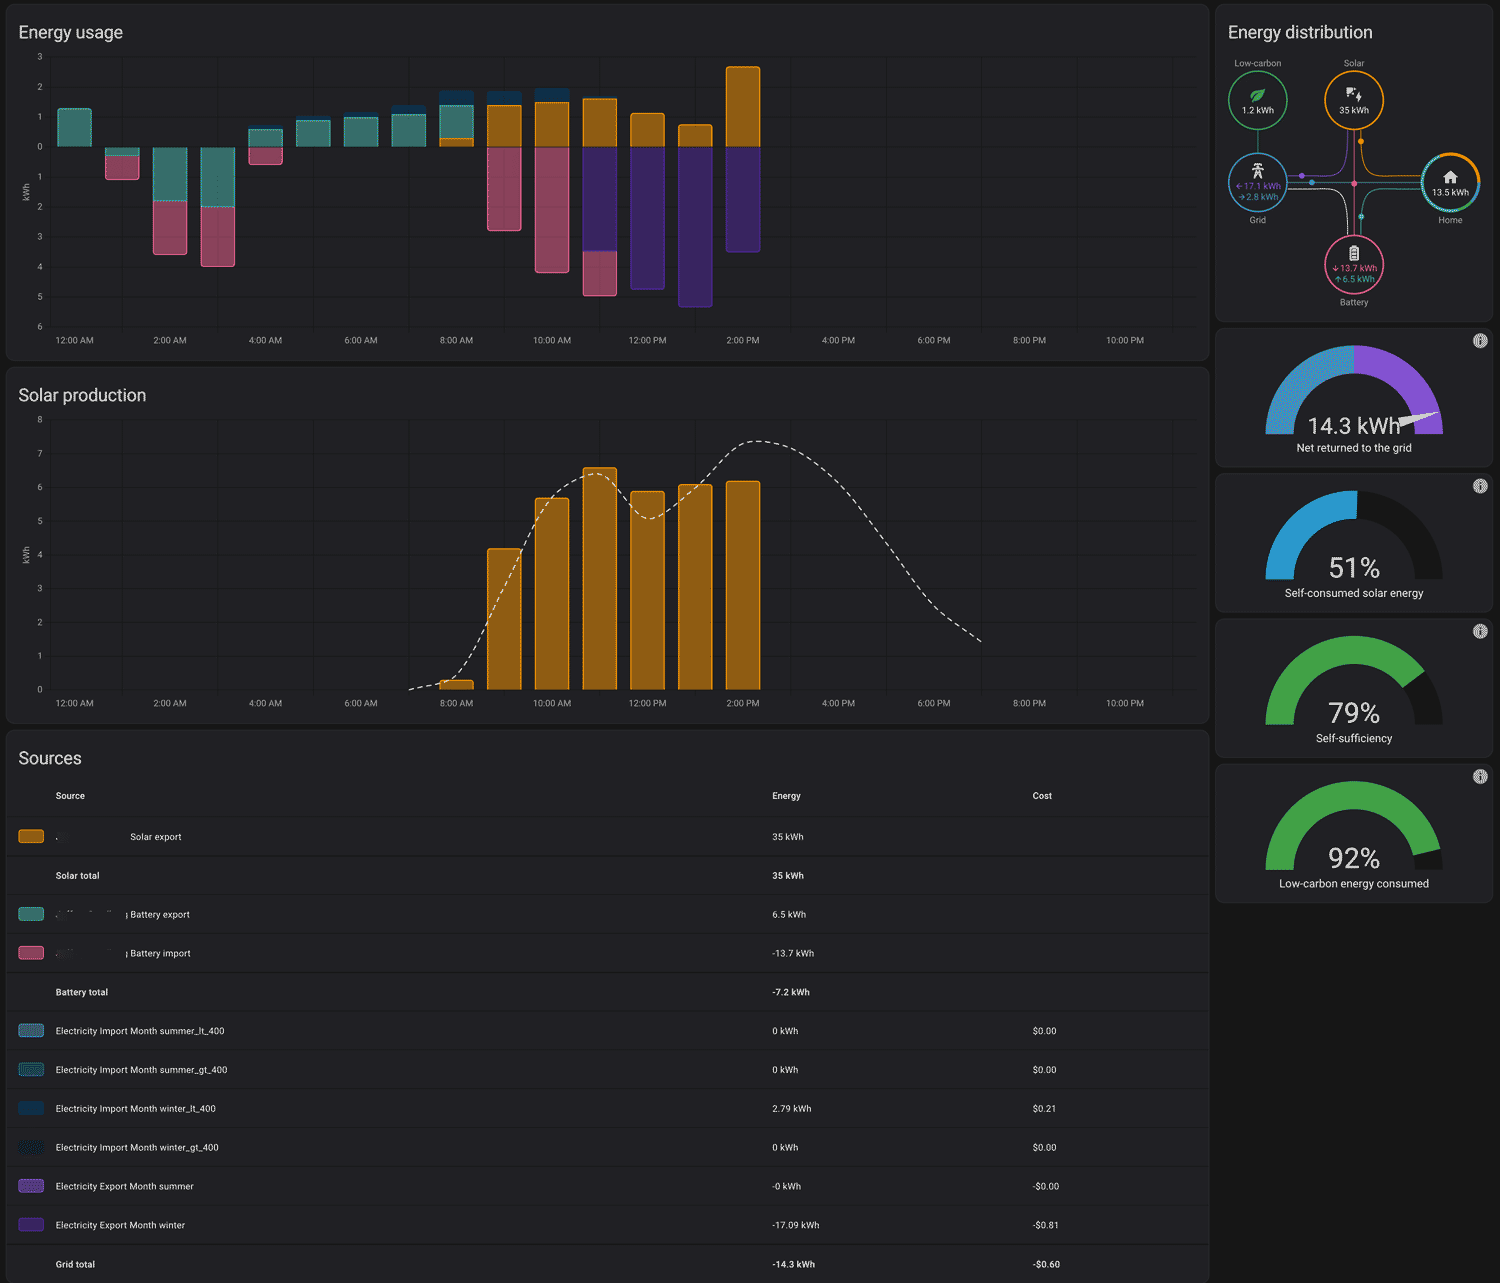
Over on his blog Jeff Sandberg has posted a writeup detailing how he combined RTL-SDR, rtl_amr, and HomeAssistant to decode wireless data from his Itron power meter, and create useful graphs showing his US home's power usage.
In the post, Jeff explains how he uses an RTL-SDR Blog V4, HomeAssistant, EMQX, and rtl_amr to receive and plot the data. The RTL-SDR and rtl_amr software receives and decodes the wireless Itron electricity meter data packets, and then EQTT passes the data to HomeAssistant for logging and plotting. Jeff also notes how he used NodeRed to correctly automate the summer and winter tariff price changes.
Finally, in an update to the post Jeff mentions that he was also able to receive and log data from his gas meter.
HomeAssistant energy dashboard with data received from an RTL-SDR and rtl_amr decoder.
Last month we posted about Aaron's video on Meshtastic, and how it's possible to decode the Meshtastic protocol using an RTL-SDR and GNU Radio project called Meshtastic_SDR.
If you weren't aware, Meshtastic is software that enables off-grid mesh network based communications and can run on cheap LoRa hardware. The mesh based nature of the system means that communications can be received over long distances, without any infrastructure, as long as there are sufficient Meshtastic nodes in an area that can route the message to the destination node. One example application of Meshtastic is to use it as a mesh-based text messaging system. This might be useful for teams of hikers, pilots, or skiers who operate in remote areas without cell phone coverage.
In his latest video, Aaron shows how Meshtatsic_SDR can also be used to transmit the Meshtastic Protocol using a transmit capable SDR like the HackRF. Aaron writes in the video description:
In this video, we take a deeper dive into the setup and usage of the meshtastic_SDR repository, which now enables the transmission and reception of Meshtastic using Software Defined Radios (SDRs). Recent updates have made this possible by partially leveraging GNU Radio flow graphs for both RX (receive) and TX (transmit), and integrating Python scripts that connect to ZMQ sources for message input and ZMQ outputs for message decoding.
I demonstrate the setup using a HackRF for the transmit side and an Airspy R2 for receiving. We also verify the results of TX and RX using a standard Meshtastic receiver to ensure accurate performance.