❌

Normal view

There are new articles available, click to refresh the page.
Before yesterdayowenduffy.net

CMRR and transmitting antennas

By: Owen
11 August 2024 at 00:33

Since the widespread takeup of the NanoVNA, a measure of performance proposed by (Skelton 2010) has become very popular.

His measure, Common Mode Rejection Ratio (CMRR), is an adaptation of a measure used in other fields, he states that he thinks the application of it in the context of antenna systems and baluns is novel and that β€œCMRR should be the key figure of merit”.

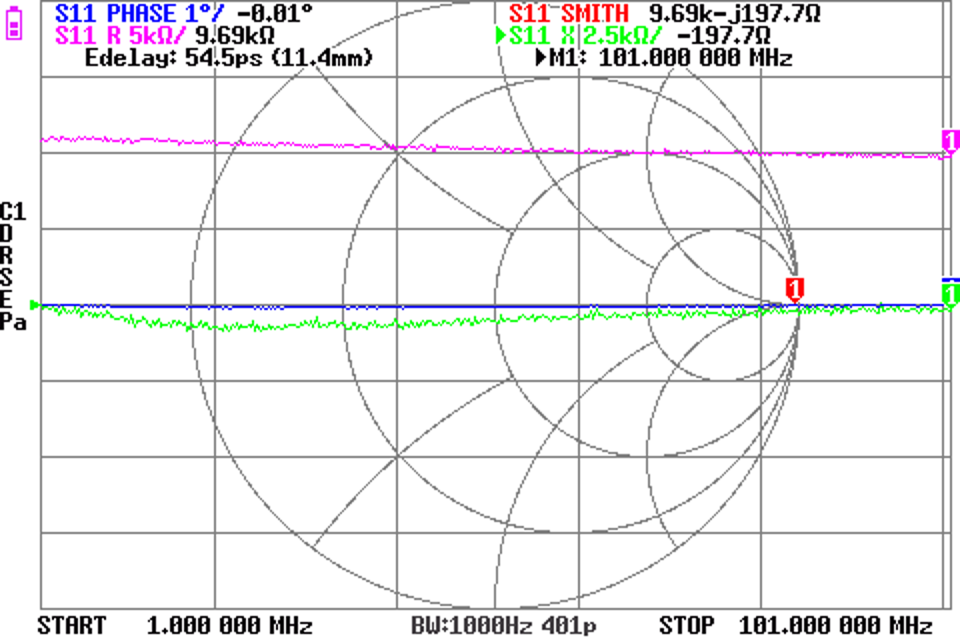
Skelton talks of different ways to measure CMRR, but essentially CMRR is a measure of the magnitude of gain (|s21|) from Port 1 to Port 2 in common mode, with the common mode choke (or balun) in series from the inner pin of Port 1 to the inner pin of Port 2.

Note that this is the same connection as used for series through impedance measurement, but calculation of impedance depends on the complex value s21.

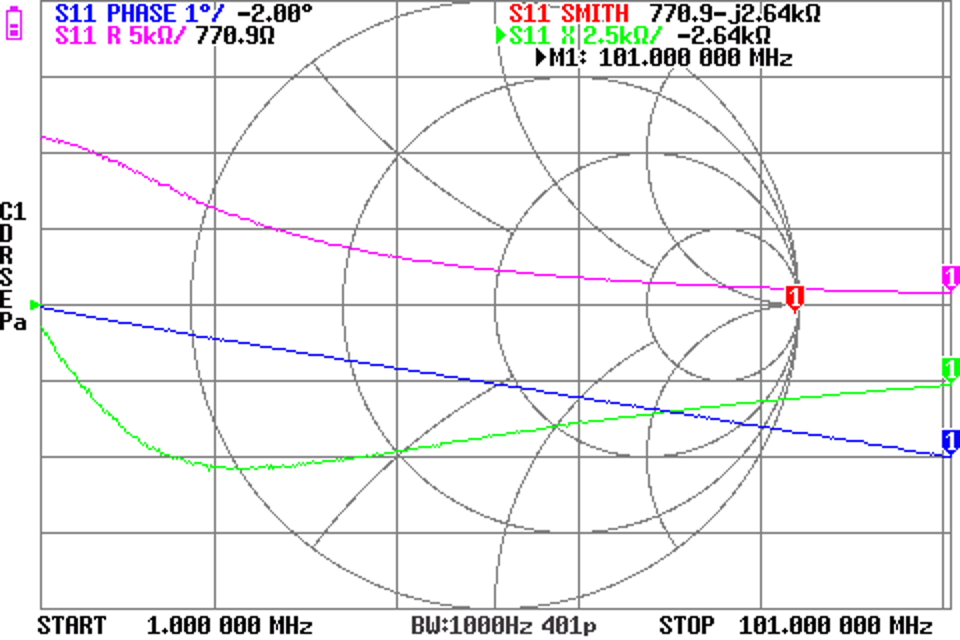
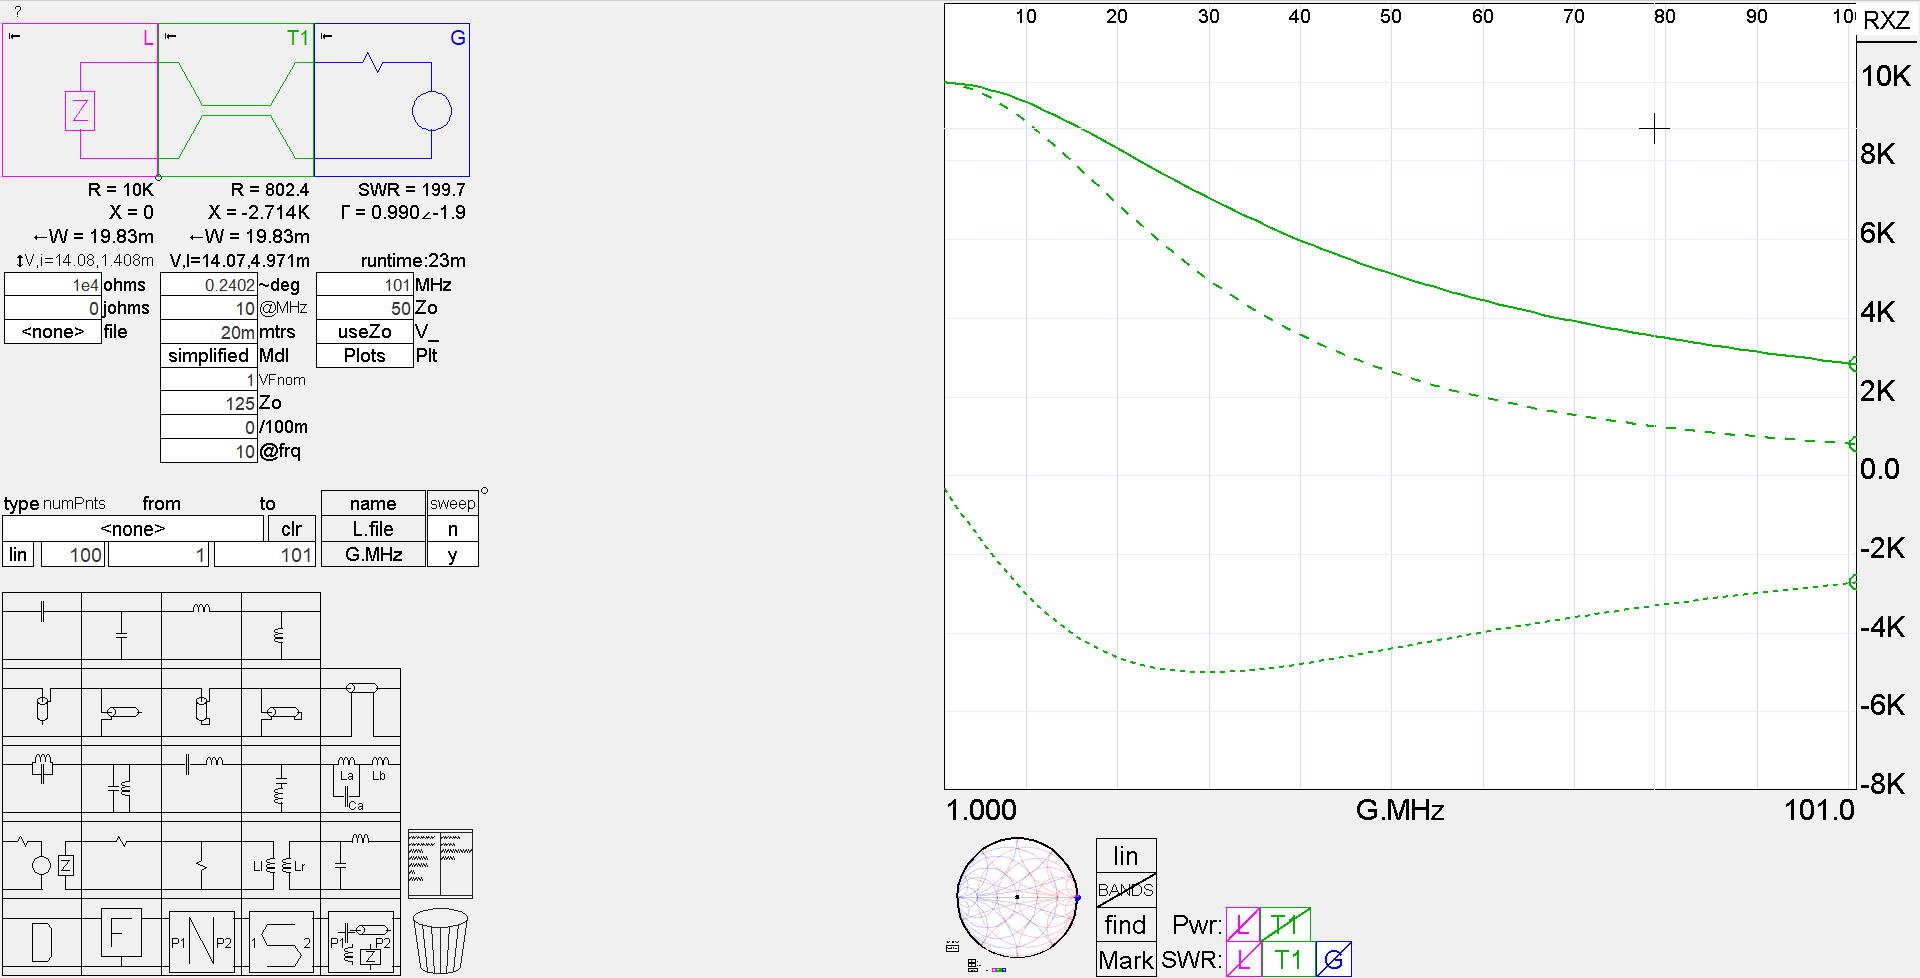
Above is capture of a measurement of a Guanella 1:1 common mode choke or balun. The red curve is |s21|, the blue and green curves are R and X components of the choke impedance Zcm calculated from s21.

Matched vs mismatched DUT

Case 1: impedance matched DUT

In this type of test, the DUT between Port 1 and Port 2 is a good match to both Port 1 and Port 2.

Lots of readers will understand that if they connected a long piece of 50Ξ© coax between Port 1 and Port 2, and measured |s21|=-6dB, that it is reasonable to say that the cable appears to have an attenuation or loss of 6dB for that length. Further, that the current into Port 2 is exactly half of that out of Port 1… the current has been β€œattenuated”.

If the DUT is deployed in another matched scenario, you would expect to observe similar behavior, including attenuation.

Case 2: impedance mismatched DUT

In this type of test, the DUT between Port 1 and Port 2 is not a good match to both Port 1 and Port 2.

For example, the matched DUT case does not apply if you made an electrically short connection between ports using a series resistor, the current from Port 1 to Port 2 is approximately uniform. If the DUT is a electrically short inductor, capacitor resistor, or combination with only two terminals, one connected to Port 1 inner and the other connected to Port 2 inner, the same thing applies, the current into Port 2 is approximately equal to the current out of Port 1, the current has NOT been β€œattenuated”.

If the DUT is deployed in another undefined mismatched scenario, you should not expect to predict behavior based on the simple |s21| measurement.

Interpretation of the |s21| plot above

The widespread interpretation of |s21| for the balun test described above is that it is a plot of the common mode current attenuation property of the balun.

That is deeply flawed, very popular, but deeply flawed. The measurement is of the type discussed under Case 2 above, and the two terminal DUT does not possess some intrinsic attenuation property independent of its measurement context.

Interpretation of the plotted series through R,X derived from the complex s21 measurement, so-called series through s21 impedance measurement

It is popularly held that it is valid to measure common mode impedance (Zcm) by this technique, superior even by many authors… but let’s stay with valid for the moment.

The calculation of series through impedance from s21 depends on an assumption that the current into Port 2 is exactly equal to that out of Port 1, there must NOT be any reduction or attenuation of current in the test setup, otherwise the results are invalid.

Properly executed, this IS a valid technique for measuring Zcm… and one of the necessary conditions is that there is no reduction in current from Port 1 to Port 2.

So, you cannot accept the common technique for series through s21 impedance measurement and at the same time entertain the concept of a matched attenuator DUT.

Bringing it all together

Let’s explore the system response using three terminal measurement of the antenna system impedance and the balun measured above.

Working a common mode scenario – VK2OMD – voltage balun solution reports a three terminal impedance measurement of an antenna system at 3.6MHz.

This following presents calculation of some interesting balun / drive scenarios based on those measurements and Zcm of the balun reported above, and repeated here for convenience.

Above, an identical balun was measured to find |s21| of the balun in common mode. Also shown is the s21 series through measurement of Zcm.

The oft touted CMRR is + or – |s21|, depending on the author and their self defining measurement. Let’s take Skelton’s definition and call CMRR for this balun 29.4dB.

Let’s list the key configuration parameters:

  • frequency=3.6MHz;
  • drive voltages V1 and V2 are not perfectly balanced as detailed in the table below;
  • other key parameters are listed in the table.

Above is a table showing for each configuration, the magnitude of the total common mode current |2Ic|, |2Ic| relative to the No balun baseline configuration, differential current |Id|, and |2Ic/Id| as a percentage.

Note that these currents are potentially standing waves, and they are measured at the antenna entrance panel, about 11 m of two wire feed line from the dipole feed point.

You might ask in respect of the total common mode current:

  1. is the no balun result surprising?
  2. is the current balun performance surprising?
  3. is the voltage balun performance surprising?
  4. does the measured CMRR of 29.2dB imply the reduction in common mode current due to the current balun of 24.3dB?
  5. what does the measured CMRR infer?
  6. can the CMRR be used in an NEC model of the system scenario?
  7. can Zcm be used in an NEC model of the system scenario?

References

  • Agilent. Feb 2009. Impedance Measurement 5989-9887EN.
  • Agilent. Jul 2001. Advanced impedance measurement capability of the RF I-V method compared to the network analysis method 5988-0728EN.
  • Anaren. May 2005. Measurement Techniques for Baluns.
  • Skelton, R. Nov 2010. Measuring HF balun performance in QEX Nov 2010.
Last update: 11th August, 2024, 10:33 AM

Some useful equivalences of very short very mismatched transmission lines – a practical demonstration

By: Owen
10 August 2024 at 10:44

This article presents a simple practical test of the concepts laid out at Some useful equivalences of very short very mismatched transmission lines.

Above is the DUT, it is a short circuit at the end of 102mm of two wire transmission line with VF=1, conductor diameter 0.47mm and 5mm spacing.

The transmission line is not perfectly uniform, but sufficiently good for this demonstration.

We are going to use port extension or e-delay to adjust the reference place to the short circuited end of the transmission line.

Let’s calculate Z0 and propagation time and phase length at 10MHz of the nominal transmission line. It is chosen for this example because it has a VF very close to 1, and is easily physically measured and parameters calculated.

RF Two Wire Transmission Line Loss Calculator

Parameters
Conductivity 5.800e+7 S/m
Rel permeability 1.000
Diameter 0.000470 m
Spacing 0.005000 m
Velocity factor 1.000
Loss tangent 0.000e+0
Frequency 10.000 MHz
Twist rate 0 t/m
Length 0.102 m
Zload 1.000e-99+j0.000e+0 Ξ©
Yload 1.000e+99+j0.000e+0 S
Results
Zo 369.31-j2.78 Ξ©
Velocity Factor 1.0000
Length 1.225 °, 0.021 ᢜ, 0.003402 λ, 0.102000 m, 3.402e+2 ps
Line Loss (matched) 1.41e-3Β dB
Line Loss >100Β dB
Efficiency ~0 %
Zin 1.198e-1+j7.953e+0 Ξ©
Yin 0.00189307-j0.12570620 S
VSWR(50)in, RL(50)in, MML(50)in 428.02, 0.041 dB 20.314Β dB

So, Z0=369Ω, and its propagation time is 340ps one way, two way is 680ps, βl=0.021ᢜ.

Using the theory set out in Some useful equivalences of very short very mismatched transmission lines, we can calculate the e-delay that should refer the reference plane from Port 1 connector to the end of the transmission line section.

\(\frac{\beta l Z_0}{50}=0.155\), so this is just above the limit of 0.1 radians for best accuracy, but the results should still be good enough visually.

\(edelay_{50}=edelay_{Z_0} \frac{Z_0}{50}=680 \frac{370}{50} \text{ ps}=5.03 \text{ ns}\\\)

Let’s estimate Z0 from the impedance of the short circuit stub.

\(Z_0=\frac{X}{\tan (\frac{2 \pi l f}{C_0})}=\frac{8.0}{\tan (\frac{2 \pi \cdot 0.102 \cdot 1e7}{299792458})}=374\), that measurement based value reconciles well with the calculation above.

Let’s plot the phase of s11 SOL calibrated at the Port 1 connector.

Above, phase looks fairly linear, but in fact it departs a little from linearity above about 6MHz, more so as frequency increases.

Above is application of e-delay adjusted to obtain an almost flat phase response to 10MHz. Never mind the phase wrap, but note there is a very slight upward slope in the upper part of the trace (obvious when the marker is swept over the area).

Above is the sweep from 1-11 MHz with e-delay adjusted to 5.05ns. The trace looks very flat, sliding the marker around shows it to be pretty good. This reconciles well with the calculated e-delay of 5.03ns.

Conclusions

Port extension within the limits discussed at at Some useful equivalences of very short very mismatched transmission lines. can provide an accurate, convenient and useful technique for referral of the reference plane without doing a full SOL calibration at that point.

Last update: 11th August, 2024, 11:02 AM

NanoVNA-H4 radio remote trial #6 – HC-05 Bluetooth matured

By: Owen
9 August 2024 at 20:11

NanoVNA-H4 radio remote trial #1 – HC-05 Bluetooth described intial tests on a Bluetooth remote connection to a NanoVNA-H4 using an inexpensive HC-05 adapter by hc01.com.

UART connector

For more convenient access to the UART pins, I installed a SIL 6w female header and cut a 3x18mm opening in the back for access.

I have seen reports that the Bluetooth module can be fitted inside the case. At this stage I am reluctant to do that for several reasons, EMC being one, and a convenient means of turning the power off to the Bluetooth module is another (it might be useful if one of the IO pins signaled that the UART interface was selected).

NanoVNA firmware changes

Dislord made changes to add compression of the screenshot data transfer using a run length encoded (RLE) compression scheme (the capture rle command). This reduced the size of the data transfer from 300kB to around 50kB depending on screen content, and made transfers over a 38400pbs link practical.

Data channel error analysis

The data channel is the path from the NanoVNA to the receiving application software.

NanoVNA UART

The NanoVNA’s UART port is a simple three wire serial port (GND, Tx, Rx) with ASYNC encoding. There is no hardware flow control, no error detection.

The prototype used a short unshielded connecting cable for GND, Tx, Rx, and Vcc.

If the connecting cable is short, there should be only a very small risk of bit errors. That may be worse if the system is subject to high intensity electromagnetic fields.

Simple bit errors that do not result in loss of an entire byte will corrupt the data, and those corruptions to some bytes of the encoded data may be detected as invalid values. Some bit errors will go undetected and be carried through as corruptions of the decoded image. This is no means provided in the data to detect the latter condition.

Bluetooth link

The Bluetooth link segment provides a reliable link at potentially very high air speed. I say potentially as it is a radio path subject to interference and loss of signal strength due to obstructions and excessive path length.

There should not be data corruptions over the Bluetooth link itself, but overrun of the input buffer is an issue.

Whilst the HC-05 appears to contain a sizeable input buffer, it is not sufficient to hold the entire screenshot transfer and so there is a risk of buffer overrun if the Bluetooth channel throughput slows. Buffer overruns would result in loss of complete bytes, one to many.

Loss of complete bytes will very likely result in failure to decode the RLE structure.

Receiving application

Because the end to end link is not a β€˜reliable link’, the way in which the receiving application handles apparently lost or corrupted data is important, and there is no β€˜standard’ way to do that.

Conclusions

The HC-05 Bluetooth solution is usable. Screenshots are practical with later firmware that supports compressed image files.

At the limits of radio coverage, communications timeouts will make the link unusable.

Last update: 10th August, 2024, 7:57 AM

Using your NanoVNA-H4 for Zref other than 50Ξ©

By: Owen
8 August 2024 at 21:37

An online expert recently promoted this way of using a NanoVNA on 600Ξ© lines: Normalizing the NanoVNA for any characteristic impedance.

Essentially, he calls for SOL calibrating the VNA with the L or LOAD being a 600Ξ© resistor.

This does have the effect of β€˜correcting’ all s11 measurements to be wrt Zref=600Ξ©, but most of the calculations of derived values like R, X, etc are wrong.

Above is an example where the NanoVNA-H4 was calibrated with LOAD=470Ξ©, and then that resistor measured. Note the |s11| is very small, it is correct. The Smith chart locus is a dot in the middle of the chart, it is correct… but the Smith chart marker legend shows Z=49.96-j0.0206Ξ© which is a gross error, it should be very close to 470Ξ©.

The instrument assumes that s11 measurements are wrt 50Ξ©, and this β€œtrick” does not consistently transform the measurements to the desired reference impedance.

So, in summary, while this does centre the Smitch chart on the impedance used for the LOAD, and some other displayed data is correct, some displayed data is grossly wrong, and many available displays are grossly wrong.

There is a better way…

There are many variants of NanoVNA-H4 firmware, and each in many versions. Some may incorporate the β€œPORT-Z” transformation shown below, some may not.

Above is a NanoVNA-H4 using Dislord’s NanoVNA-D reporting v1.2.37. This version was downloaded as beta firmware and might not be generally available. Competetive variants might have the same feature.

The VNA was SOL calibrated with a LOAD=50Ξ©, and the PORT-Z set to 470 to change the reference Z for calculation of related displays.

Note the chart is centred on 470Ξ© (the DUT resistor), the marker legend shows 467-j5.057Ξ©.

So if you want to present the measurements wrt some impedance other than 50Ξ©, this is the better way to do it.

A similar feature exists in lots of one port antenna analysers, some allowing selection fromΒ a small set of alternative references.

Last update: 9th August, 2024, 3:16 PM

Mains (230VAC) DC power supplies for ham radio equipment – AU

By: Owen
8 August 2024 at 01:34

One sees a lot of discussion on social media of 12VDC power supplies for ham radio equipment. Some of the recommendations are unsafe.Β  Bear in mind that the user could well be a young person with little knowledge and experience and unsafe equipment may put not just themselves at risk of electrocution, but other members of the family / household, people who might try to rescue them.

Firstly, before someone rushes to correct me on the matter of 230V:

The nominal mains input supply voltage in Australia in accordance with AS 60038 is now:

  • 230 volts AC Single phase with a tolerance range of + 10% to – 6%
  • 400 volts AC Three phase with a tolerance range of + 10% to – 6%

NSW has laws / regulations requiring approval of some electrical articles to protect end users and others. A quote from Explanatory Notes -For the approval and sale of electrical articles in New SouthΒ  Wales July 2024:

2.1 Definition of β€˜Sell’
β€œSell” includes auction or exchange; offer, agree or attempt to sell; advertise, expose, send, forward or deliver for sale; cause or permit to be sold or offered for sale; hire or cause to be hired; and display for sale or hire. The laws apply to any person who sells an electrical article and includes the manufacturer or importer and any on-seller. The compliance requirements of electrical articles at the time of sale reflects the current applicable product standard as revised or amended. It’s important that traders effectively manage their
compliance obligations by ensuring that inventory is controlled and that the valid approval status and compliance of this stock is maintained. A person’s obligation under Section 8 of the Act is at the
time the article is sold (for example to a retailer). Once sold it is the obligation of the current holder of the stock for any further sales.
2.2 Declared articles
In order to sell declared articles in New South Wales, the articles must:
1. Be approved as compliant to use prior to sale, evidenced by a NSW Fair Trading Certificate of Approval (or by an accredited Recognised External Approval Scheme.)
2. The approval process must demonstrate that the electrical article meets all relevant Australian Standards and any further requirements that may apply. This process includes the testing of these articles by accredited laboratories.
3. Be marked with the NSW approval mark or an approved alternate mark (see 3.3.)
4. Definitions of declared articles and their associated safety standard/s are attached

Battery chargers and Extra Low Voltage supplies are declared articles.

States each make these regulations, this is NSW but similar regulations apply in other states.

Note that you do not have to be a commercial seller to be in scope of these regulations, read the definition of β€œsell” carefully.

Some equipment recommended by online experts is actually a power supply component intended to be incorporated into some larger piece of equipment, and enclosed in a way that prevents accidental contact with live conductors / terminals / parts, and they would never obtain the approval necessary to be sold as an ELV power supply article.

Online market places offer a wide range of battery chargers and ELV power supplies, many of which may not have the required approvals. Similarly Chinese online market places are likely to offer equipment that does not have the required approval.

There are retail sellers of approved ELV power supplies suited to ham radio equipment.

Last update: 9th August, 2024, 7:10 AM

A short comparison of the latest BLHeli_S with SimonK / tgy (~2017)

By: Owen
7 August 2024 at 20:51

This article repeats some earlier tests on two competitive ESC firmwares for sensorless brushless DC motors.

The motor chosen for the tests, a 4822-690KV, is of a type that is very popular; a flat radial flux outrunner with high pole count. These are marketed as more suitable to multi-rotors that the barrel shaped motors developed for planes, but the claims are questionable, these motors are often at higher risk of sync loss due than the barrel shaped motors and used feature regularly in forum postings of de-sync problems.

The articleΒ Demagnetisation in a sensorless brushless DC drive givese a broad overview of demagnetisation in a sensorless brushless DC drives that depend on Zero Crossing (ZC) detection to synchronise the next commutation phase.

A Demagnetisation Risk Index for a sensorless brushless DC drive gives a quantitative measure that can be used to indicate high risk drives. In my own testing experience, motors unlikely to exhibit sync loss have DRI well less than 5, and those well over 5 are problem motors. High pole count increases DRI, and this is a 22 pole motor, high when compared to 11 pole barrel shaped motors.

DRI on 4S is 5.1, on 3S is 3.8.

On 3S sync loss could be excited with a hand servo tester using BLHeli, it was not observed with SimonK. Previous testing has shown this motor very prone to sync loss on 4S with either ESC and I dismiss it as impractical.

Above is a logged test run of SimonK (~2017) on 3s using script driven by asrg.

Above is a logged test run of BLHeli-16.7.14.9.0.3 (the latest) with default settings on 3s using script driven by asrg.

Importantly they both use default settings including Complementary PWM (though BLHeli calls it something else).

Superficially, they might look nearly identical, but there are some key differences:

  • they are both stable, there is no significant sign of desync;
  • BLHeli uses more current at all throttle settings (so reduced battery endurance); and
  • BLHeli is less responsive to throttle, it is slower to accelerate, and even slower to decelerate (possibly a measure to avoid de-sync).

Lots of claims have been made of the superiority of the 48MHz Silabs based ESC used for the BLHeli test over the 16MHz AVR MCU used for the SimonK test… but it does not result in superior performance, rather the BLHeli ESC isn’t quite as good.

Overall, I would be happy with BLHeli, though it is slightly poorer than the old SimonK (tgy) firmware. BLHeli was taken up by the community, even when it had significant de-sync problems, and I can only guess that users liked the GUI and drives system performance was a lesser priority.

I have not tried the newer closed source BLHeli_32, and doubt that I will. The BLHeli pitch that a more powerful 32bit MCU will result in better performance is questioned by the above comparison of 8bit MCUs… and if it is the GUI one desires, it is already there in BLHeli_S.

Last update: 10th August, 2024, 9:10 PM

Use of port extension or e-delay to measure a dummy load

By: Owen
1 August 2024 at 21:57

I have an MFJ-264N which does not perform very well.

A measurement of the impedance at the inboard side of the N connector jack would be informative.

So, a NanoVNA-H4Β  (SOL calibrated at the Port 1 connector) with short SMA(M) to SMA(M) and SMA(F) to N(M) adapter are available, but how to set the reference plane to the inboard end of the N(F) connector?

Port extension, or e-delay is a means of correcting a lossless (ie short) β€˜adapter’ where propagation time is independent of frequency, ie phase delay is proportional to frequency.

Above is a view of the inboard side of N(F) connector. If we can apply an effective short circuit centre pin to ground at that point, we can adjust e-delay to calibrate the β€˜fixture’.

Above shows a small piece of kitchen foil scrunched up into a ball and pressed into the space to short the inner conductor to the connector body. The piece is held in place with moderate finger pressure whilst calibrating the e-delay value.

Above is the display after tweaking e-delay for approximately flat s11 phase over the frequency range (save the wrap from 180Β° to -180Β°), a necessary condition for validity of the technique.

The VNA is configured with VF=1, so the displayed distance is the two way free space electrical length which reconciles with the approximately 200mm cable length.

Having calibrated e-delay, we can now measure Z looking into the dummy load from the inboard end of the N(F) connector. There are two significant problems:

  • R at low frequencies is close to 60Ξ© when ideally it would be 50Ξ©; and
  • X rises linearly to 4.7Ξ© at 100MHz, suggesting there is about 7nH of series inductance when ideally X should be zero.

The main problem is the resistance of the carbon resistor. They tend to age high in value, and operation at high temperature accelerates aging. Given that these are rated at 1500W for intermittent operation and the derating curve suggests they are probably not good for more than about 50W continuously, users should keep in mind that every cycle to extreme temperature accelerates aging of the resistor and upwards creep in resistance.

This one has not been abused, abuse will exacerbate the problem.

Conclusions

Port extension or e-delay can provide a convenient means of shifting the reference plane given suitable test fixtures.

Last update: 2nd August, 2024, 1:14 PM

Some useful equivalences of very short very mismatched transmission lines

By: Owen
31 July 2024 at 16:12

This article explains some very useful equivalences of very short very mismatched transmission lines. They can be very useful in:

  • understanding / explaining /anticipating some measurement errors; and
  • applying port extension corrections to VNA measurements where the fixture can be reasonably be approximated as a uniform transmission line.

Port extension commonly applies a measurement correction assuming a section of lossless 50Ξ© transmission line specified by the resulting propagation time, e-delay, but as explained below, can be used to correct other approximately lossless uniform transmission line sections of other characteristic impedance.

In the following, Z0 is the characteristic impedance of the transmission line, and Zl is the load at the end of that transmission line.

The line section can usually be considered lossless because of its very short length, but whilst its loss might be insignificant, the phase change along the line may be significant and is considered in the following analysis.

The expression for Zin of a lossless transmission line terminated in Zl is:

\(Z_{in}=Z_0 \frac{Z_l+\jmath Z_0 tan(\beta l)}{Z_0+\jmath Z_l tan(\beta l)}\\\)

where:

  • Z0 is the characteristic impedance of the line;
  • Ξ² is the phase velocity of the wave on the transmission line, the imaginary part of the complex wave propagation constant Ξ³ (the real part Ξ± is zero by virtual of it being assumed lossless);
  • l is the length of the line section.

Ξ²l is the electrical length or phase length in radians.

Ξ² can be calculated:

\(\beta= \frac{2 \pi f}{c_0 v_f}\) which allows the equivalent shunt capacitance to be calculated (an exercise for the reader).

  • where f is the frequency;
  • c0 is the speed of an EM wave in a vacuum, 299792458m/s; and
  • vf is the applicable velocity factor.

The transmission line has a propagation time t:

\(t=\frac{l}{c_0 v_f}\) or rearranged \(l=t c_0 v_f\), or \(t=\frac{3.336}{v_f} \text{ps/mm}\).

Two cases are discussed:

  • Zl>>Zo; and
  • Zl<<Zo.

Zl>>Zo

Recalling that the expression for Zin of a lossless transmission line terminated in Zl is:

\(Z_{in}=Z_0 \frac{Z_l+\jmath Z_0 tan(\beta l)}{Z_0+\jmath Z_l tan(\beta l)}\\\)

Inverting both sides:

\(Y_{in}=\frac{1}{Z_0} \frac{Z_0+\jmath Z_l tan(\beta l)}{Z_l+\jmath Z_0 tan(\beta l)}\\\)

For \(Z_l \gg Z_0 \text{, } Z_0 tan(\beta l) \ll Z_l\) and can be ignored.

\(Y_{in}= \frac{1+\jmath \frac{Z_l}{Z_0} tan(\beta l)}{Z_l}\\\) \(Y_{in}=Y_l +\jmath \frac{tan(\beta l)}{Z_0}\)

Where \(\beta l \lt 0.1\) applies:

For short electrical length, \(\beta l<0.1\), \(tan(\beta l) \approx \beta l\):

\(Y_{in}=Y_l +\jmath \frac{\beta l}{Z_0}\\\)

So, the effect of this transmission line is to add a small +ve (capacitive) shunt susceptance to Yl.

\(\frac{\beta l}{Z_0}\) is interesting:

\(\frac{\beta l}{Z_0}= \frac{2 \pi f}{Z_0 c_0 v_f} t c_0 v_f=2 \pi f \frac{t}{Z_0}\\\)

Where \(\beta l\frac{50}{Z_0} \lt 0.1\) also applies:

At a given frequency, we can say that \(\frac{\beta l}{Z_0} \propto \frac{t}{Z_0}\) and that \(t_{50} \equiv t_{Z_0}\frac{50}{Z_0}\) and since \(l \propto t \text{, } l_{50} \equiv l_{Z_0}\frac{50}{Z_0}\). These equivalences allow transforming a length or propagation time at actual Z0 into an equivalent length or time at Z0=50. For example if the propagation time of a fixture of 6mm length of air spaced line with Z0=200Ξ© was 20ps, an equivalent one way e-delay at Z0=50Ξ© (the instrument reference) of \(t_{50} =20\frac{50}{200}=5 \text{ ps}\) would approximately correct the transmission line effects of the 20ps of 200Ξ© line. Note that for an s11 correction, the two way e-delay is needed, 10ps in this example.

An important thing to remember is that port extension using e-delay assumes a lossless port extension using transmission line where phase length is proportional to f.

Above is a SimNEC simulation of Zl=10000+j0Ξ© with 0.025rad 200Ξ© lossless line backed out by -0.1rad of lossless 50Ξ© line (comparable to e-delay). The green reversal path lies almost exactly over the magenta path of the original transmission line transformation.

Summary for Zl>>Zo

\(Y_{in}=Y_l +\jmath \frac{\beta l}{Z_0}\\\) \(t_{50} =t_{Z_0}\frac{50}{Z_0}\\\) \(l_{50} =l_{Z_0}\frac{50}{Z_0}\)

Zl<<Zo

Recalling that the expression for Zin of a lossless transmission line terminated in Zl is:

\(Z_{in}=Z_0 \frac{Z_l+\jmath Z_0 tan(\beta l)}{Z_0+\jmath Z_l tan(\beta l)}\\\)

For \(Z_l \ll Z_0 \text{, } Z_l tan(\beta l) \ll Z_0\) and can be ignored.

\(Z_{in}=Z_0 \frac{Z_l+\jmath Z_0 tan(\beta l)}{Z_0}\\\) \(Z_{in}=Z_l+\jmath Z_0 tan(\beta l)\)

Where \(\beta l \lt 0.1\) applies:

For short electrical length, \(\beta l<0.1\), \(tan(\beta l) \approx \beta l\):

\(Z_{in}=Z_l+\jmath Z_0 \beta l\\\)

So, the effect of this transmission line is to add a small +ve (inductive) series reactance to Zl.

\(\beta l Z_0\) is interesting:

\(\beta l Z_0= \frac{2 \pi f Z_0}{c_0 v_f} t c_0 v_f=2 \pi f Z_0 t\\\)

Where \(\beta l\frac{Z_0}{50} \lt 0.1\) also applies:

At a given frequency, we can say that \(\beta l Z_0 \propto t Z_0\) and that \(t_{50} \equiv t_{Z_0}\frac{Z_0}{50}\) and since \(l \propto t \text{, } l_{50} \equiv l_{Z_0}\frac{Z_0}{50}\). These equivalences allow transforming a length or propagation time at actual Z0 into an equivalent length or time at Z0=50. For example if the propagation time of a fixture of 6mm length of air spaced line with Z0=200Ξ© was 20ps, an equivalent one way e-delay at Z0=50Ξ© (the instrument reference) of \(t_{50} =20\frac{200}{50}=80 \text{ ps}\) would approximately correct the transmission line effects of the 20ps of 200Ξ© line. Note that for an s11 correction, the two way e-delay is needed, 160ps in this example.

An important thing to remember is that port extension using e-delay assumes a lossless port extension using transmission line where phase length is proportional to f.

Above is a SimNEC simulation of Zl=1+j0Ξ© with 0.1rad lossless 200Ξ© line backed out by -0.025rad of lossless 50Ξ© line (comparable to e-delay). The green reversal path lies almost exactly over the magenta path of the original transmission line transformation.

Summary for Zl<<Zo

\(Z_{in}=Z_l+\jmath Z_0 \beta l\\\) \(t_{50} =t_{Z_0}\frac{Z_0}{50}\\\) \(l_{50} =l_{Z_0}\frac{Z_0}{50}\)

Β 

Last update: 9th August, 2024, 11:57 PM

Common mode choke measurement – length matters #4

By: Owen
25 July 2024 at 10:26

Common mode choke measurement – length matters #2 discussed the effect that even quite short pigtails might have on the measurement of a high value resistor.

This article documents an experiment to measure a DUT comprising two 1206 0.1% 10kΞ© resistors soldered to a 2w section of turned pin male header strip.

Above is the measurement fixture with the 5kΞ© DUT, and the parts used to calibrate the fixture. The LOAD resistor measured 50.185Ξ© at DC, and that was entered into the NanoVNA for improved calibration accuracy.

The fixture is a 3w section of female turned pin header soldered to a male end launch SMA connector.

What to expect?

Even small resistors like these are not perfect.

Above is the equivalent circuit proposed by (Vishay 2009). Note that the resistor is inside the dot-dash box. The parts outside the box are a model of their fixture.

Above is a table from (Vishay 2009). The resistors used were not Vishay, and at 1206 size, they were twice the size of the 0603 parts listed. We might extrapolate and estimate that for 2 x 1206 resistors in parallel, C is of the order of 120fF and L is of the order of 0.01nH.

Above is a SimNEC model of the assumed equivalent circuit of the parallel pair of 10kΞ© resistors. Note the Smith chart plot follows a constant G circle (Zref=5kΞ©). For such high resistance and at relatively low frequencies, the result is dominated by the shunt capacitance.

So without the long connections shown in Common mode choke measurement – length matters #2 there is still a departure that we should be able to measure, even with the humble NanoVNA with a suitable fixture and care.

Measured

Let’s measure the DUT shown above, and import the s1p file into SimNEC for analysis.

Β 

Above is a Smith chart polot of a sweep from 1 to 101MHz, the reference impedance (ie chart centre) is 5kΞ©. Note that the sweep locus is circular, and approximately follows a constant G circle.

The measured result is not greatly different to the expected response given earlier.

Above is a plot of S11 admittance from 1 to 101 MHz.

Note that G is approximately constant (equivalent to R=5.8kΞ©), and that susceptance B is close to a straight line proportional to frequency risingΒ  to 72e-6S at 100MHz, equivalent to \(C=\frac{B}{2 \pi f}=114 \text{ fF}\).

G is a little different to expectation for unknown reasons, the resistor measured 5001Ξ© at DC. Perhaps the current distribution is not uniform at RF, some kind of skin effect?

So, the DUT is looking like a resistance of about R=5.8kΞ© in parallel with a capacitance C=114fF.

R||C is one explanation for the curve we see.

There are other possible explanations, contributions of different effects, but considering the equivalent circuit laid out earlier, it would be naive to expect to observe and ideal resistor response, even with a quite good fixture.

Conclusions

There are challenges in measuring extreme impedances with a reflection measurement instrument, the DUT is key to success.

Assertions that reflection measurement instruments are worthless for measurements of impedances much above perhaps 200Ξ© are not well informed, and if based on experiment, speak to experiment shortcomings.

References

  • Feb 2009. Vishay. Frequency response of thin film chip resistors (60107).
Last update: 10th August, 2024, 7:33 AM

NanoVNA-H4 radio remote trial #5 – NanoVNA enhancement

By: Owen
25 July 2024 at 05:29

A series of four articles explored different wireless solutions for remote operation of a NanoVNA-H4.

The NanoVNA-H4 can use a USB connection, or a serial connection, the UART, selected from the configuration menu. The UART β€˜channel’ is a conventional unprotected asynchronous protocol, 8N1, and supports a range of DTE speeds.

Three different wireless remote solutions were trialed, and an inexpensive Bluetooth adapter showed the most promise. The air-link is a β€˜reliable’ link in terms of error free transmission, though of course it depends on adequate signal strength. Importantly, even at 115200bps DTE speed, it did not seem to suffer buffer overruns, an important detail given the lack of effective flow control in the NanoVNA-H4 UART interface (as brought to the edge pads).

In response to the need for a more efficient data transfer for screenshots (~399kB), Dislord has released a version of NanoVNA-D that supports a RLE compressed screenshot download.

The Python script published at https://github.com/owenduffy/tinydevicecapture allows standalone screenshot capture using the new β€œcapture rle” command which permits screenshot download in 2-5s at DTE speed 115200, less than a quarter the uncompressed image.

Above, a loopback throughput test at 20m outside gave throughput of 42958bps, so it is deemed prudent to configure the NanoVNA serial speed to 38400 bps to minimise the risk of buffer overruns. Transfer time for a not very busy screen is around 6s.

Last update: 26th July, 2024, 9:14 AM

Stand alone update of SiK radio firmware

By: Owen
21 July 2024 at 09:58

SiK is an inexpensive data radio commonly used by UAVs.

At least two of the β€˜ground station’ applications incorporate facility for firmware upgrade, but if you aren’t using them for their main purpose, it is a huge installation just to upgrade the SiK radio.

Above is an inexpensive C2 programmer with DIY pogo pin adapter, one of may options. A C2 programmer is needed to write the bootloader.

The SiK radio project publishes a python script at https://github.com/ArduPilot/SiK/blob/master/Firmware/tools/uploader.py . This article gives a revised version that works on a HM-TRP radio under Windows 11.

The firmware was v2.2 sourced from https://firmware.ardupilot.org/SiK/stable/ .

Here is the revised Python script:

#next line fails in Windows
##!/usr/bin/env python3
#
# Serial firmware uploader for the SiK bootloader
#

import argparse
import binascii
import glob
import serial
import sys
import time

if sys.version_info.major < 3:
    print("This tool requires python3")
    sys.exit(1)


class Firmware(object):
    """Loads a firmware file"""

    # parse a single IntelHex line and obtain the byte array and address
    def __parseline(self, line):
        # ignore lines not beginning with :
        if line[0] != ":":
            return
        # parse the header off the line
        hexstr = line.rstrip()[1:-2]
        binstr = binascii.unhexlify(hexstr)
        command = binstr[3]

        # only type 0 and 4 records are interesting
        if command == 4 and binstr[0] == 0x02 and (binstr[1] << 8) + binstr[2] == 0x0000:
            self.upperaddress = (binstr[4] << 8) + binstr[5]
            self.bankingDeteted = True
        elif command == 0:
            address = (binstr[1] << 8) + binstr[2] + (self.upperaddress << 16) bytes = bytearray(binstr[4:]) if self.upperaddress in self.sanity_check: self.sanity_check[self.upperaddress][0] += len(bytes) if self.sanity_check[self.upperaddress][1] > (binstr[1] << 8) + binstr[2]:
                    self.sanity_check[self.upperaddress][1] = (binstr[1] << 8) + binstr[2]
                if self.sanity_check[self.upperaddress][2] < (binstr[1] << 8) + binstr[2] + len(bytes):
                    self.sanity_check[self.upperaddress][2] = (binstr[1] << 8) + binstr[2] + len(bytes)
            else:
                self.sanity_check[self.upperaddress] = []
                self.sanity_check[self.upperaddress].append(len(bytes))
                self.sanity_check[self.upperaddress].append((binstr[1] << 8) + binstr[2])
                self.sanity_check[self.upperaddress].append((binstr[1] << 8) + binstr[2] + len(bytes)) self.__insert(address, bytes) # insert the byte array into the ranges dictionary, merging as we go def __insert(self, address, bytes): # look for a range that immediately follows this one candidate = address + len(bytes) if candidate in self.ranges: # found one, remove from ranges and merge it nextbytes = self.ranges.pop(candidate) bytes.extend(nextbytes) # iterate the existing ranges looking for one that precedes this for candidate in list(self.ranges.keys()): prevlen = len(self.ranges[candidate]) if (candidate + prevlen) == address: self.ranges[candidate].extend(bytes) return # just insert it self.ranges[address] = bytes def __init__(self, path): self.ranges = dict() self.upperaddress = 0x0000 self.bankingDeteted = False self.sanity_check = dict() # read the file # XXX should have some file metadata here too ... f = open(path, "r") for line in f: self.__parseline(line) def code(self): return self.ranges class Uploader(object): """Uploads a firmware file to the SiK bootloader""" NOP = chr(0x00) OK = chr(0x10) FAILED = chr(0x11) INSYNC = chr(0x12) EOC = chr(0x20) GET_SYNC = chr(0x21) GET_DEVICE = chr(0x22) CHIP_ERASE = chr(0x23) LOAD_ADDRESS = chr(0x24) PROG_FLASH = chr(0x25) READ_FLASH = chr(0x26) PROG_MULTI = chr(0x27) READ_MULTI = chr(0x28) PARAM_ERASE = chr(0x29) REBOOT = chr(0x30) PROG_MULTI_MAX = 32 # 64 causes serial hangs with some USB-serial adapters READ_MULTI_MAX = 255 READ_MULTI_MAX = PROG_MULTI_MAX #fix buffer overrun on verify with FTDI FT-232RL BANK_PROGRAMING = -1 def __init__(self, portname, atbaudrate=57600, use_mavlink=False, mavport=0, debug=0): print(("Connecting to %s" % portname)) if use_mavlink: from pymavlink import mavutil self.port = mavutil.MavlinkSerialPort(portname, 115200, devnum=mavport, timeout=3, debug=debug) else: self.port = serial.Serial(portname, 115200, timeout=3) self.atbaudrate = atbaudrate self._debug = debug self.percent = -1 if use_mavlink: # we can send a bit more on mavlink Uploader.PROG_MULTI_MAX = 64 def debug(self, s, level=1): """write some debug text""" if self._debug >= level:
            print(s)

    def __send(self, c):
        if type(c) is str:
            self.port.write(bytes(c, 'latin-1'))
            self.debug(("writing", c), 7)
        else:
            self.debug(("writing ", binascii.hexlify(c)), 7)
            self.port.write(c)

    def __recv(self, raise_error=True):
        start_time = time.time()
        c = self.port.read(1)
        if len(c) < 1: self.debug("timeout waiting for data (%.2f seconds)" % (time.time() - start_time)) if raise_error: raise RuntimeError("timeout waiting for data") return None return c.decode('latin-1') def __getSync(self, raise_error=True): c = self.__recv(raise_error) if c is None: return False if c != self.INSYNC: print("c ", type(c), " ", c) print("INSYNC ", type(self.INSYNC), " ", self.INSYNC) self.debug(("unexpected ", c, " instead of INSYNC 0x", self.INSYNC)) if raise_error: raise RuntimeError(("unexpected ", c, " instead of INSYNC 0x", self.INSYNC)) return False c = self.__recv() if c != self.OK: self.debug(("unexpected 0x", c, " instead of OK 0x", self.OK)) if raise_error: raise RuntimeError(("unexpected ", c, "instead of OK 0x", self.OK)) return False self.debug("__getSync OK", 2) return True # attempt to get back into sync with the bootloader def __sync(self): # send a stream of ignored bytes longer than the longest possible conversation # that we might still have in progress self.debug("trying __sync") self.__send(Uploader.NOP * (Uploader.PROG_MULTI_MAX + 2)) self.port.flushInput() self.__send(Uploader.GET_SYNC + Uploader.EOC) self.debug("trying __getSync") return self.__getSync(raise_error=False) # send the CHIP_ERASE command and wait for the bootloader to become ready def __erase(self, erase_params=False): self.__send(Uploader.CHIP_ERASE + Uploader.EOC) self.__getSync() if erase_params: print("resetting parameters...") self.__send(Uploader.PARAM_ERASE + Uploader.EOC) self.__getSync() # send a LOAD_ADDRESS command def __set_address(self, address, banking): if banking: if self.BANK_PROGRAMING != address >> 16:
                self.BANK_PROGRAMING = address >> 16
                if self.BANK_PROGRAMING == 0:
                    print("HOME")
                else:
                    print("BANK", self.BANK_PROGRAMING)
            self.__send(Uploader.LOAD_ADDRESS
                        + chr(address & 0xff)
                        + chr((address >> 8) & 0xff)
                        + chr((address >> 16) & 0xff)
                        + Uploader.EOC)
        else:
            self.debug("set addr - no banking")
            self.__send(Uploader.LOAD_ADDRESS
                        + chr(address & 0xff)
                        + chr(address >> 8)
                        + Uploader.EOC)
            self.debug("set addr - done")
        self.__getSync()

    # send a PROG_FLASH command to program one byte
    def __program_single(self, data):
        self.debug("prog single")
        self.__send(Uploader.PROG_FLASH
                    + chr(data)
                    + Uploader.EOC)
        self.__getSync()

    # send a PROG_MULTI command to write a collection of bytes
    def __program_multi(self, data):
        self.debug("Program Multi", 10)
        sync_count = 0
        while len(data) > 0:
            n = len(data)
            if n > Uploader.PROG_MULTI_MAX:
                n = Uploader.PROG_MULTI_MAX
            block = data[:n]
            data = data[n:]
            self.__send(Uploader.PROG_MULTI + chr(n))
            self.__send(block)
            self.__send(Uploader.EOC)
            sync_count += 1
        while sync_count > 0:
            self.debug("sync_count=%u" % sync_count)
            self.__getSync()
            sync_count -= 1

    # verify multiple bytes in flash
    def __verify_multi(self, data):
        self.__send(Uploader.READ_MULTI
                    + chr(len(data))
                    + Uploader.EOC)
        for i in data:
            if self.__recv() != chr(i):
                return False
        self.__getSync()
        return True

    # send the reboot command
    def __reboot(self):
        self.__send(Uploader.REBOOT)

    # split a sequence into a list of size-constrained pieces
    def __split_len(self, seq, length):
        return [seq[i:i + length] for i in range(0, len(seq), length)]

    def total_size(self, code):
        """return total programming size in bytes"""
        total = 0
        for address in list(code.keys()):
            total += len(code[address])
        return total

    def progress(self, count, total):
        """show progress bar"""
        pct = int((100 * count) / total)
        if pct != self.percent:
            self.percent = pct
            hlen = (pct / 2)
            hashes = '#' * int(hlen)
            spaces = ' ' * (50 - int(hlen))
            sys.stdout.write("[%s] %u/%u (%u%%)\r" % (
                hashes + spaces,
                count,
                total,
                pct))
            sys.stdout.flush()
        if count == total:
            print("")

    # upload code
    def __program(self, fw):
        code = fw.code()
        count = 0
        total = self.total_size(code)
        for address in sorted(code.keys()):
            self.debug("address", address)
            self.__set_address(address, fw.bankingDeteted)
            groups = self.__split_len(code[address], Uploader.PROG_MULTI_MAX)
            for bytes in groups:
                self.__program_multi(bytes)
                count += len(bytes)
                self.progress(count, total)
        self.progress(count, total)
        self.debug("done")

    # verify code
    def __verify(self, fw):
        code = fw.code()
        count = 0
        total = self.total_size(code)
        for address in sorted(code.keys()):
            self.__set_address(address, fw.bankingDeteted)
            groups = self.__split_len(code[address], Uploader.READ_MULTI_MAX)
            for bytes in groups:
                if not self.__verify_multi(bytes):
                    raise RuntimeError("Verification failed in group at 0x%x" % address)
                count += len(bytes)
                self.progress(count, total)
        self.progress(count, total)
        self.debug("done")

    def expect(self, pattern, timeout):
        """wait for a pattern with timeout, return True if found, False if not"""
        import re
        prog = re.compile(pattern)
        start = time.time()
        s = ''
        while time.time() < start + timeout: b = self.port.read(1) if len(b) > 0:
                sys.stdout.write(b.decode('latin-1'))
                s += b.decode('latin-1')
                if prog.search(s) is not None:
                    return True
            else:
                time.sleep(0.01)
        return False

    def send(self, s):
        """write a string to port and stdout"""
        self.port.write(bytes(s, 'latin-1'))
        sys.stdout.write(s)

    def setBaudrate(self, baudrate):
        try:
            self.port.setBaudrate(baudrate)
        except Exception:
            # for pySerial 3.0, which doesn't have setBaudrate()
            self.port.baudrate = baudrate

    def autosync(self):
        """use AT&UPDATE to put modem in update mode"""
        if self.atbaudrate != 115200:
            self.setBaudrate(self.atbaudrate)
        print("Trying autosync")
        self.send('\r\n')
        time.sleep(1.0)
        self.send('+++')
        self.expect('OK', timeout=1.1)
        for i in range(5):
            self.send('\r\nATI\r\n')
            if not self.expect('SiK .* on', timeout=0.5):
                print("Failed to get SiK banner")
                continue
            self.send('\r\n')
            time.sleep(0.2)
            self.port.flushInput()
            self.send('AT&UPDATE\r\n')
            time.sleep(0.7)
            self.port.flushInput()
            if self.atbaudrate != 115200:
                self.setBaudrate(115200)
            print("Sent update command")
            return True
        if self.atbaudrate != 115200:
            self.setBaudrate(115200)
        return False

    # verify whether the bootloader is present and responding
    def check(self):
        for i in range(3):
            try:
                if self.__sync():
                    print("Got sync")
                    return True
                self.autosync()
            except RuntimeError:
                self.autosync()
        return False

    def identify(self):
        self.__send(Uploader.GET_DEVICE
                    + Uploader.EOC)
        board_id = self.__recv()[0]
        board_freq = self.__recv()[0]
        self.__getSync()
        return board_id, board_freq

    def upload(self, fw, erase_params=False):
        print("erasing...")
        self.__erase(erase_params)
        print("programing...")
        self.__program(fw)
        print("verifying...")
        self.__verify(fw)
        print("done.")
        self.__reboot()


if __name__ == '__main__':
    # Parse commandline arguments
    parser = argparse.ArgumentParser(description="Firmware uploader for the SiK radio system.")
    parser.add_argument('--resetparams', action="store_true", help="reset all parameters to defaults")
    parser.add_argument("--baudrate", type=int, default=57600, help='baud rate')
    parser.add_argument('--forceBanking', action="store_true", help="force the programmer to use 24bit addressing")
    parser.add_argument("--mavlink", action='store_true', default=False, help='update over MAVLink')
    parser.add_argument("--mavport", type=int, default=0, help='MAVLink port number')
    parser.add_argument("--debug", type=int, default=0, help='debug level')
    parser.add_argument('--port', required=True, action="store", help="port to upload to")
    parser.add_argument('firmware', action="store", help="Firmware file to be uploaded")
    args = parser.parse_args()

    # Load the firmware file
    fw = Firmware(args.firmware)
    if args.forceBanking:
        fw.bankingDeteted = True
    ''' This stuff does not work for high COM ports in Windows
    ports = glob.glob(args.port)
    if not ports:
        print(("No matching ports for %s" % args.port))
        sys.exit(1)
    # Connect to the device and identify it
    for port in glob.glob(args.port):
    '''
    for port in [args.port]:
        print(("uploading to port %s" % port))
        up = Uploader(port, atbaudrate=args.baudrate, use_mavlink=args.mavlink,
                      mavport=args.mavport, debug=args.debug)
        if not up.check():
            print("Failed to contact bootloader")
            sys.exit(1)
        id, freq = up.identify()
        print(("board %x  freq %x" % (ord(id), ord(freq))))
        # CPU's that support banking have the upper bit set in the byte (0x80)
        if (fw.bankingDeteted and (ord(id) & 0x80) != 0x80):
            print("This firmware requires a CPU with banking")
            sys.exit(1)
        if (ord(id) & 0x80) == 0x80:
            fw.bankingDeteted = True
            print("Using 24bit addresses")
        up.upload(fw, args.resetparams)

There are only a few changes, here is the diff file:

--- uploader.py.o	2024-07-21 12:45:58.103535500 +1000
+++ uploader.py	2024-07-21 16:36:56.263199800 +1000
@@ -1,4 +1,5 @@
-#!/usr/bin/env python3
+#next line fails in Windows
+##!/usr/bin/env python3
 #
 # Serial firmware uploader for the SiK bootloader
 #
@@ -103,6 +104,7 @@
 
     PROG_MULTI_MAX = 32  # 64 causes serial hangs with some USB-serial adapters
     READ_MULTI_MAX = 255
+    READ_MULTI_MAX = PROG_MULTI_MAX #fix buffer overrun on verify with FTDI FT-232RL
     BANK_PROGRAMING = -1
 
     def __init__(self, portname, atbaudrate=57600, use_mavlink=False, mavport=0, debug=0):
@@ -416,13 +418,15 @@
     fw = Firmware(args.firmware)
     if args.forceBanking:
         fw.bankingDeteted = True
-
+    ''' This stuff does not work for high COM ports in Windows
     ports = glob.glob(args.port)
     if not ports:
         print(("No matching ports for %s" % args.port))
         sys.exit(1)
     # Connect to the device and identify it
     for port in glob.glob(args.port):
+    '''
+    for port in [args.port]:
         print(("uploading to port %s" % port))
         up = Uploader(port, atbaudrate=args.baudrate, use_mavlink=args.mavlink,
                       mavport=args.mavport, debug=args.debug)

Prior to debugging the py script, I rewrote the bootloader using a U-EC2 programmer:

@echo off
rem this script 
set BOOTLOADER=bootloader~hm_trp~433.hex
set SIK=radio~hm_trp-2.2.hex
set SIK=junk.hex

set srec_cat=D:\Program Files\srecord\bin\srec_cat.exe
set HEXPATH=
set XXD=xxd

set FLASHUTILCL="d:\SiLabs\MCU\Utilities\FLASH Programming\Static Programmers\Command-Line\FlashUtilCL.exe"

echo on
rem fix the adress ordering
"%srec_cat%" %SIK% -intel -o temp.hex -intel
rem now write the flash
%FLASHUTILCL% FlashEraseUSB 0 1
%FLASHUTILCL% DownloadUSB "%BOOTLOADER%" 0 0 1
%FLASHUTILCL% VerifyUSB "%BOOTLOADER%" 0 1
%FLASHUTILCL% DownloadUSB temp.hex 0 0 1
%FLASHUTILCL% VerifyUSB temp.hex 0 1

@echo off

echo.
echo All done
pause

That worked fine, it seems that the flash utils do not like out of sequence data, the srec_cat fixes than (though you will get a warning).

Above are the C2 connections to the module. I powered it from a separate power supply, VDD_MCU was not used (do not connect 5V here).

The bootloader was sourced from https://firmware.ardupilot.org/SiK/bootloader/ .

Last update: 30th July, 2024, 7:14 AM

NanoVNA-H4 radio remote trial #4 – Summary

By: Owen
21 July 2024 at 08:53

A series of three articles explored different wireless solutions for remote operation of a NanoVNA-H4.

The NanoVNA-H4 can use a USB connection, or a serial connection, the UART, selected from the configuration menu. The UART β€˜channel’ is a conventional asynchronous protocol, 8N1, and supports a range of DTE speeds. Importantly, it does not incorporate:

  • any form of flow control; or
  • any form of error detection / correction.

Essentially, any form of wireless channel were the actual throughput is less than the DTE speed is likely to experience buffer overruns, errors.

For my use, direct capture of screens is very important. It is supported, but the RGB565 format used means a 307KB transfer for the -H4. This takes nearly 1min on an error free channel with throughput of 57600bps… so it is very slow.

The unprotected link problem will result in an unreliable communications link, though a reliable radio link of sufficient bandwidth might be reasonably successful.

Three possible solutions were tried:

  • Bluetooth using HC-05 module;
  • 433MHz data link using HC-12 modules; and
  • SiK data radio.

Tests were conducted at DTE speed 57600bps unless stated otherwise.

Bluetooth using HC-05 module

The Bluetooth solution actually worked. Air speed is greater than the DTE speed used, and even at 115200bps DTE speed, data overruns were not apparent, throughput close to the theoretical 80% of 115200bps DTE speed (due to async encoding). Transfer time for a 307kB screen capture is just under 30s.

This appears to be a workable solution, though with a distance limitation typically of 10-30m depending on path obstruction.

Another advantage is that the radio frequencies used are at 2.4GHz, well away from the NanoVNA-H4’s measurement range.

433MHz data link using HC-12 modules

The HC-12 modules are a simple single channel data radio with a range of speed and bandwidths. The air speed is automatically chosen based on the DTE speed.

Distances of 1km or more are possible, though probably at lower data speed.

The problem is that at 57600DTE speed, throughput was around 20kbps for a very short distance at full power.

Since the throughput was way less than the DTE speed, in the absence of flow control this will suffer intolerable errors due to buffer overruns.

It is deemed unsuitable.

SiK data radio

The SiK data radio is designed for use with UAVs. It is a FHSS technology. It has the potential to work over distances up to 1km or more, depending on the configured transmit power.

The measured throughput was around 22kbps.

Since the throughput was way less than the DTE speed, in the absence of flow control this will suffer intolerable errors due to buffer overruns.

It is deemed unsuitable.

Bluetooth+improvements

The transfer time for screen capture would be improved if the user was offered an uncompressed TIFF format (which is already supported for SD card saves). The saving is 60-80% of download time, so a screen capture would take say 30% of 30s, so just under 10s for an average screen capture.

If the NanoVNA calculated a CRC and sent it at the end of the capture transfer, the receiving application could check the integrity of the transfer and the operator would know on the spot whether it need to be taken again.

An enhancement request was submitted on github: Enhancement: capturetiff command.

Time will tell whether that results in these improvements.

Last update: 21st July, 2024, 6:53 PM

NanoVNA-H4 radio remote trial #3 – 3DR radio (SiK)

By: Owen
19 July 2024 at 18:27

As part of investigation of radio remote options for the NanoVNA, a 3D Robotics (SiK) clone radio was evaluated. Firmware is v2.2.

Above is the radio. These are widely used for UAVs, indeed the firmware is optimised for that application. My assumption is that the thing implements a reliable radio link, potentially over distances to 1km or so (at 20dBm tx power).

I have used these on UAV applications and the radio comms has been reliable out to a few hundred meters (including ground to ground).

The USB and a non-USB device were configured for 57600 DTE speed.

Β 

Above is a test of throughput using Ezurio Terminal with the devices separated 5m.

Since the NanoVNA does not implement flow control, buffer overruns can be expected to occur and this configuration is dismissed.

Last update: 20th July, 2024, 4:49 PM

NanoVNA-H4 radio remote trial #2 – HC-12

By: Owen
19 July 2024 at 07:25

As part of investigation of radio remote options for the NanoVNA, hc01.com’s HC-12 modules looked promising. Some parts were purchased and tested for the application.

Above is a HC-12-USB and HC-12 using a Si4438 chip. Another of these and two HC-12 using Si4463 chip were purchased, however Si4438 were supplied against all orders.

The USB and a non-USB device were configured for 57600 DTE speed and 11dBm transmit power. Turns out there is a trap in programming these, the programming command input times out in less than 20ms between characters, and needed 100ms rest after each command.

In a test with the devices separated 5m, the maximum throughput was under 20kbps, just 30% of the DTE speed. The input buffer overran at about 220B. This is unusable for the NanoVNA application which has no flow control.

Testing did not progress to distance vs power checks and the inability to handle data at full DTE rate with a good signal made them unsuitable for the application.

Last update: 19th July, 2024, 5:29 PM

nanoVNA-H – Deepelec test jig #2

By: Owen
17 July 2024 at 22:59

I have found you can never have enough of these things. It is very convenient to leave some measurement projects set up while work continues on some parallel projects.

Above is the kit as supplied (~$8 on Aliexpress). Note that it does not contain any male turned pin header… more on that later.

I was critical of Alixpress four years ago when I purchased the last one, but things have improved greatly in that time, to the point they are often faster delivery that eBay’s β€œAustralian stock” sellers.

Carefully break off 7 x 7 way pieces of the turned pin female header and β€˜dry’ fit them to the board, Now get two more pieces of header that are at least 7 way, and plug them at right angles to the ones already placed to set the spacing. Now solder them to the board (hint: liquid flux makes this job easier.) The β€˜donuts’ are quite small, use a tip that gives contact to the donut so that heat is applied to the pin and the β€˜tube’ for a good solder joint.

Test the coax connectors on a good male connector to be sure they are not defective… quality of these is poor. I tighten them to 0.8Nm to seat and form the female connector. If the threads bind, chuck them now rather than after you have soldered them in place.

I installed only the mid connectors on this board, I have another which has all the connectors and I have never used the other four. Carefully position and solder the connectors, again liquid flux helps.

The clear plinth does not come in the kit, it is my addition.

Above, the plinths designed in Freecad were cut out of 3mm clear PVC.

They are cut using a single flute 2mm carbide cutter.

You could easily make them with hand tools and a drill. M2.5Γ—6 nylon screws are used to attach the plinth to the hex spacers (supplied), giving the assembly four non-scratch feet.

Now the kit is incomplete. You are going to need some parts you see above built on male turned pin header strip. The kit does contain some 49.9Ξ© resistors you can use for a LOAD, you will also need an OPEN (centre left) and a SHORT (lower right). Others are for connecting the sections of the test board and THROUGH calibration.

The SMA connector at left is another test fixture which uses the same calibration parts. It can be used directly on the NanoVNA or at the end of a convenient length of cable. I originally made it to use on a Rigexpert AA600, either on a N(M)-SMA(F) adapter, or a short N(M)-SMA(F) cable.

It is bit hard to see the connections on the board when it is populated, so I have made the graphic above, printed it and laminated it for handy reference.

Note that the connections are a little different to the SDR-Kits jig (that they probably copied), in particular C2, C6, E2 and E6 are each not connected to anything.

I have some custom made 300mm long RG400 cables that I use with these, labelled for calibration purposes. IIRC they cost about $30 per pair from RFSupplier.com.

Β 

Last update: 18th July, 2024, 9:20 AM

Common mode choke measurement – length matters #3

By: Owen
15 July 2024 at 21:06

Following on from Common mode choke measurement – length matters #2 which demonstrated that the following test fixture gave invalid results due to the 20mm length of resistor pigtails, the connection length in general terms

Above is a pic of my experimental setup. The resistor on Port 1 is a 10k 1% metal film resistor. The NanoVNA has been SOL calibrated at the Port 1 jack.

These plots should be horizontal lines at R=10k and X=0. They can be improved by shortening the connections, try the experiment yourself, you will learn more than if I show you the results.

If you do the experiment, you will be better placed to critically appraise the test configurations that abound online, especially on Youtube, and form a view as to whether the results are credible.

A thought exercise: do you think the fixture for this choke is good?

Β 

Last update: 16th July, 2024, 7:11 AM

NanoVNA-H4 radio remote trial #1 – HC-05 Bluetooth

By: Owen
12 July 2024 at 20:22

This series of articles documents a trial of an Bluetooth link for remote operation of a NanoVNA-H4.

There are risks in fitting a radio transmitter in close proximity to RF measurement equipment. Those risks can be mitigated by just not doing it, but with care, it may be possible to achieve the utility of remote operation without degradation of the instrument.

The Bluetooth adapter is an external HC-05 adapter, <$5 on Aliexpress, configured for 38400bps.

The trial started with NanoVNA-D v1.2.35 firmware.

This should be straightforward as people claim to have this working.

Note than HC-05 modules are not all the same, and different performance may be obtained from different manufacturers products and different firmware versions. The one tested here was labelled hc01.com… but it is Chinese product and Chinese are copyists, it means little. Firmware reports version hc01.com v2.1.

AT+VERSION
+VERSION:hc01.comV2.1
OK

The module uses a CSR BC417 Bluetooth chip. The Windows end is unknown, but relatively new.

Some loopback throughput tests using Ezurio terminal

Above, results hint high protocol overhead.

Above, close to ideal throughput for async encoding.

Problems encountered

System hangs sometimes

It sort of worked, but there was excessive delay in running a single scan from NanoVNA-App, though continuous scanning worked ok (after the same start up delay).

To help locate the problem:

  • a test was run of the UART connection to the VNA using a USB to serial adapter, so a wired connection; and
  • an extended bit error rate test was run on the Bluetooth link looped back at the HC-05.

Both comms links were reliable so the problem was the NanoVNA or NanoVNA-App.

Throughput at 38400 was 77%, quite close to the async encoding limit of 80%. Throughput at 230400 was 42%, not much better than half the async encoding limit of 80%.

A communications trace revealed that the NanoVNA appeared to hang on a pause command.

The issue was reported to Dislord, and the defect in NanoVNA-D v1.2.35 firmware fixed quite quickly (NanoVNA-D v1.2.37).

Downloading screenshots fails

I have a script set that are derived from a script published by Ho-Ro, and my script failed on the slow link.

That turned out to be a read timeout as the transfers are quite large, eg 307k which takes about 80s on an error free uncongested Bluetooth connection at 38400bps.

Higher speeds were tried, 115200bps failed, so I reverted to 38400bps which seems reliable.

In any event, the script needs facility to adjust timeout appropriately.

To do that, a baudrate parameter was added to the script, and it calculates a timeout equal to twice the time to transfer the calculated transfer size. If no baudrate is specified, it defaults to 1s timeout.

The Python script is published at https://github.com/owenduffy/tinydevicecapture .

UART connector

For more convenient access to the UART pins, I installed a SIL 6w female header and cut a 3x18mm opening in the back for access.

Beware

I have purchased some other Bluetooth adapters, and some HC-05 that did not have the hc01.com label on the board mask and they have had low throughput.

I have a bunch of hc01.com product from more than 10 years ago, and I purchased a new one in the past weeks, the hc01.com labelled ones all perform the same as each other.

Dislord claims he measured 460kbit throughput, but the β€˜genuine’  HC-05 does not deliver that throughput with my recent purchase Lenovo Windows 11 notebook.

Conclusions

This is not quite the no-brainer. The problems encountered were related to the specific firmware and my script (though Ho-Ro’s script may have the same issue). One is left wondering whether there were unresolved problems in some claimed implementations using this firmware.

That said, the prototype appears to work ok. It now needs to be packaged and some tests made of EMC including noise floor degradation.

Last update: 29th July, 2024, 6:38 PM

Holzforma / Farmertec G395XP chainsaw – first impressions

By: Owen
12 July 2024 at 01:22

I purchased a Holzforma G395XP chainsaw, it is a Chinese clone of the now discontinued Husqvarna 395XP It is a relatively old technology carburetted engine without stratified intake and without introducing electronic auto tune, a 30 year old design.

Some of the fasteners used to hold the top cowl down were noodled and would only work with a plain slotted screwdriver. They were replaced with hex button head screws.

In the light of experience with Holzforma / Farmertec G372XT chainsaw – early evaluation, a decision was made to preemptively vacuum and pressure test the G395XP saw.

It failed the vacuum test, not really badly, bad badly enough to warrant repair.

On removing the clutch etc to visibly examine the PTO side seal, the outer lip was not properly sitting on the shaft, the seal need to be driven in 1.0 to 1.5mm further. Given that the seals in the G372XT failed early due to one of both of low quality seal material and dry installation, the seal was removed and replaced. It was actually ok, not burnt, not worn, but had not properly engaged the shaft.

The flywheel was removed and the seal inspected, same problem but worse… the seal need to be driven about 2mm to properly engage the shaft. For the reasons given above, the seal was removed and a new one fitted.

A vacuum and pressure test was performed after 10min of operation with the new seals. There is a very slow leak of both vacuum and pressure, so slow as not to be concerning. It is substantially improved over the original hardly used crankshaft seals which were probably just not driven in sufficiently.

However, reassembling the muffler resulted in the M6 bolt thread stripping at just 6Nm (Husqvarna specified torque is 10-12Nm, hinting grade 8.8 fasteners), hinting low grade bolts on the Holzforma. A bad design where the expensive part (the bolt) failsΒ  before the nut.

They were replaced with Husqvarna bolts, and new nuts.

Lessons learned

Some small problems, though the air leak (bad crankcase seal fitting) could quite quickly cause a hot seizure which would probably write the saw off.

I own two Holzforma saws, and both failed a crankcase vacuum test. I would probably not buy one again, but if I did, I would perform a crankcase vacuum and pressure test.

I would be reluctant to torque any fasteners to more than 50% of Husqvarna’s recommendation.

Evaluation post repairs

The saw starts easily, as easily as any big saw. After adjustment to service manual settings, idle is stable, WOT is stable. It is a heavy but powerful saw with it seems a moderately wide power band. Running on 50:1 Amsoil Sabre and Ethanol free ULP, it is fairly low smoke, not as clean as strato engines, but pretty good.

Last update: 12th July, 2024, 12:33 PM

Common mode choke measurement – length matters #2

By: Owen
11 July 2024 at 17:18

Following on from Common mode choke measurement – length matters…

Lots of people have reported experiments to show gross failure of s11 reflection measurement of high impedances such as those encountered measuring common mode chokes.

Above is a chart of a β€œ10k resistor with leads” from (G4AKE 2020), the curve of interest is the s11 curve which he describes as unsuitable. He did not publish enough information to critique his measurement… so I will conduct a similar experiment.

My experiment

Above is a pic of my experimental setup. The resistor on Port 1 is a 10k 1% metal film resistor. The NanoVNA has been SOL calibrated at the Port 1 jack.

Above is a screenshot of the measurement. Quite similar result to that shown in (G4AKE 2020). (Note R, X, s11 phase at the marker.)

Note the s11 phase plot, we see the phase of s11 falling at a uniform rate from 1 to 101MHz.

What should we expect?

s11 for a 10k+j0 DUT should be 0.990050+j0 or 0.990050∠0.000° independent of frequency.

But we see this linearly decreasing phase. It is a big hint, transmission lines do this sort of thing.

So what if we attempt an approximate correction using e-delay.

e-delay of 54.5ps flattens the phase response, and the R and X values are closer to ideal, not perfect, but much closer than the uncompensated plot earlier.

A SimNEC simulation

Above is a SimNEC simulation of my experiment.

Conclusions

  • An experiment to duplicate G4AKE’s measurement achieves similar response.
  • Drilling down on the detail of the experiment response hints that the resistor pigtails contribute transmission line effect that are the main cause of the poor response.
  • An approximate compensation of the transmission line effects gives an impedance measurement that is much better than G4AKE’s recommended s21 series through measurement.
  • G4AKE condemns s11 impedance measurement as unsuitable, but there is good reason his fixture was the main reason for poor results… length matters.
  • Read widely, question everything.

References

Mar 2020. G4AKE. Measuring high and low impedance at RF.

Last update: 12th July, 2024, 7:57 AM
❌
❌