2m activity contest (UKAC)
1 October 2024 at 19:50

As usual, I was running 10W PEP to my big-wheel omni antenna.
Because of my poor voice I was only on for 30 minutes. 4 QSOs were made. See map.
![]()

![]()
Don't know why I didn't write about this when it happened.
August 9th, the daily Sunspot Number (SSN) was 382. That seemed enormously high. I couldn't remember a single time when the SSN was that high. So, I did some digging.
I downloaded all the SSN data, converted into an Excel spreadsheet and did some analysis. The SSN hasn't been that high since 1991. That's 33 years ago!
The SSN has only been this high a total of ten times in my lifetime (since February 1961) -- Five in 1979, Twice in 1989, and Three times in 1991.
Of course, none of this compares with Cycle 19, where daily SSN values were well over 500 for many days. But those values all happened 1956-1959, well before I was born.
Cycle 25 is shaping up to be much better than Cycle 24, which was really lousy, and possibly better than Cycle 23. The smoothed SSN has already exceeded the maximum value for Cycle 24, and it is far from over.
We've already seen a huge change in the bands in the last couple of years. 20m is open 24 hours, and 15m much of that time. 12 and 10m is open every day. I'm hoping we might see some 6m F2 openings. Enjoy it while you can. We should have two more years of these conditions before the cycle starts back down.
I’ve been enjoying activating SOTA summits on 2m, and after visiting Glas Maol and seeing how far I could get with an omni directional antenna, and watching videos of people using a 2m yagi to get into England from the highlands, I wanted to build a yagi.
All my research pointed me towards DK7ZB’s designs, specifically the lightweight ones. I decided the 4 element design with a 1m boom was optimal between gain and practicalities. This has a gain of 7 dBd and a front to back ratio of 12 dB. It also has the advantage of being able to use it with 70 cms.
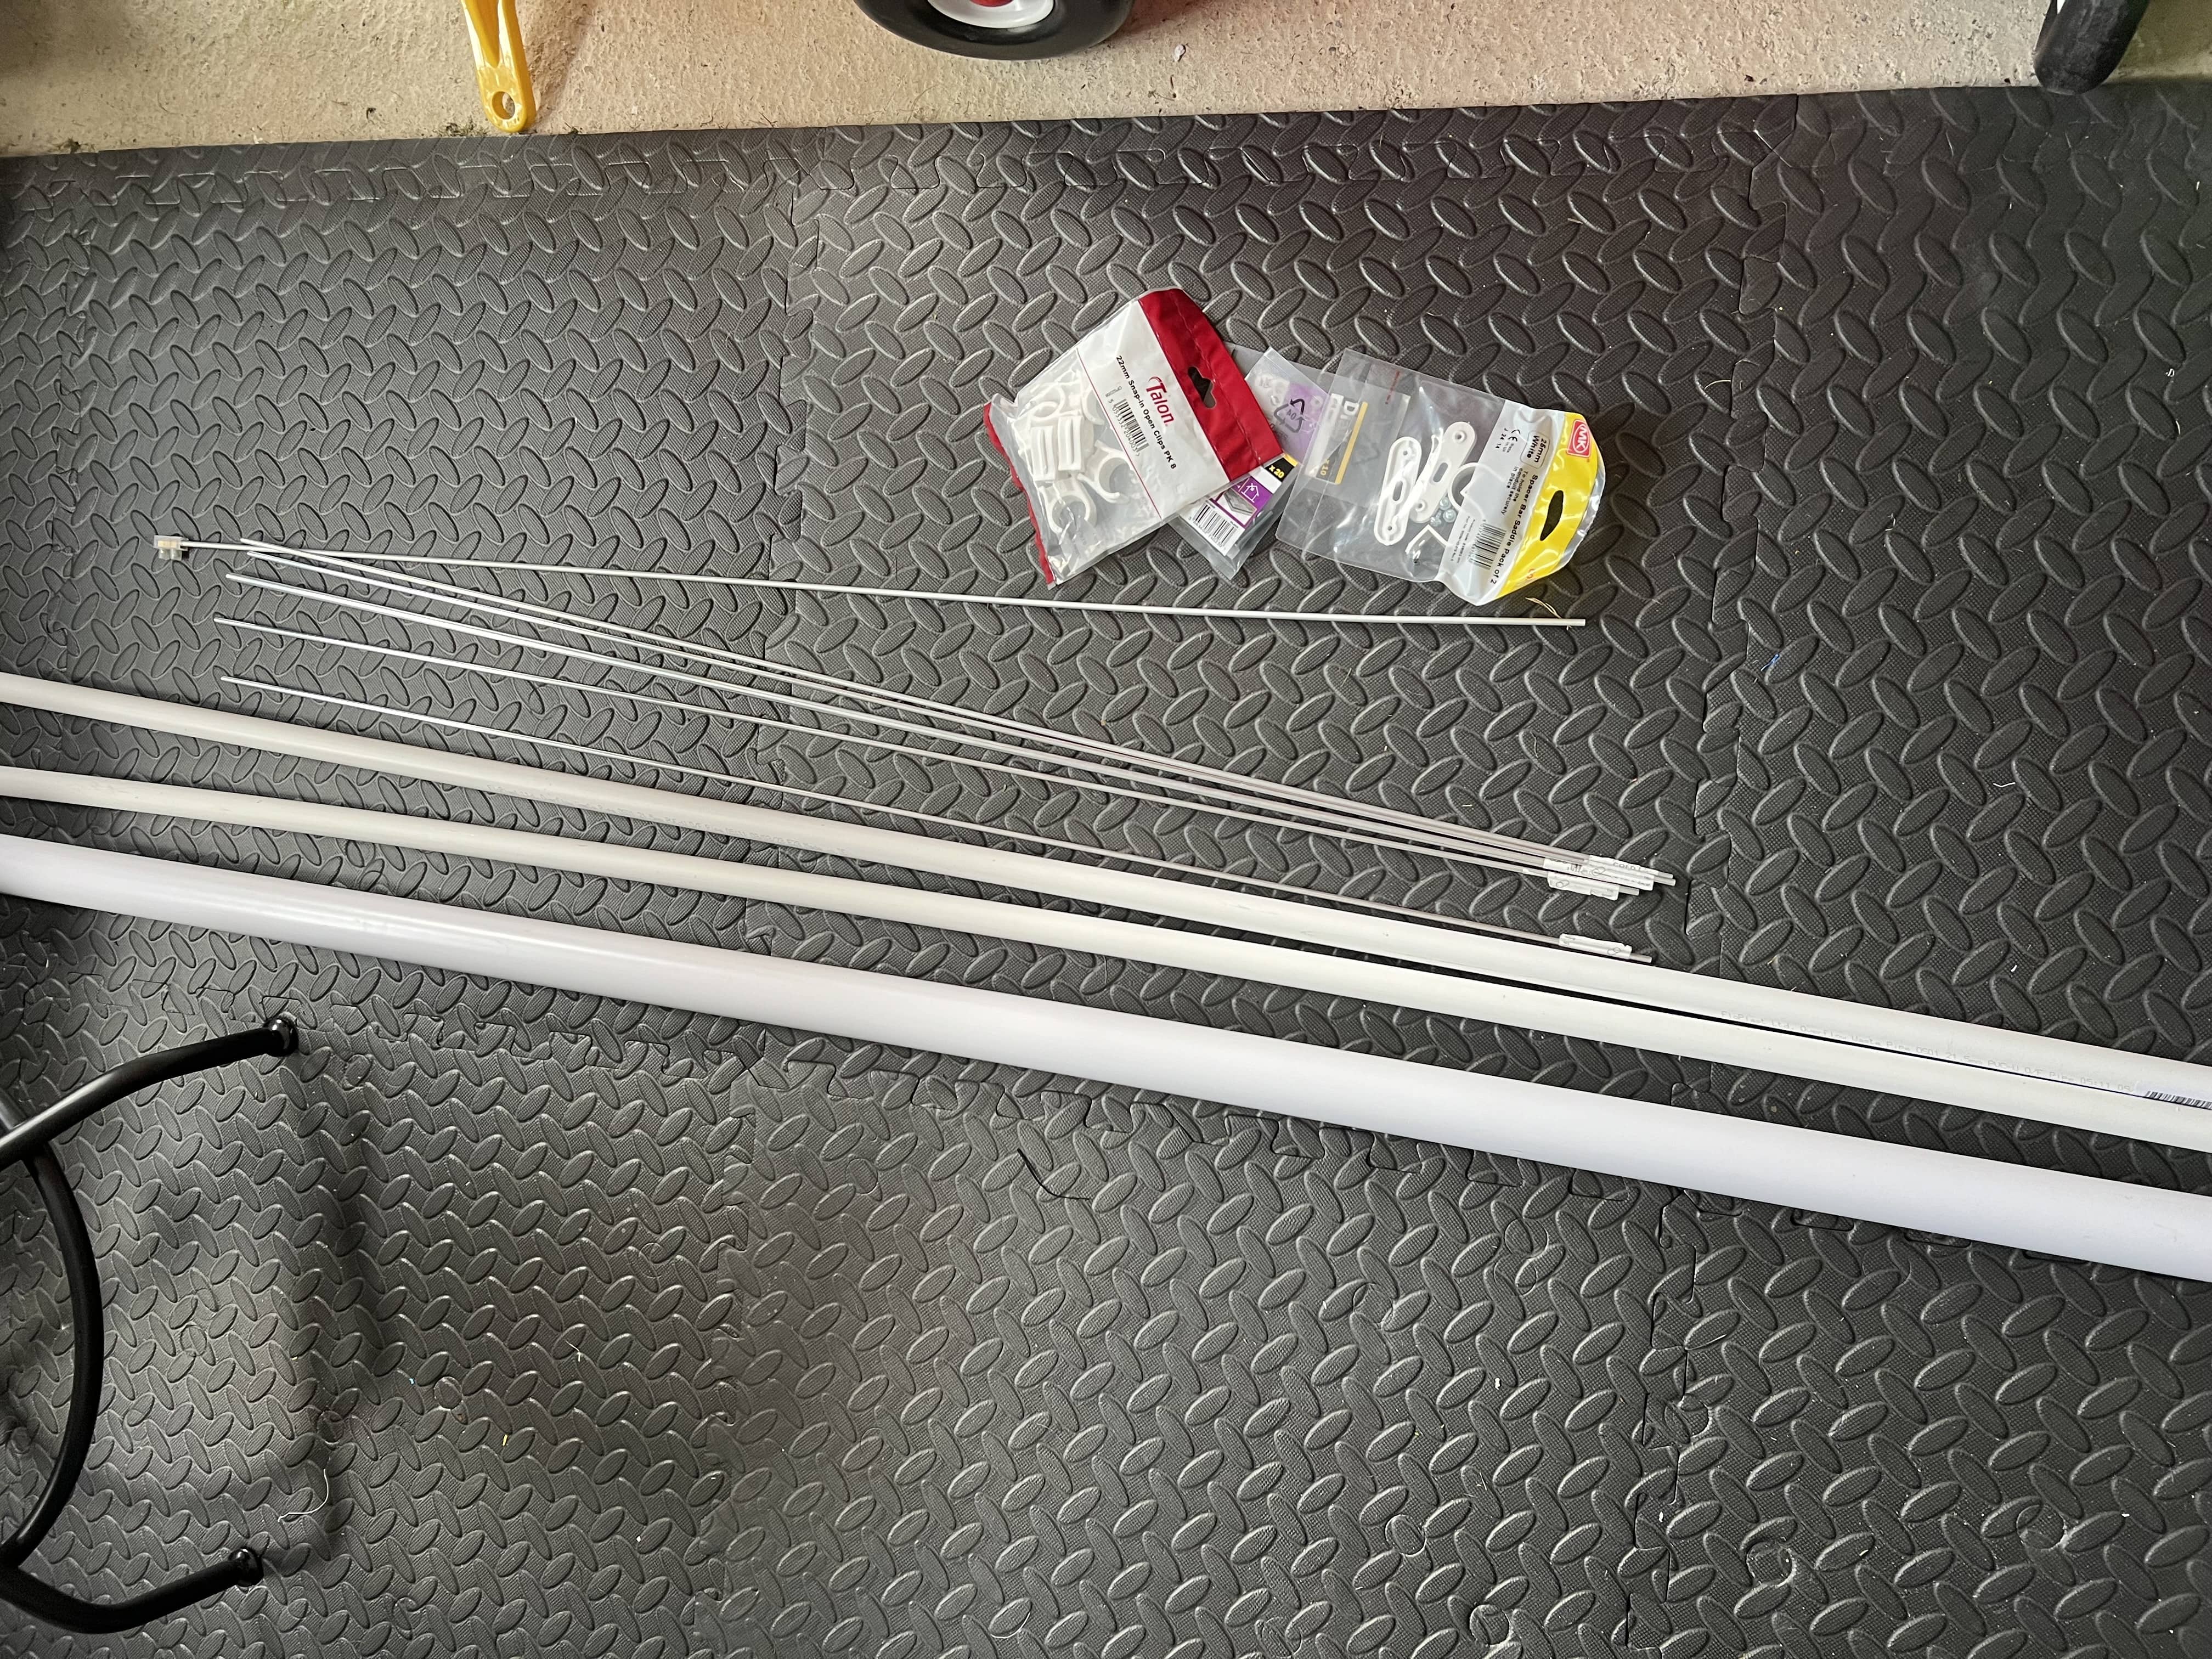
I went to B&Q and bought some 22mm PVC pipe, some wall clips, 4mm aluminium rods, and a 6mm aluminium tube. I already had some electrical connector blocks and RG58 cable at home. I made the boom a little longer than 1m, so I could hand hold it if I wanted to, otherwise it only needs to be 1m in length.
| Positions along boom (mm) | Length of element (mm) | |
|---|---|---|
| Reflector | 0 | 1020 |
| Radiator | 260 | 977 |
| Director 1 | 470 | 930 |
| Director 2 | 985 | 910 |
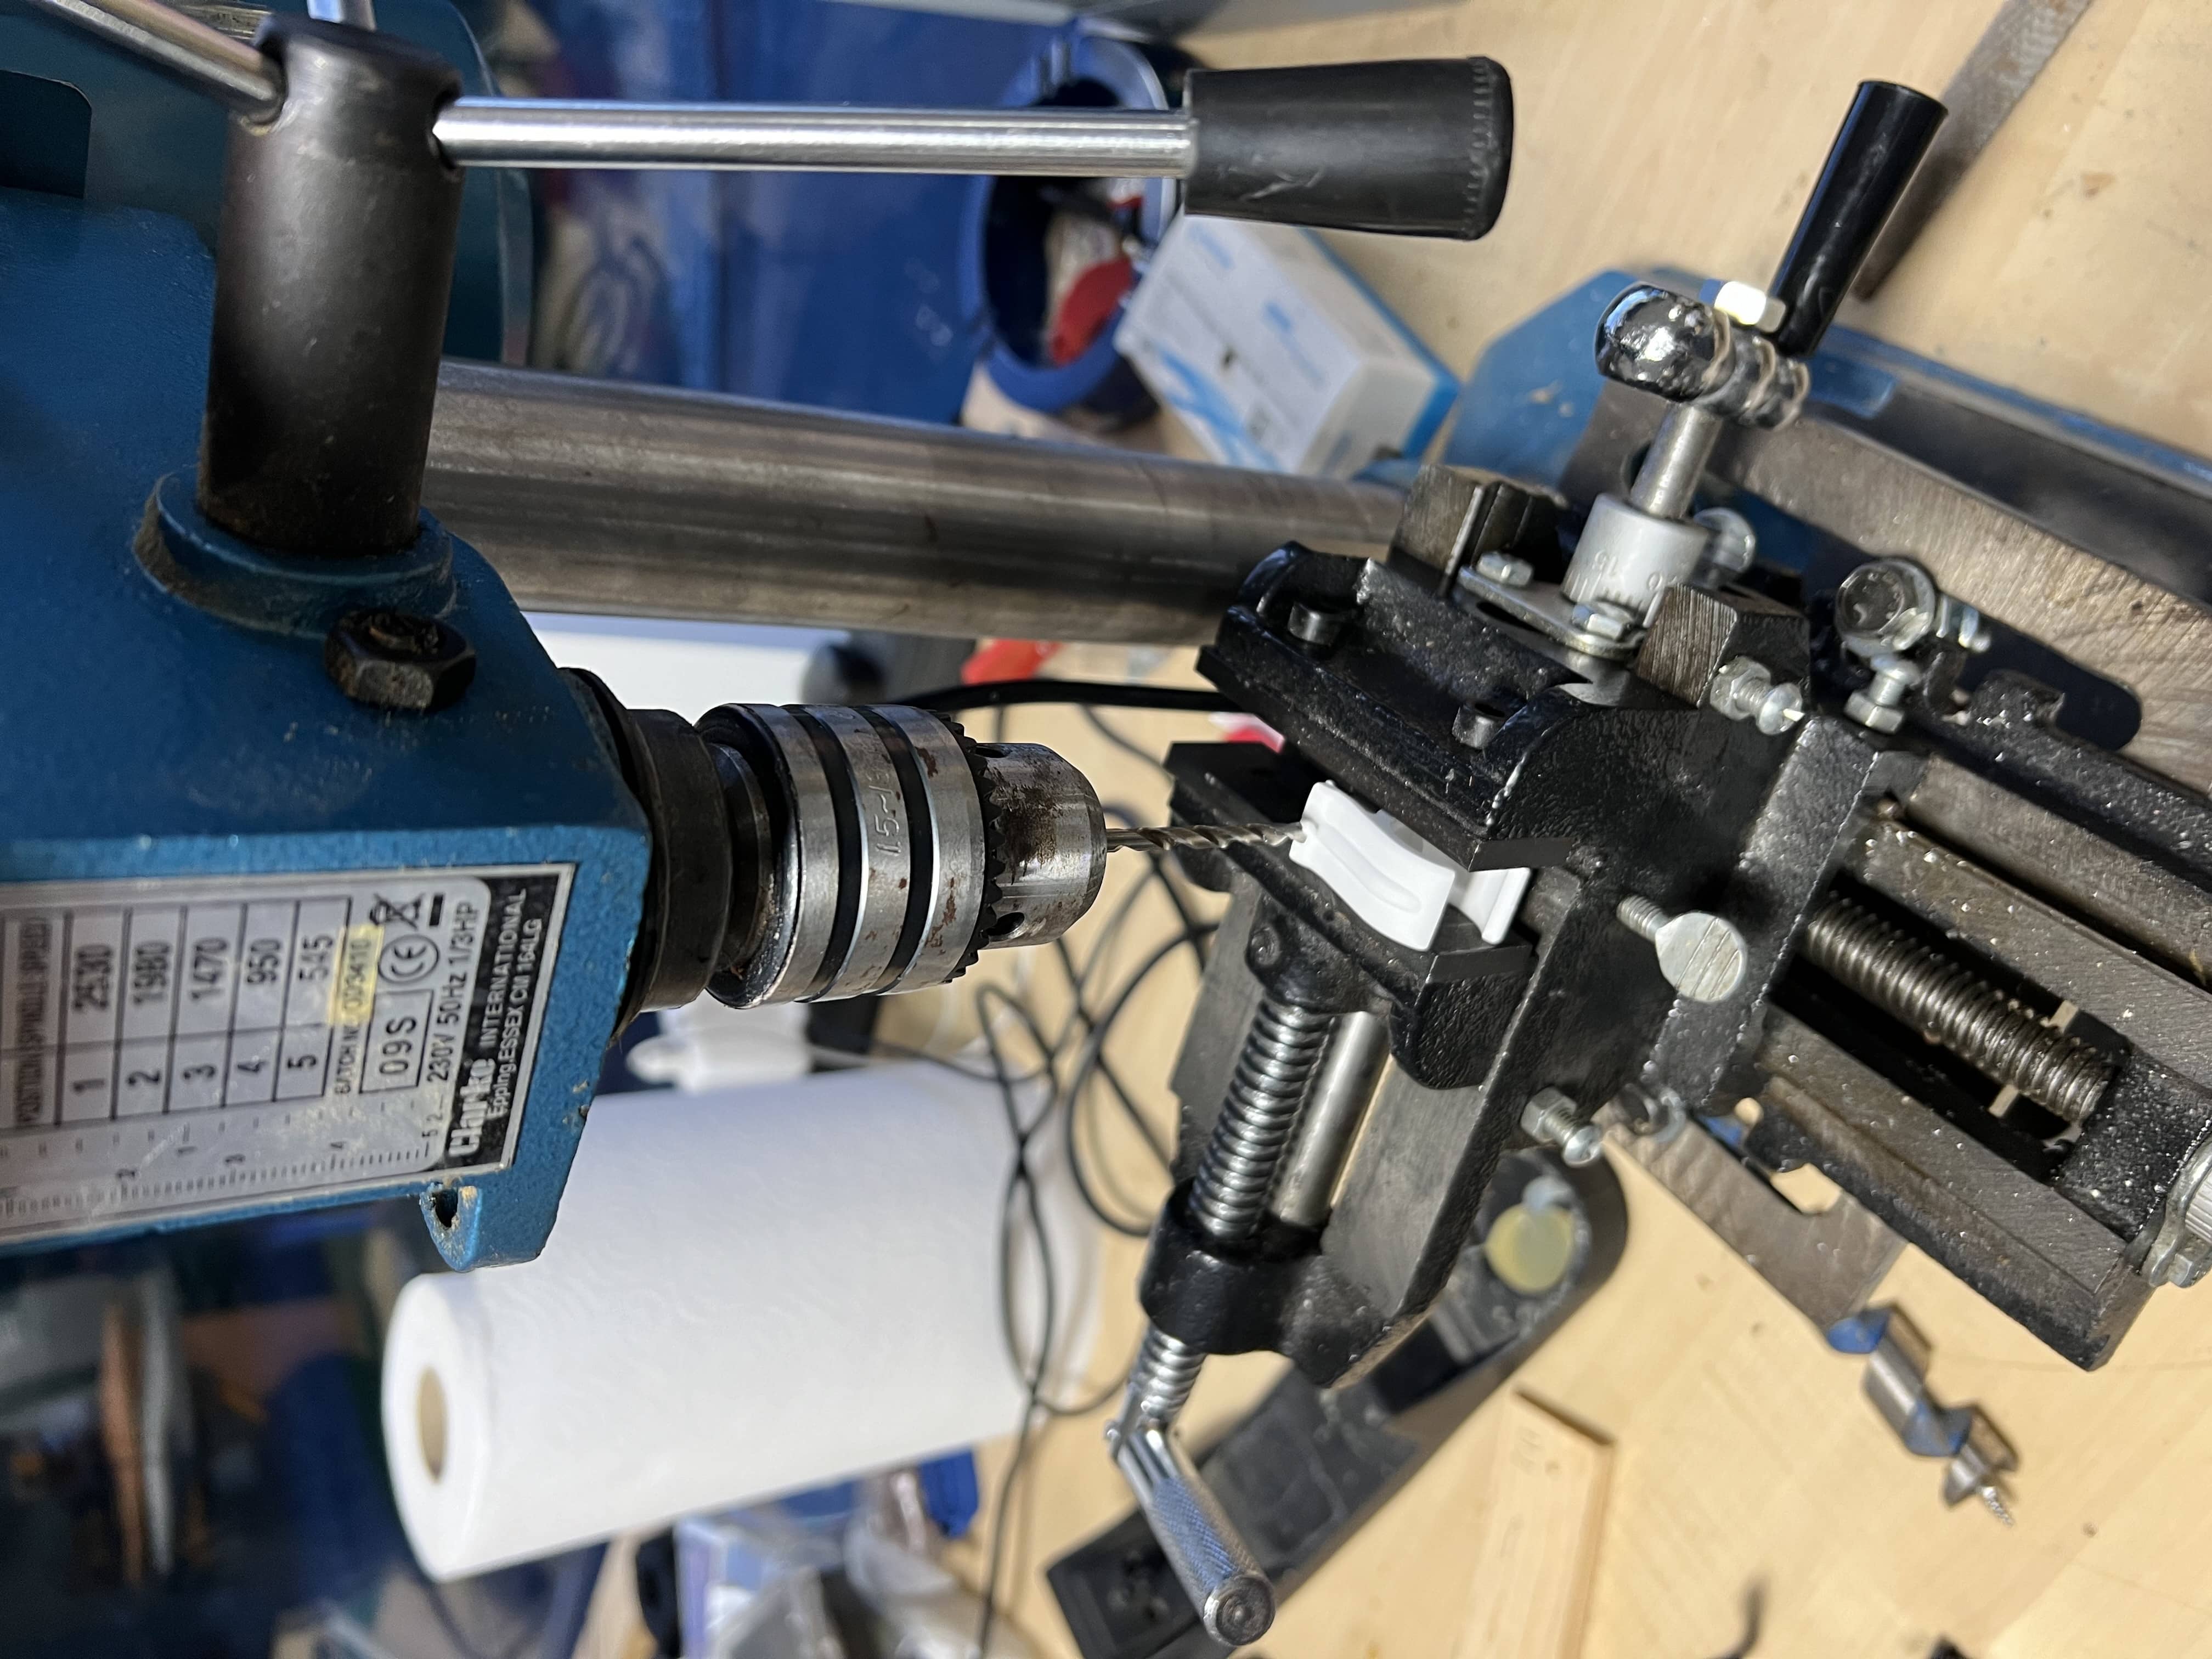
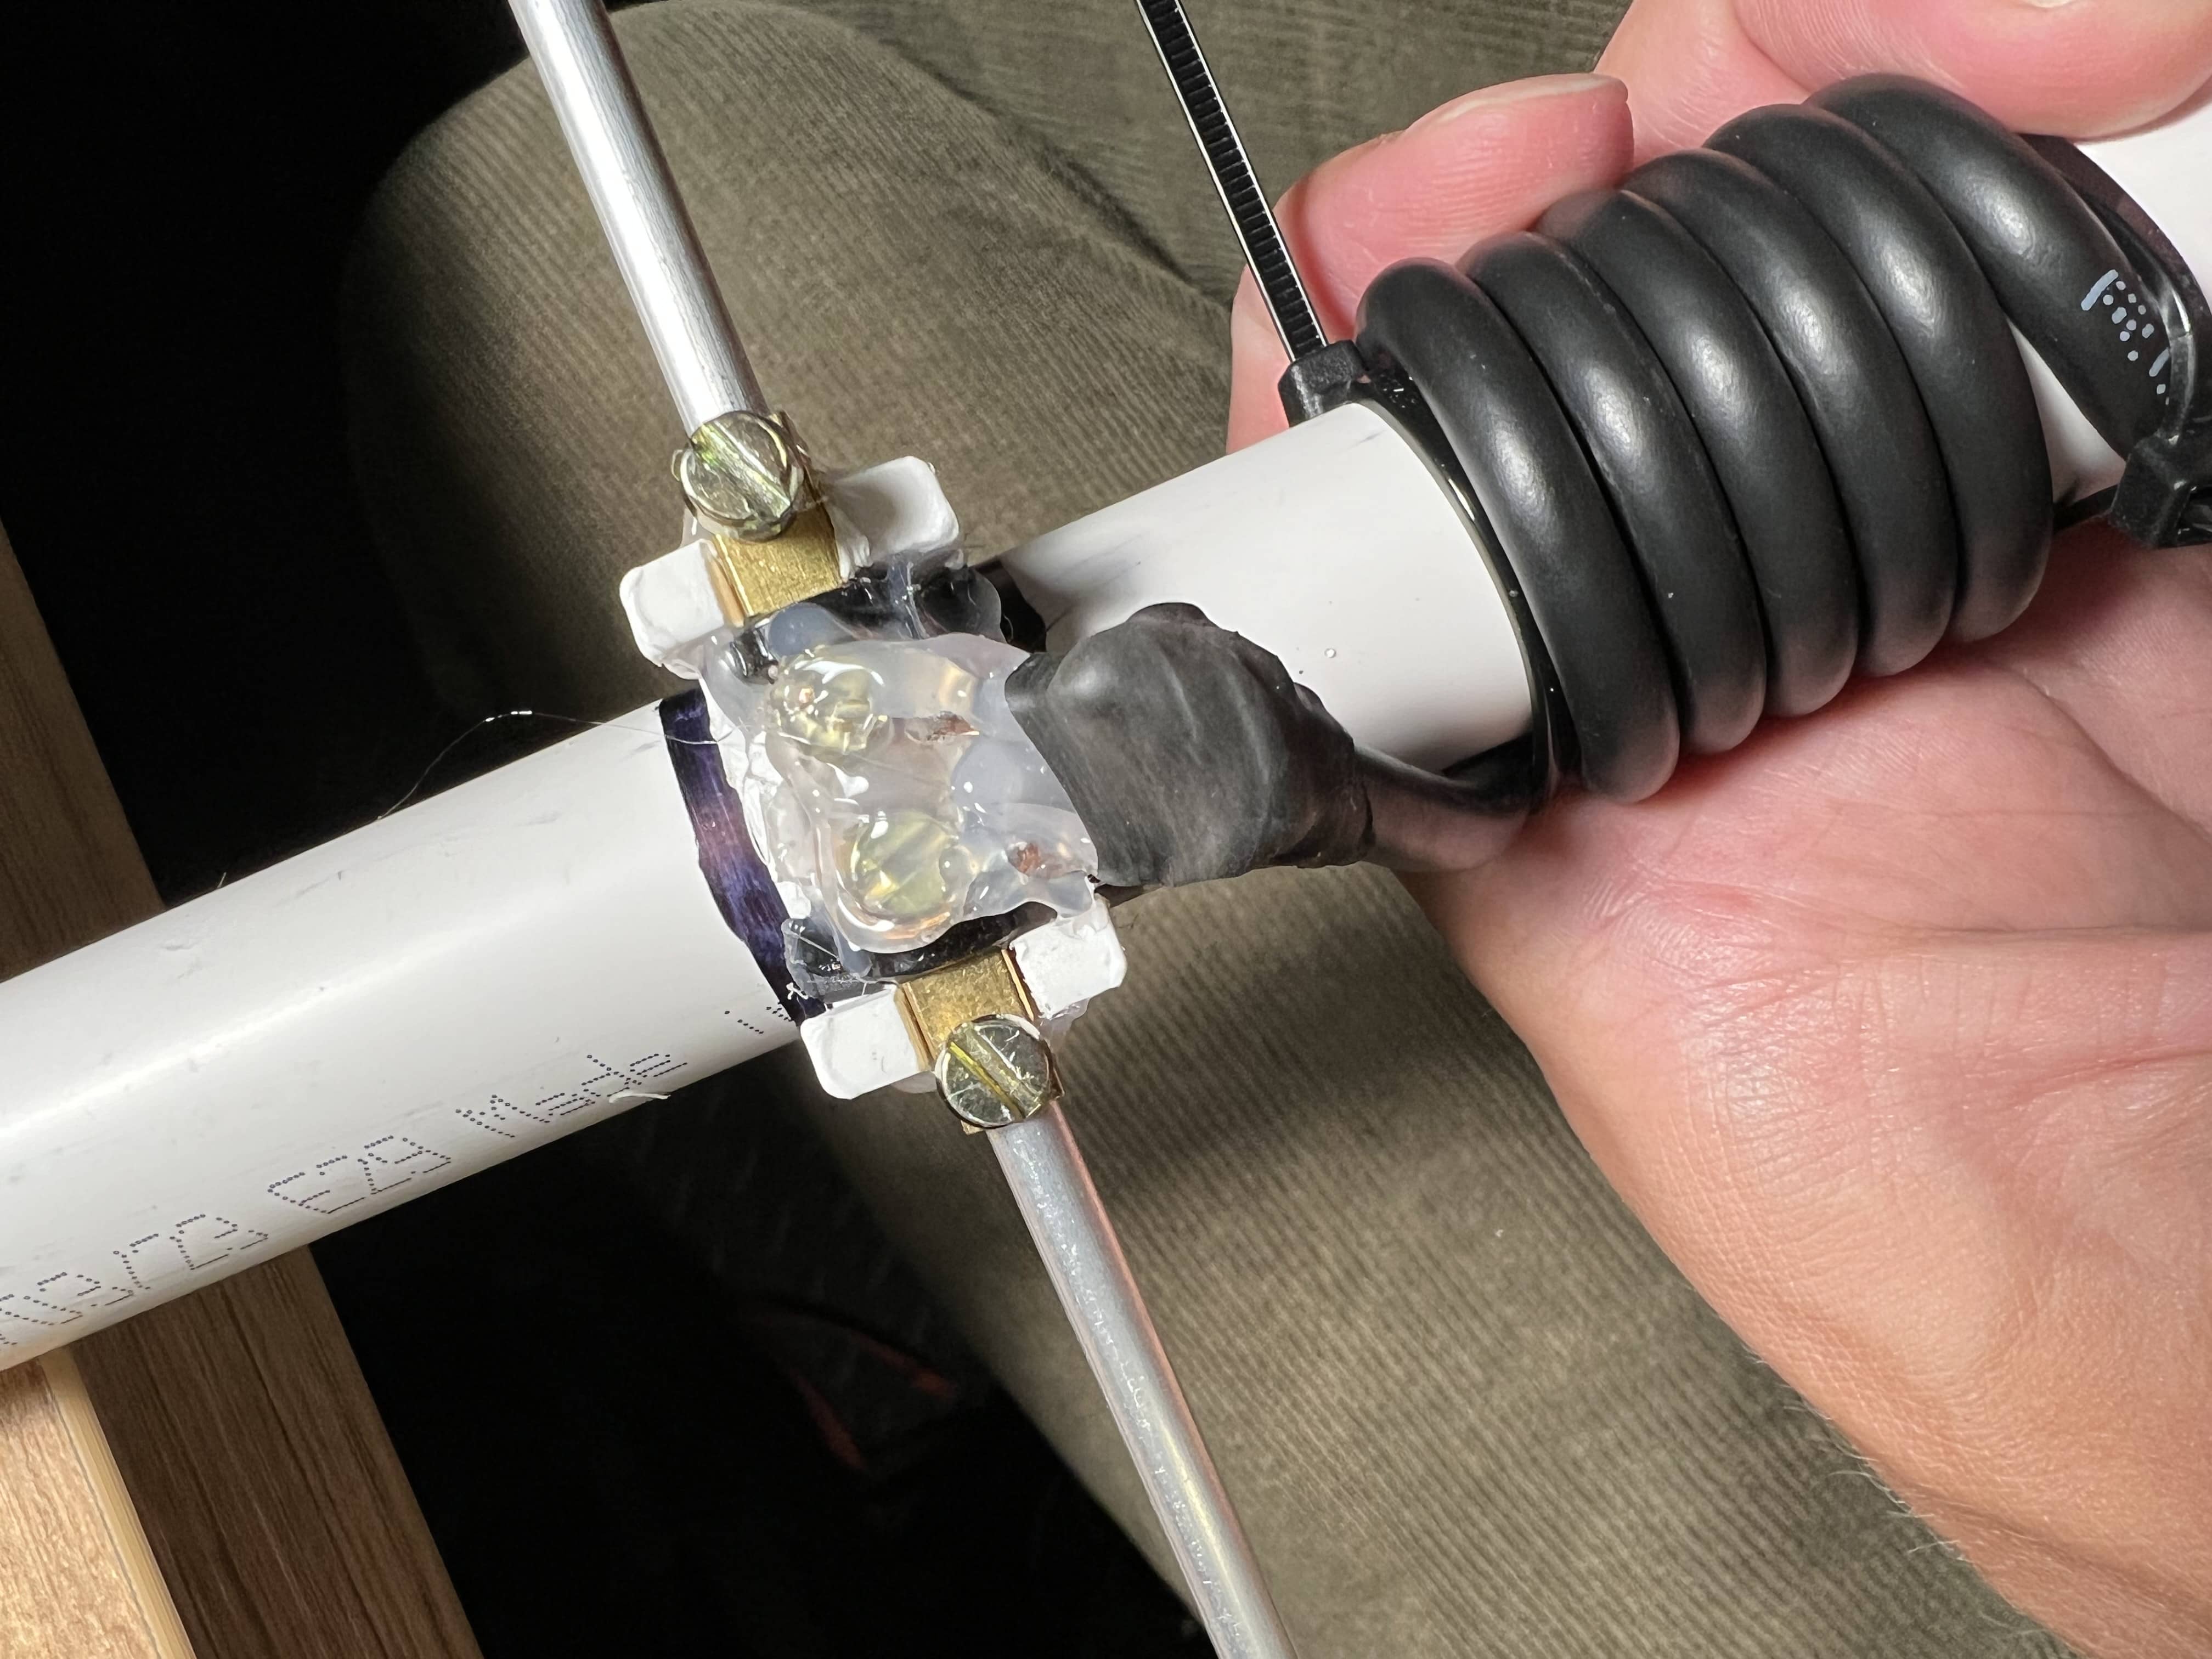
VK1AD’s post on building a similar yagi helped me decide how to mount everything to the boom, and I set to cutting the aluminium rods and drilling the holes in the clamp. The directors are easy, as they just slide through the clamp as a single piece. The reflector is slightly longer than 1m which the rods come in, so I used the 6mm tube as a connector between two 4mm rods. Sounds good in theory but it’s tricky to get the rods into the tube - precision hammering needed.
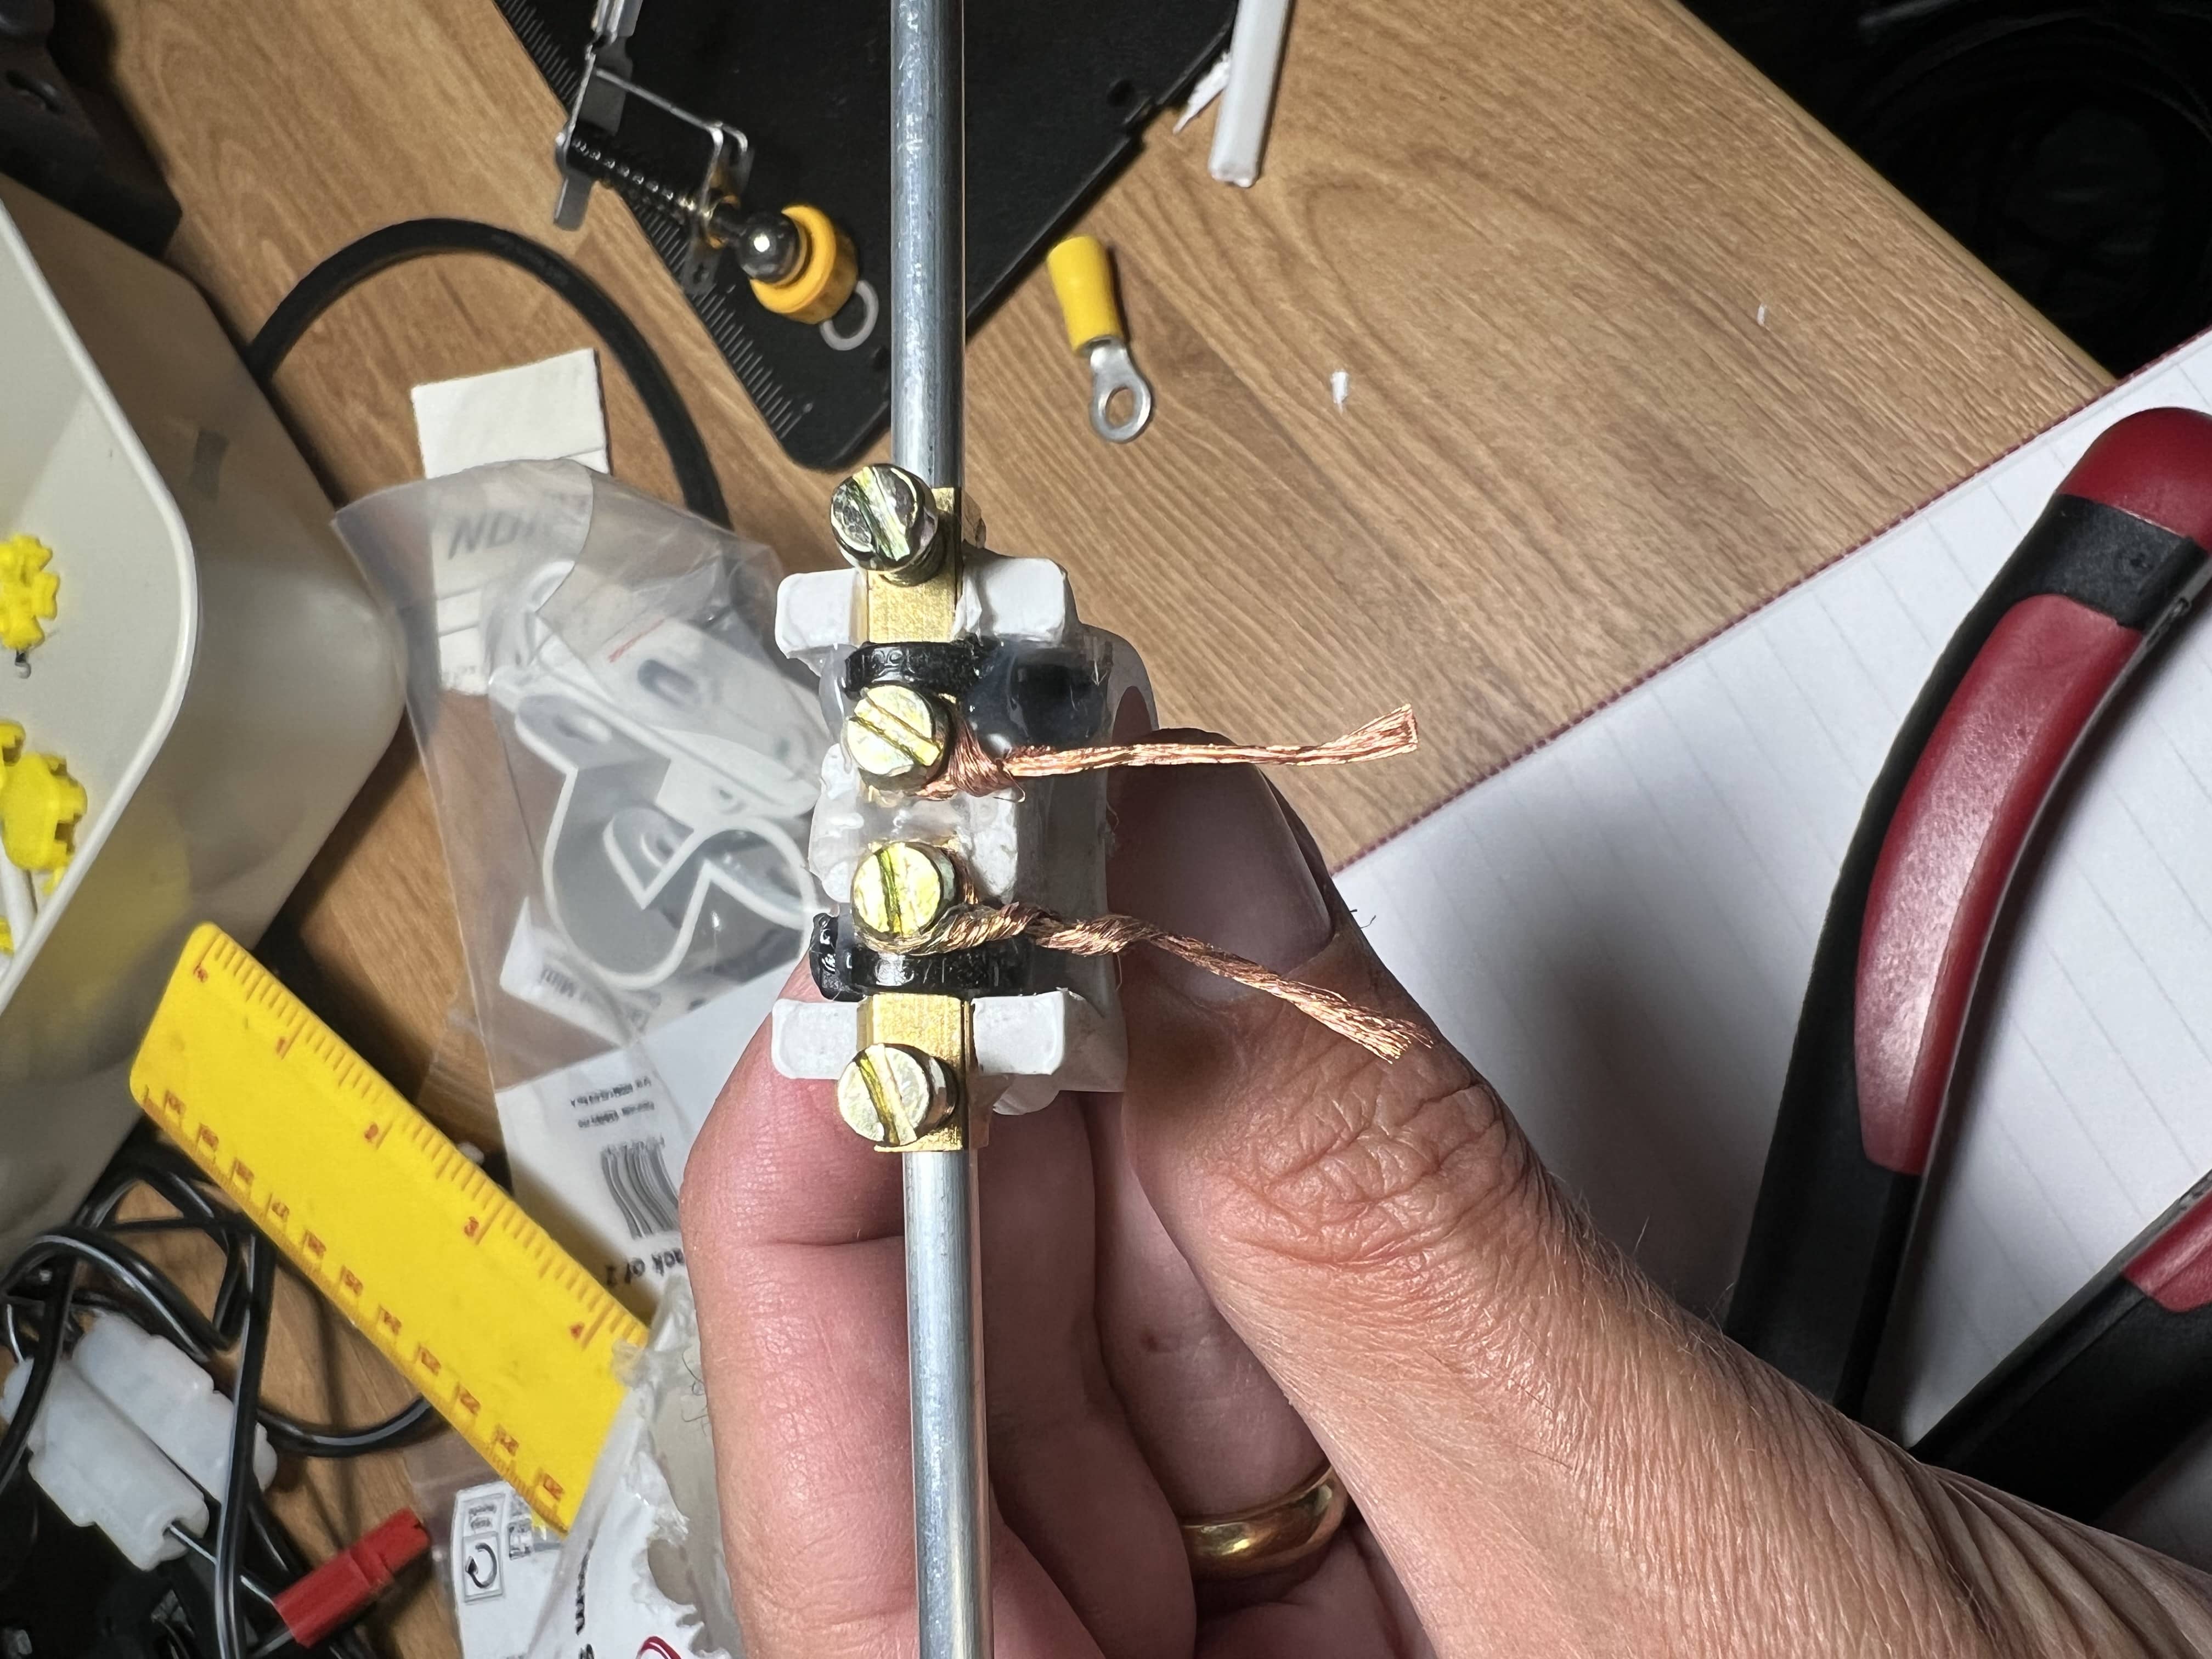
The driven element used the connectors from inside an electrical connector block, zip tied and then glued into one of the clamps. I used some solder wick to attach the coax to and screwed the elements in on each side.
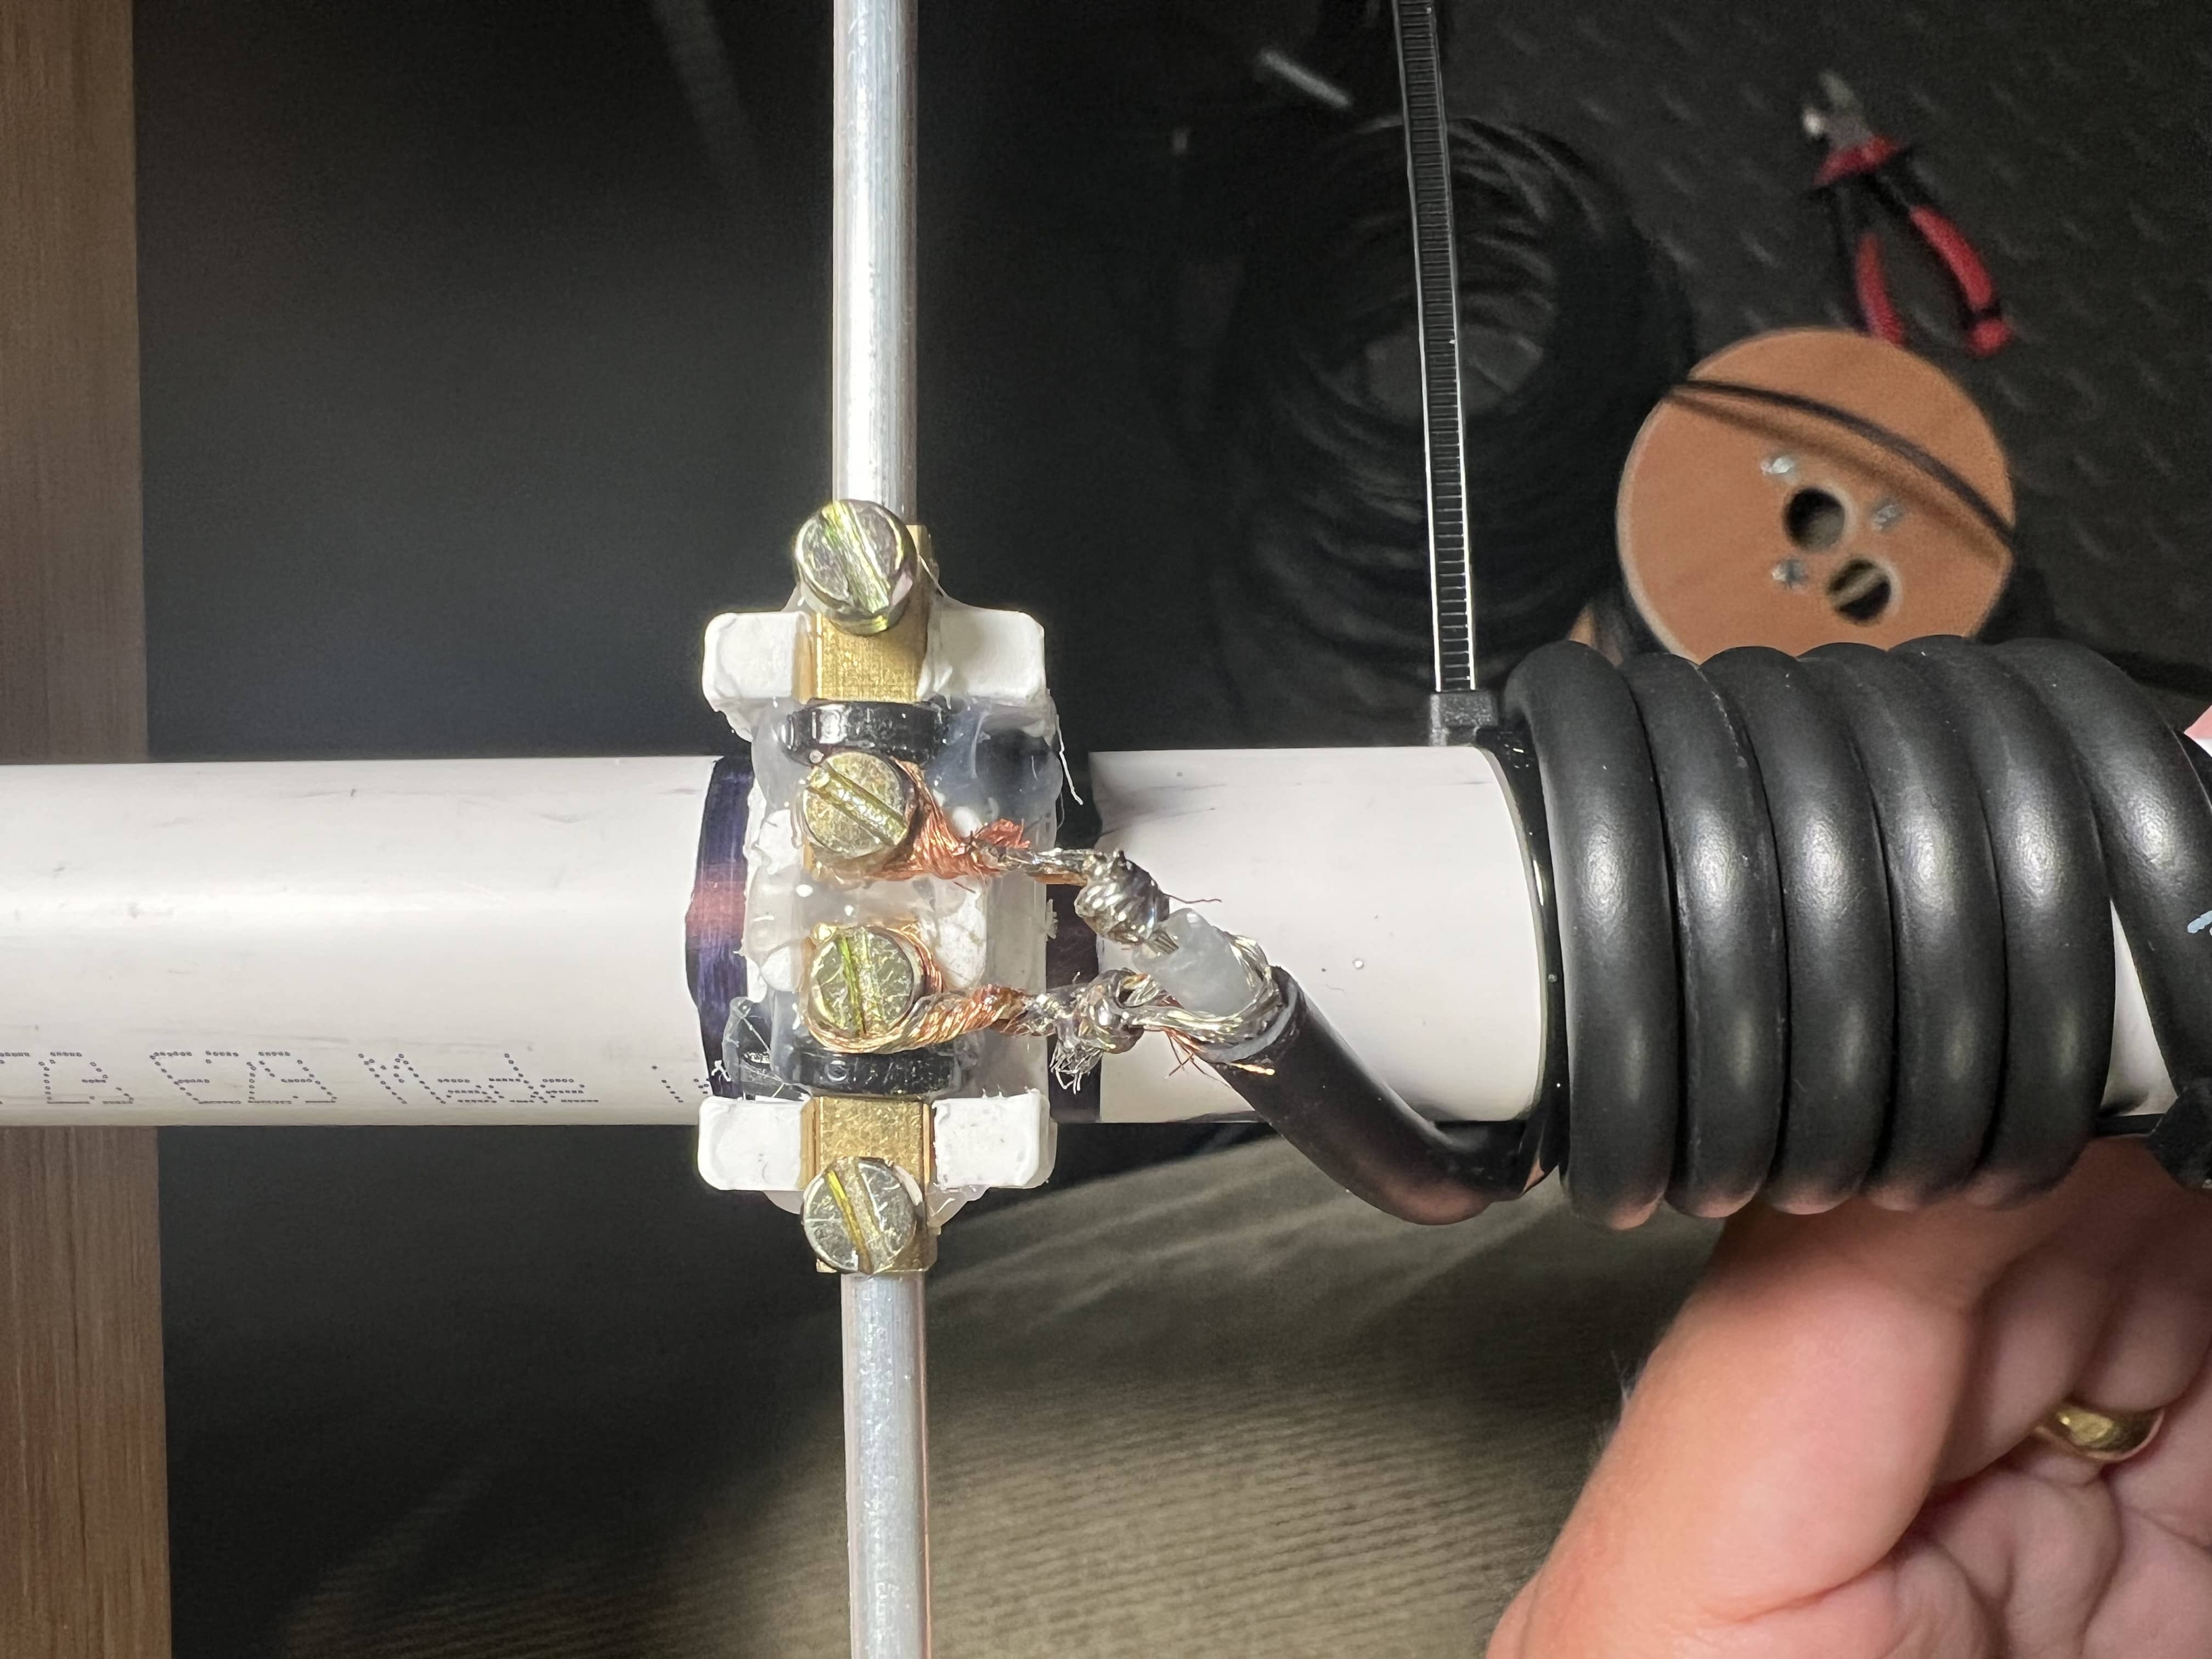
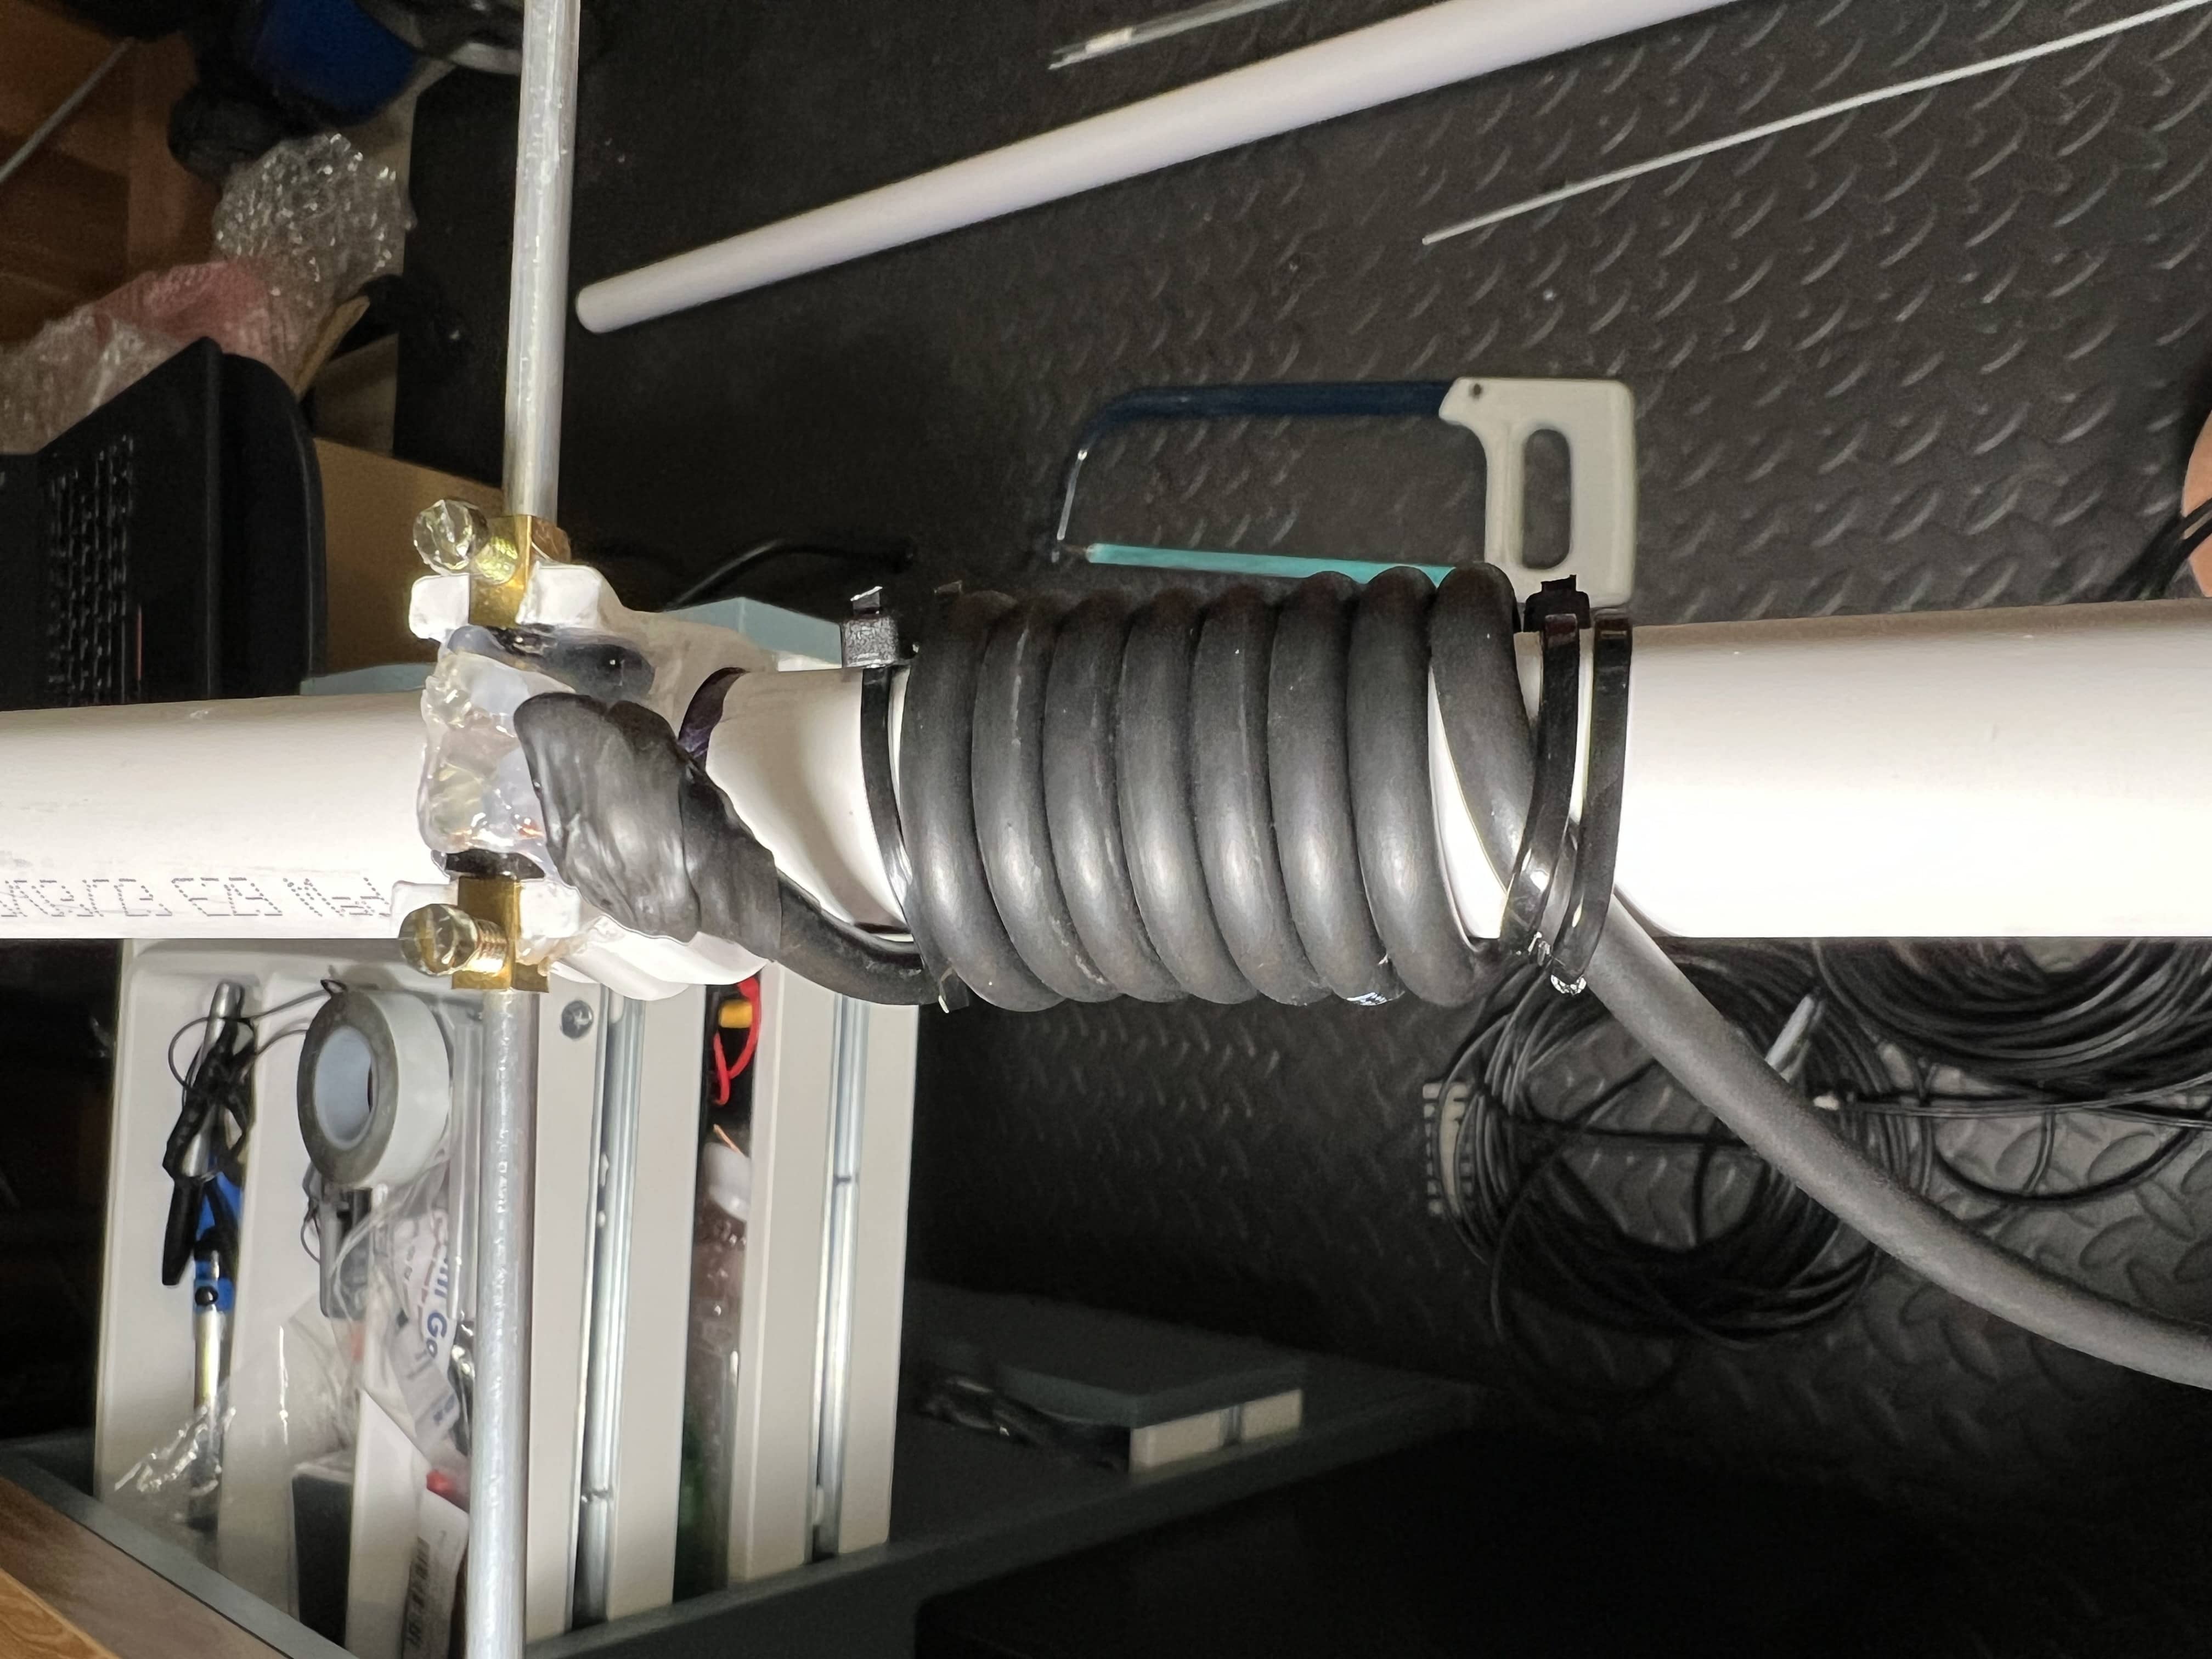
RG58 is a bit heavy but it’s all I had so would do. Whilst this was easy to build, it does mean the only way I can transport it is by unscrewing the elements. Not the best solution but I wanted to get it built vs. debating over other ways or buying more things. A common way others do it is with a box mounted on the boom and there’s a coax connector on it, so you can remove the box with driven element in one. My one has about 3-4m of coax on which is enough from the mast mounting position to having the radio on the ground underneath.
The length of the driven element is from tip to tip, including the gap in between.
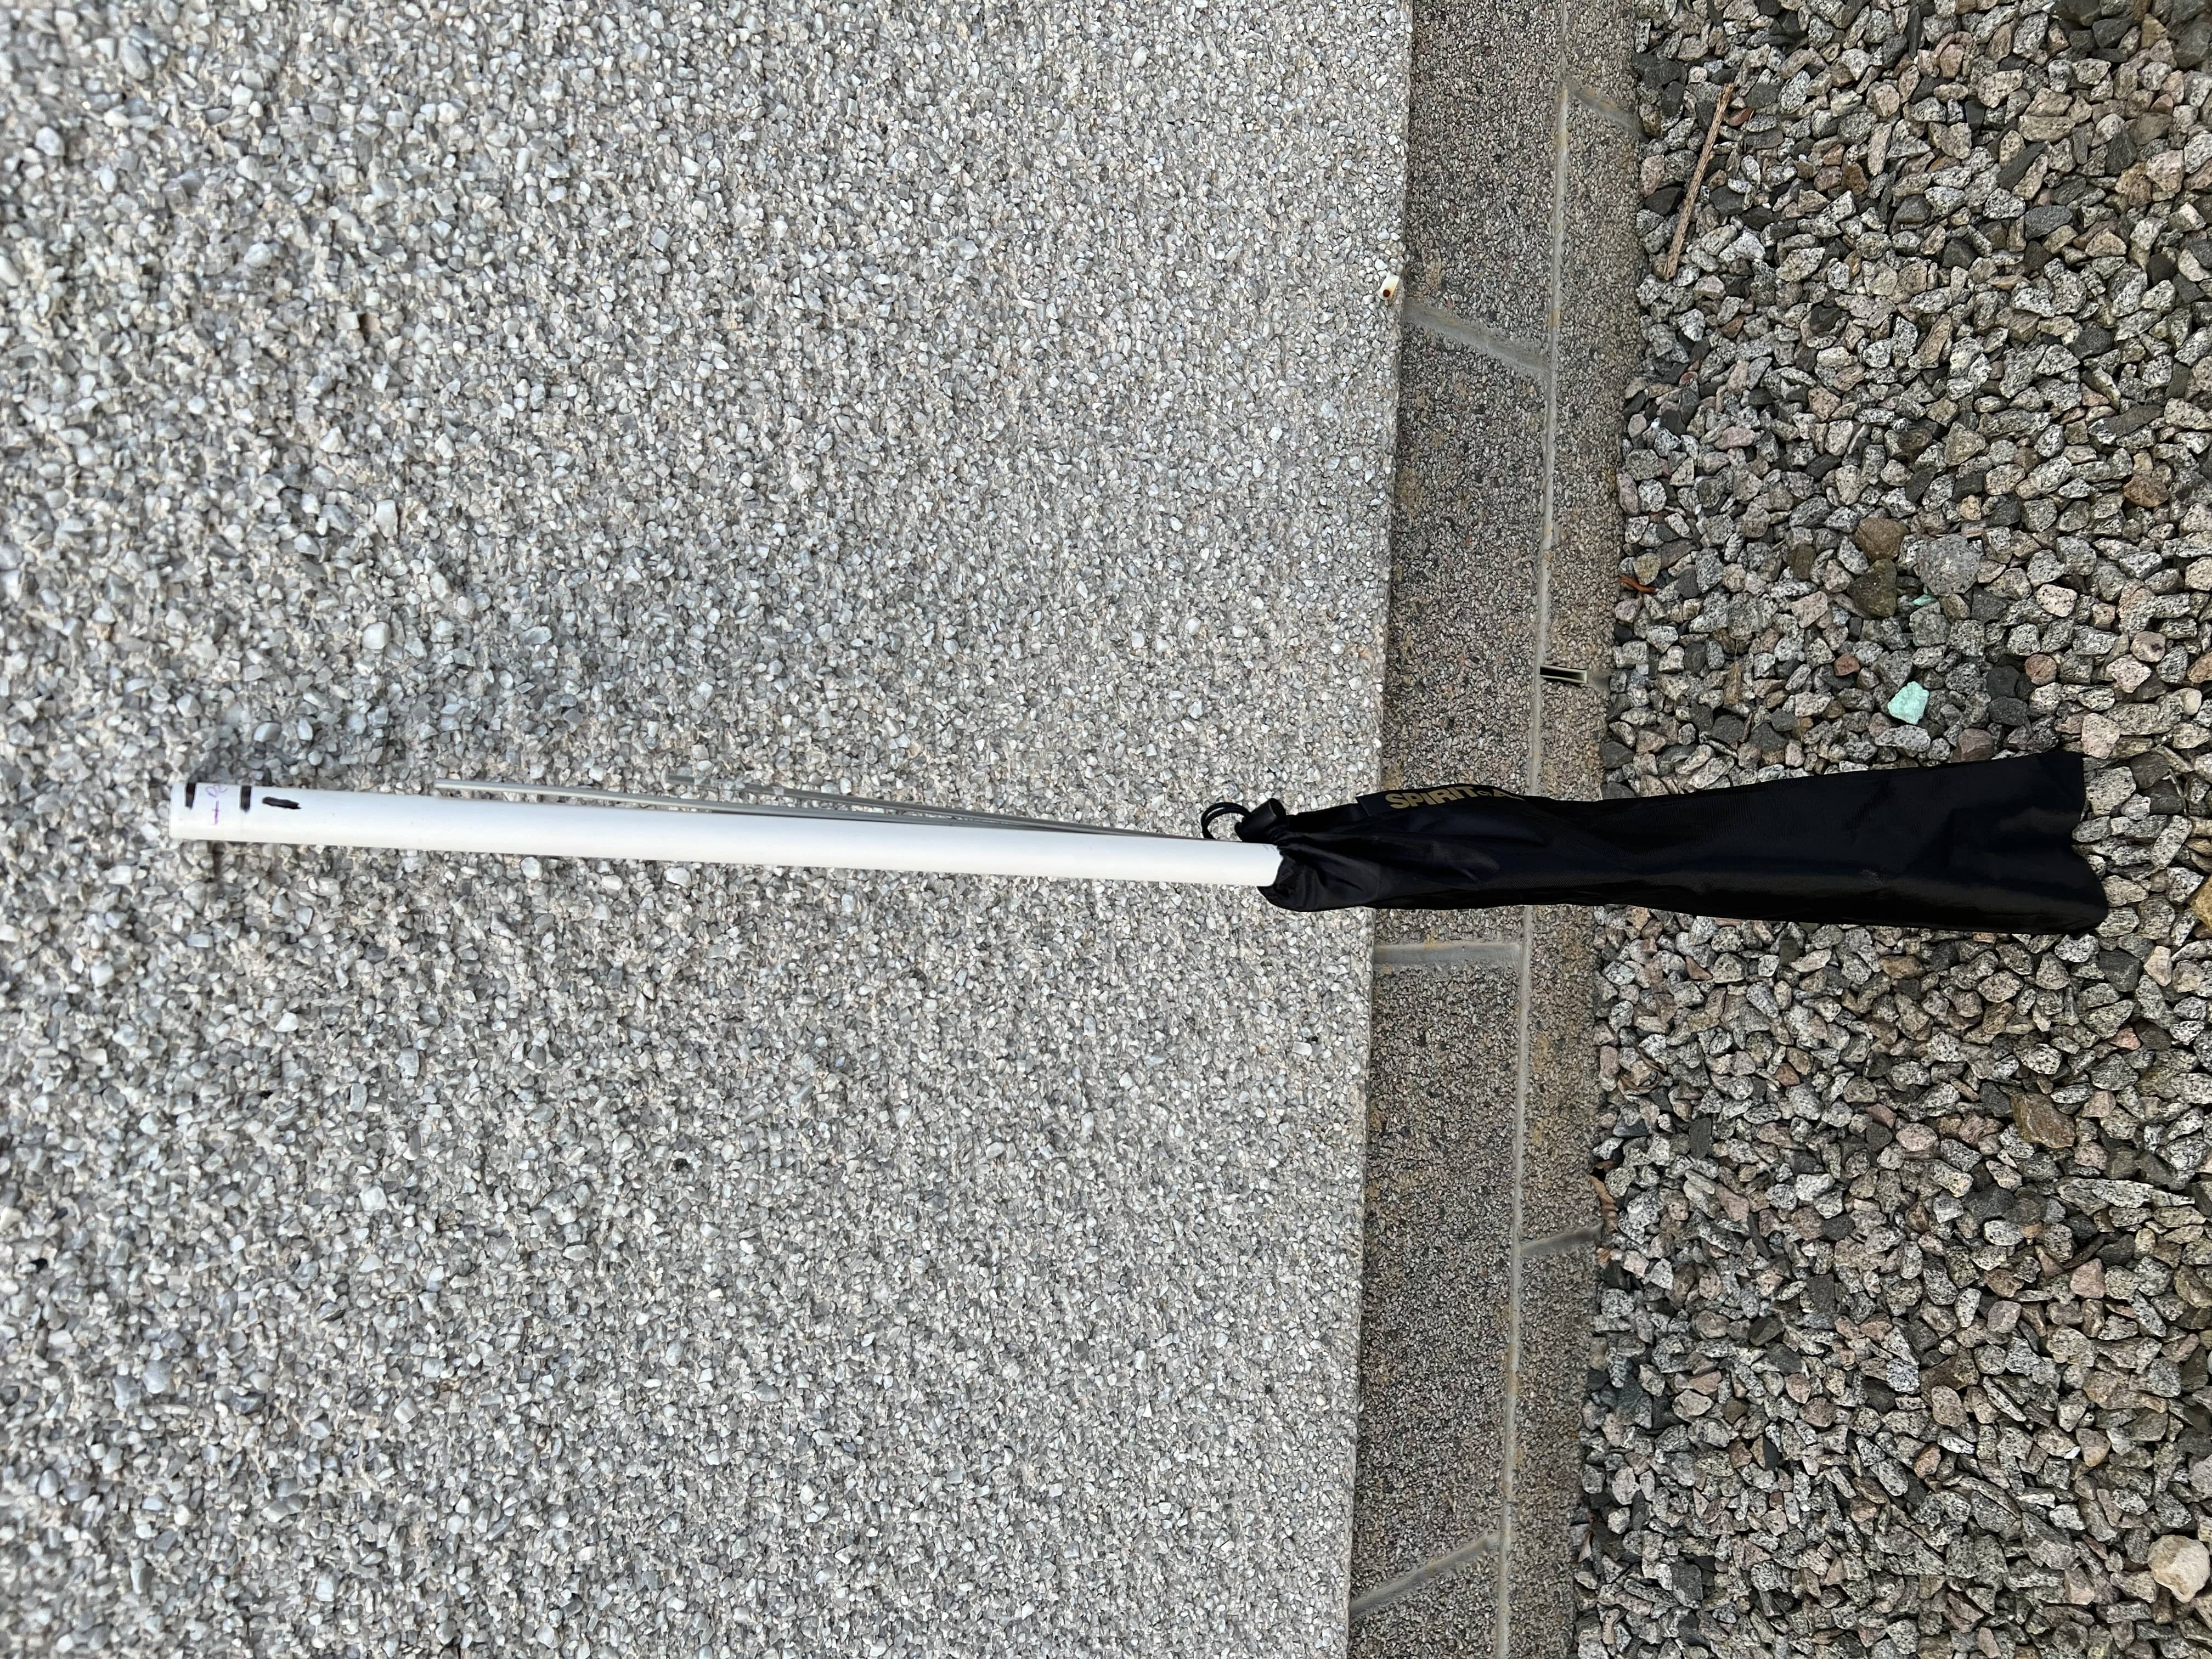
I marked the PVC tube with sharpie for the location of each clamp, together with numbers. I also put a mark in the centre of the rod on the directors so I could centre it if it moved about in the clamp. It’s all about 1m long and I found a thin bag to carry it in. It’s not the greatest but will do. I used bungees to tie it to the side of my backpack.
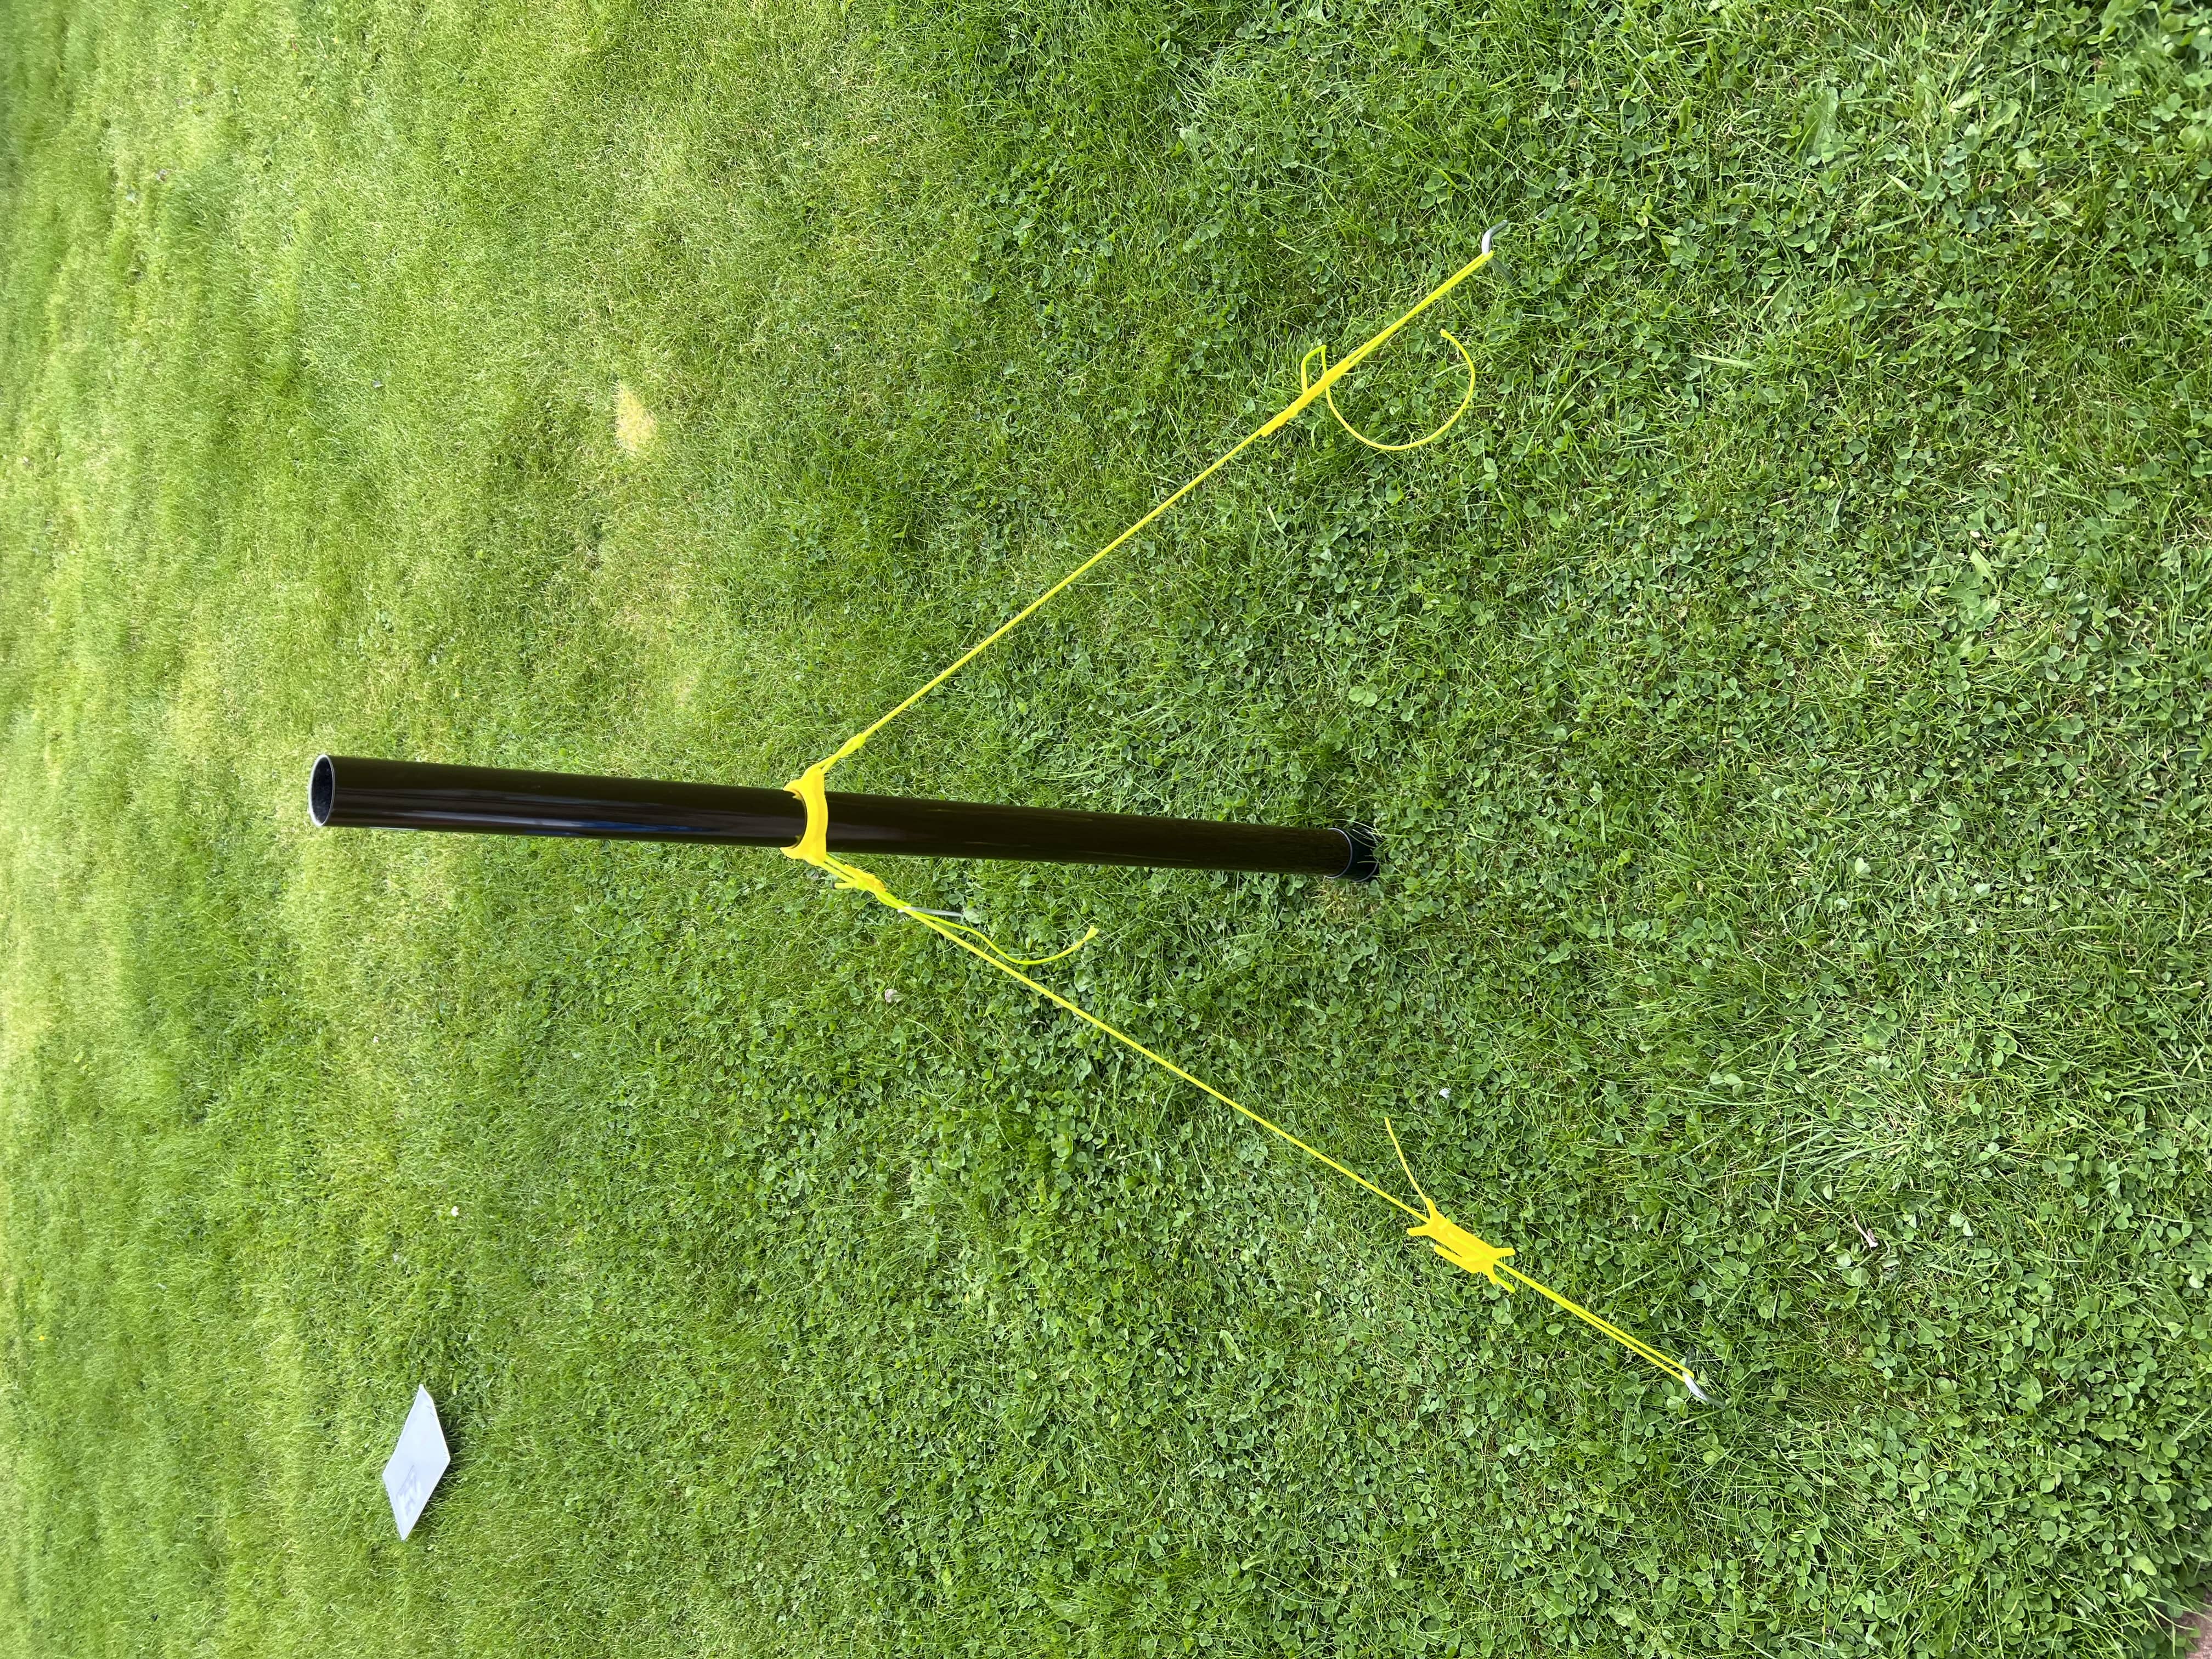
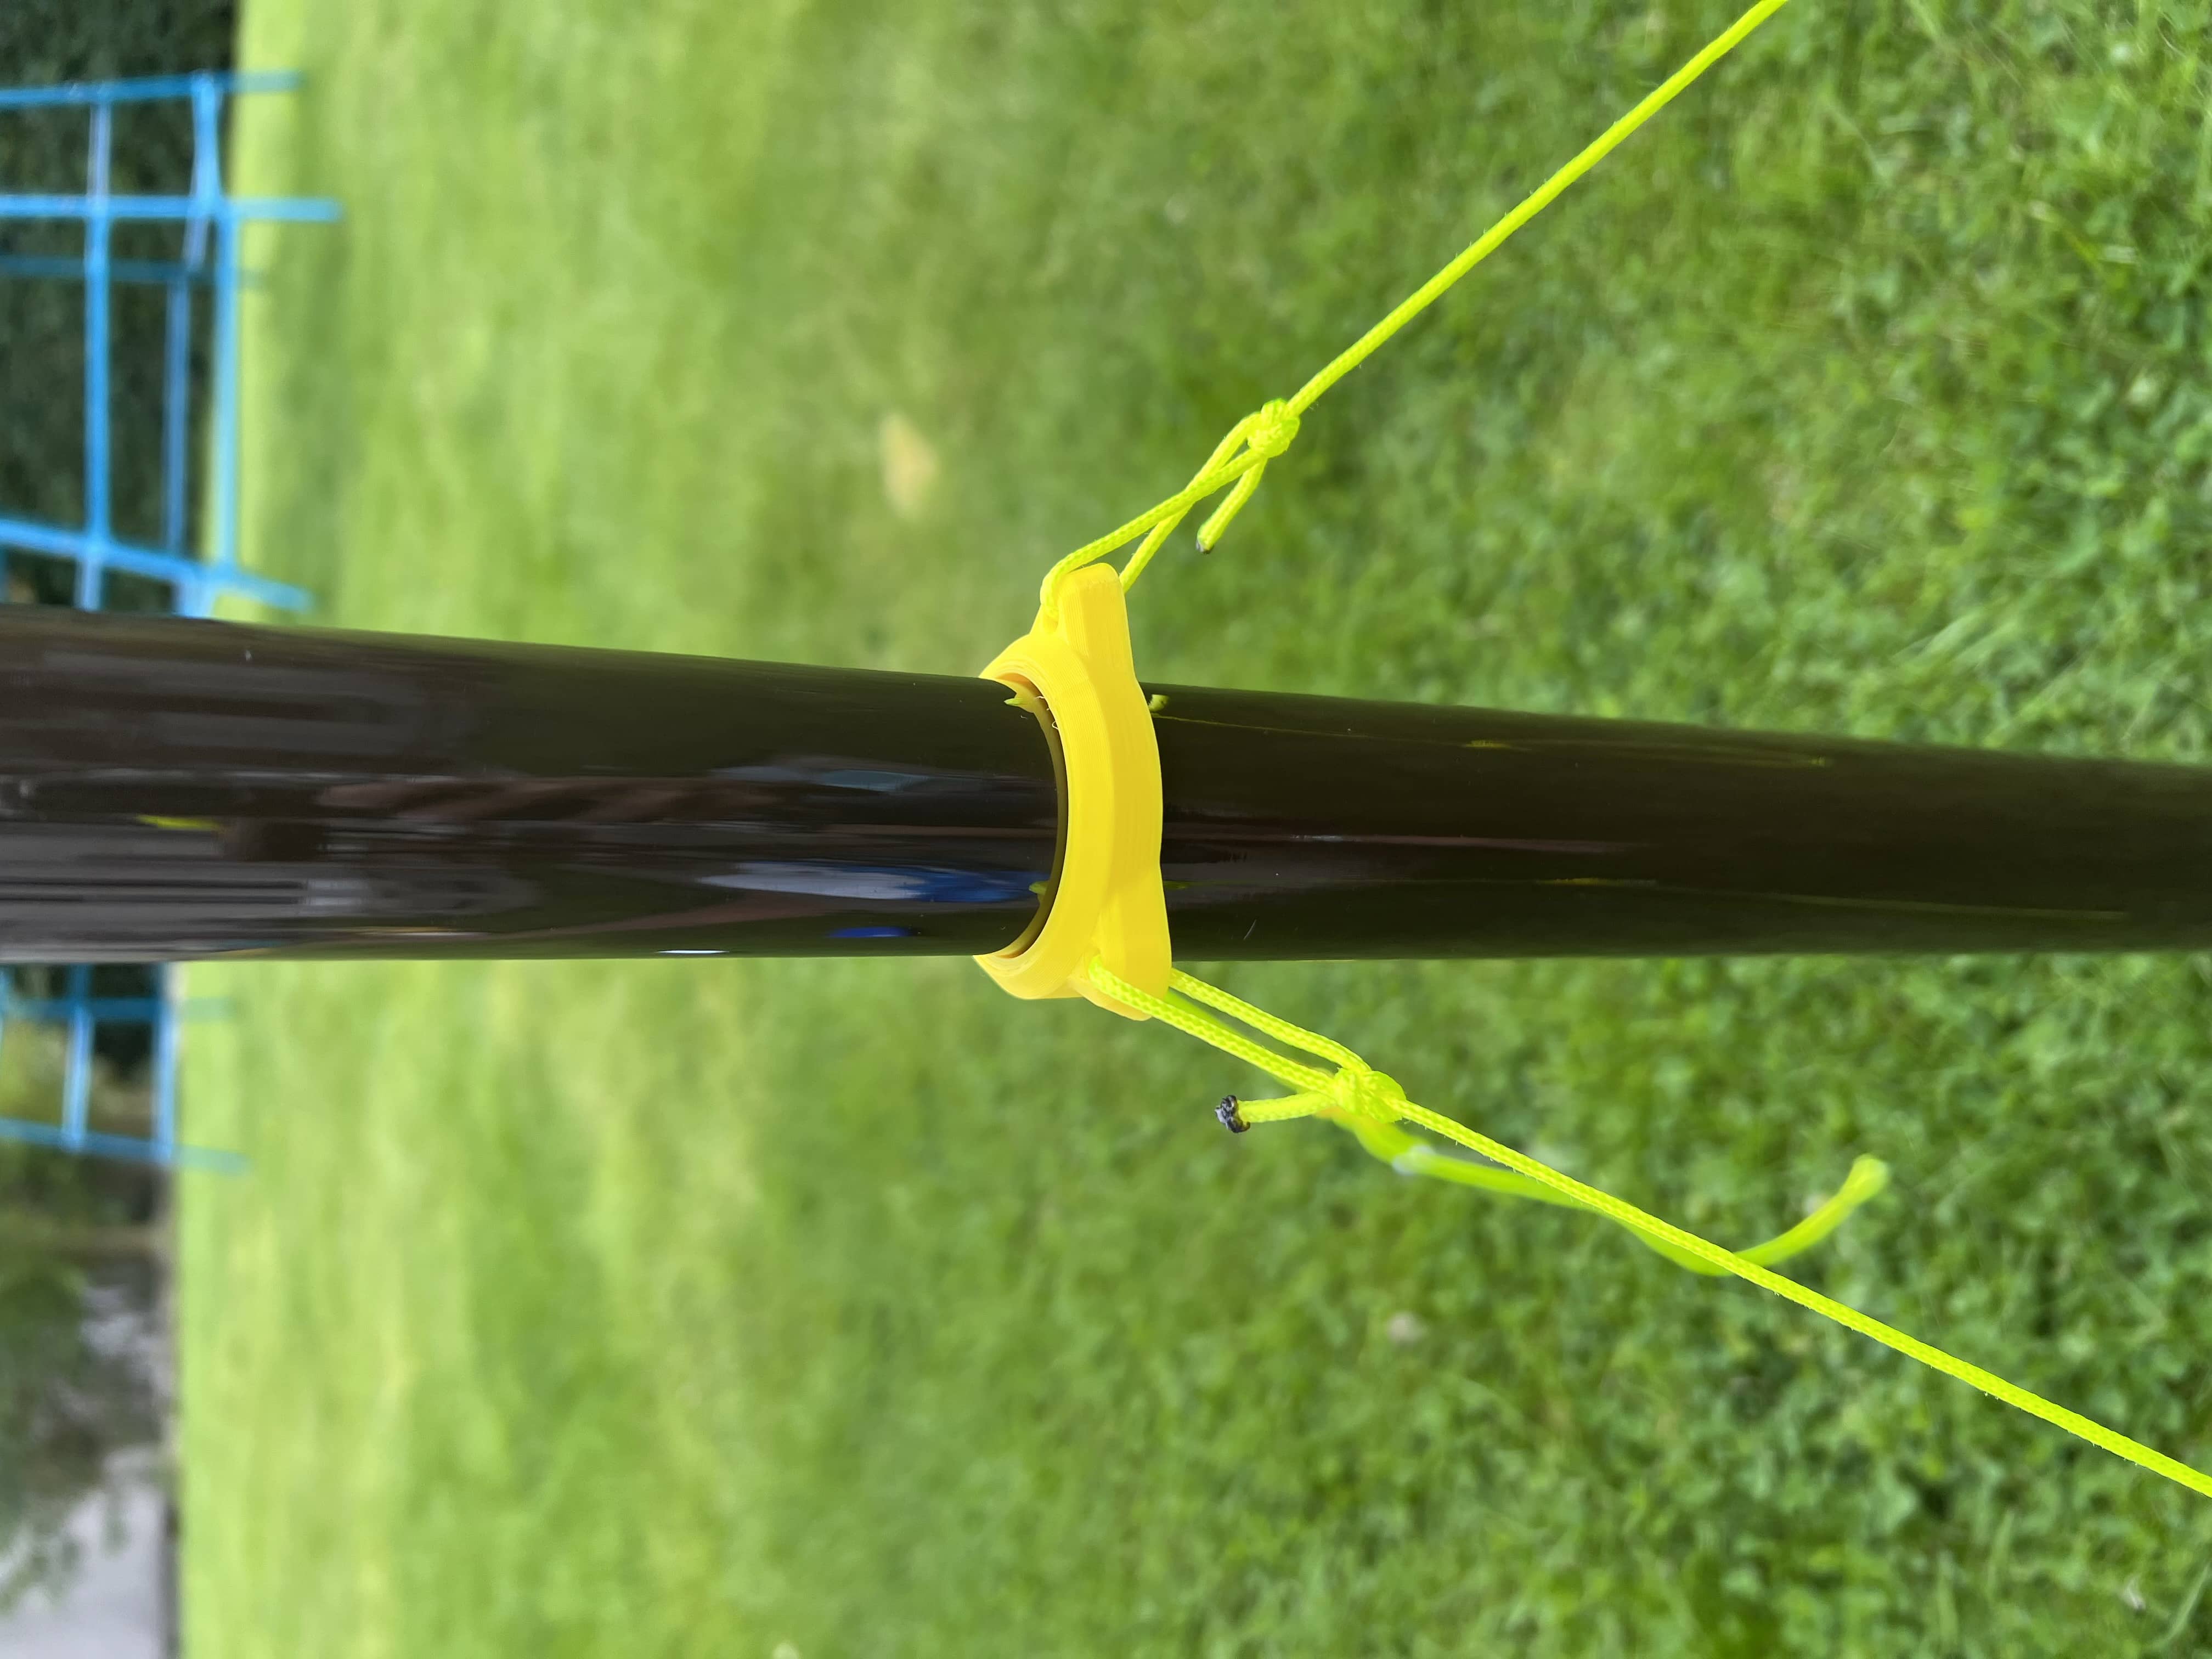
I’m using a SOTABeams tactical mini mast to support it. It’s 6m telescopic fibreglass pole that has more strength than my usual Carbon-6 mast. There are two conduit wall mounts attached to the boom, so the yagi can be mounted vertically or horizontally. It works well enough, although if I want to change polarisation I have to take the mast down and then put it up again. I could take out all the other sections I don’t need but if I’m only taking one mast on an activation I want the 6m in case I need to setup HF.
I 3D printed some guying rings and rope tensioners from this design and cut some cord to length for the mast. The 2nd lowest ring fitted perfectly on the bottom segment of the tactical mini.
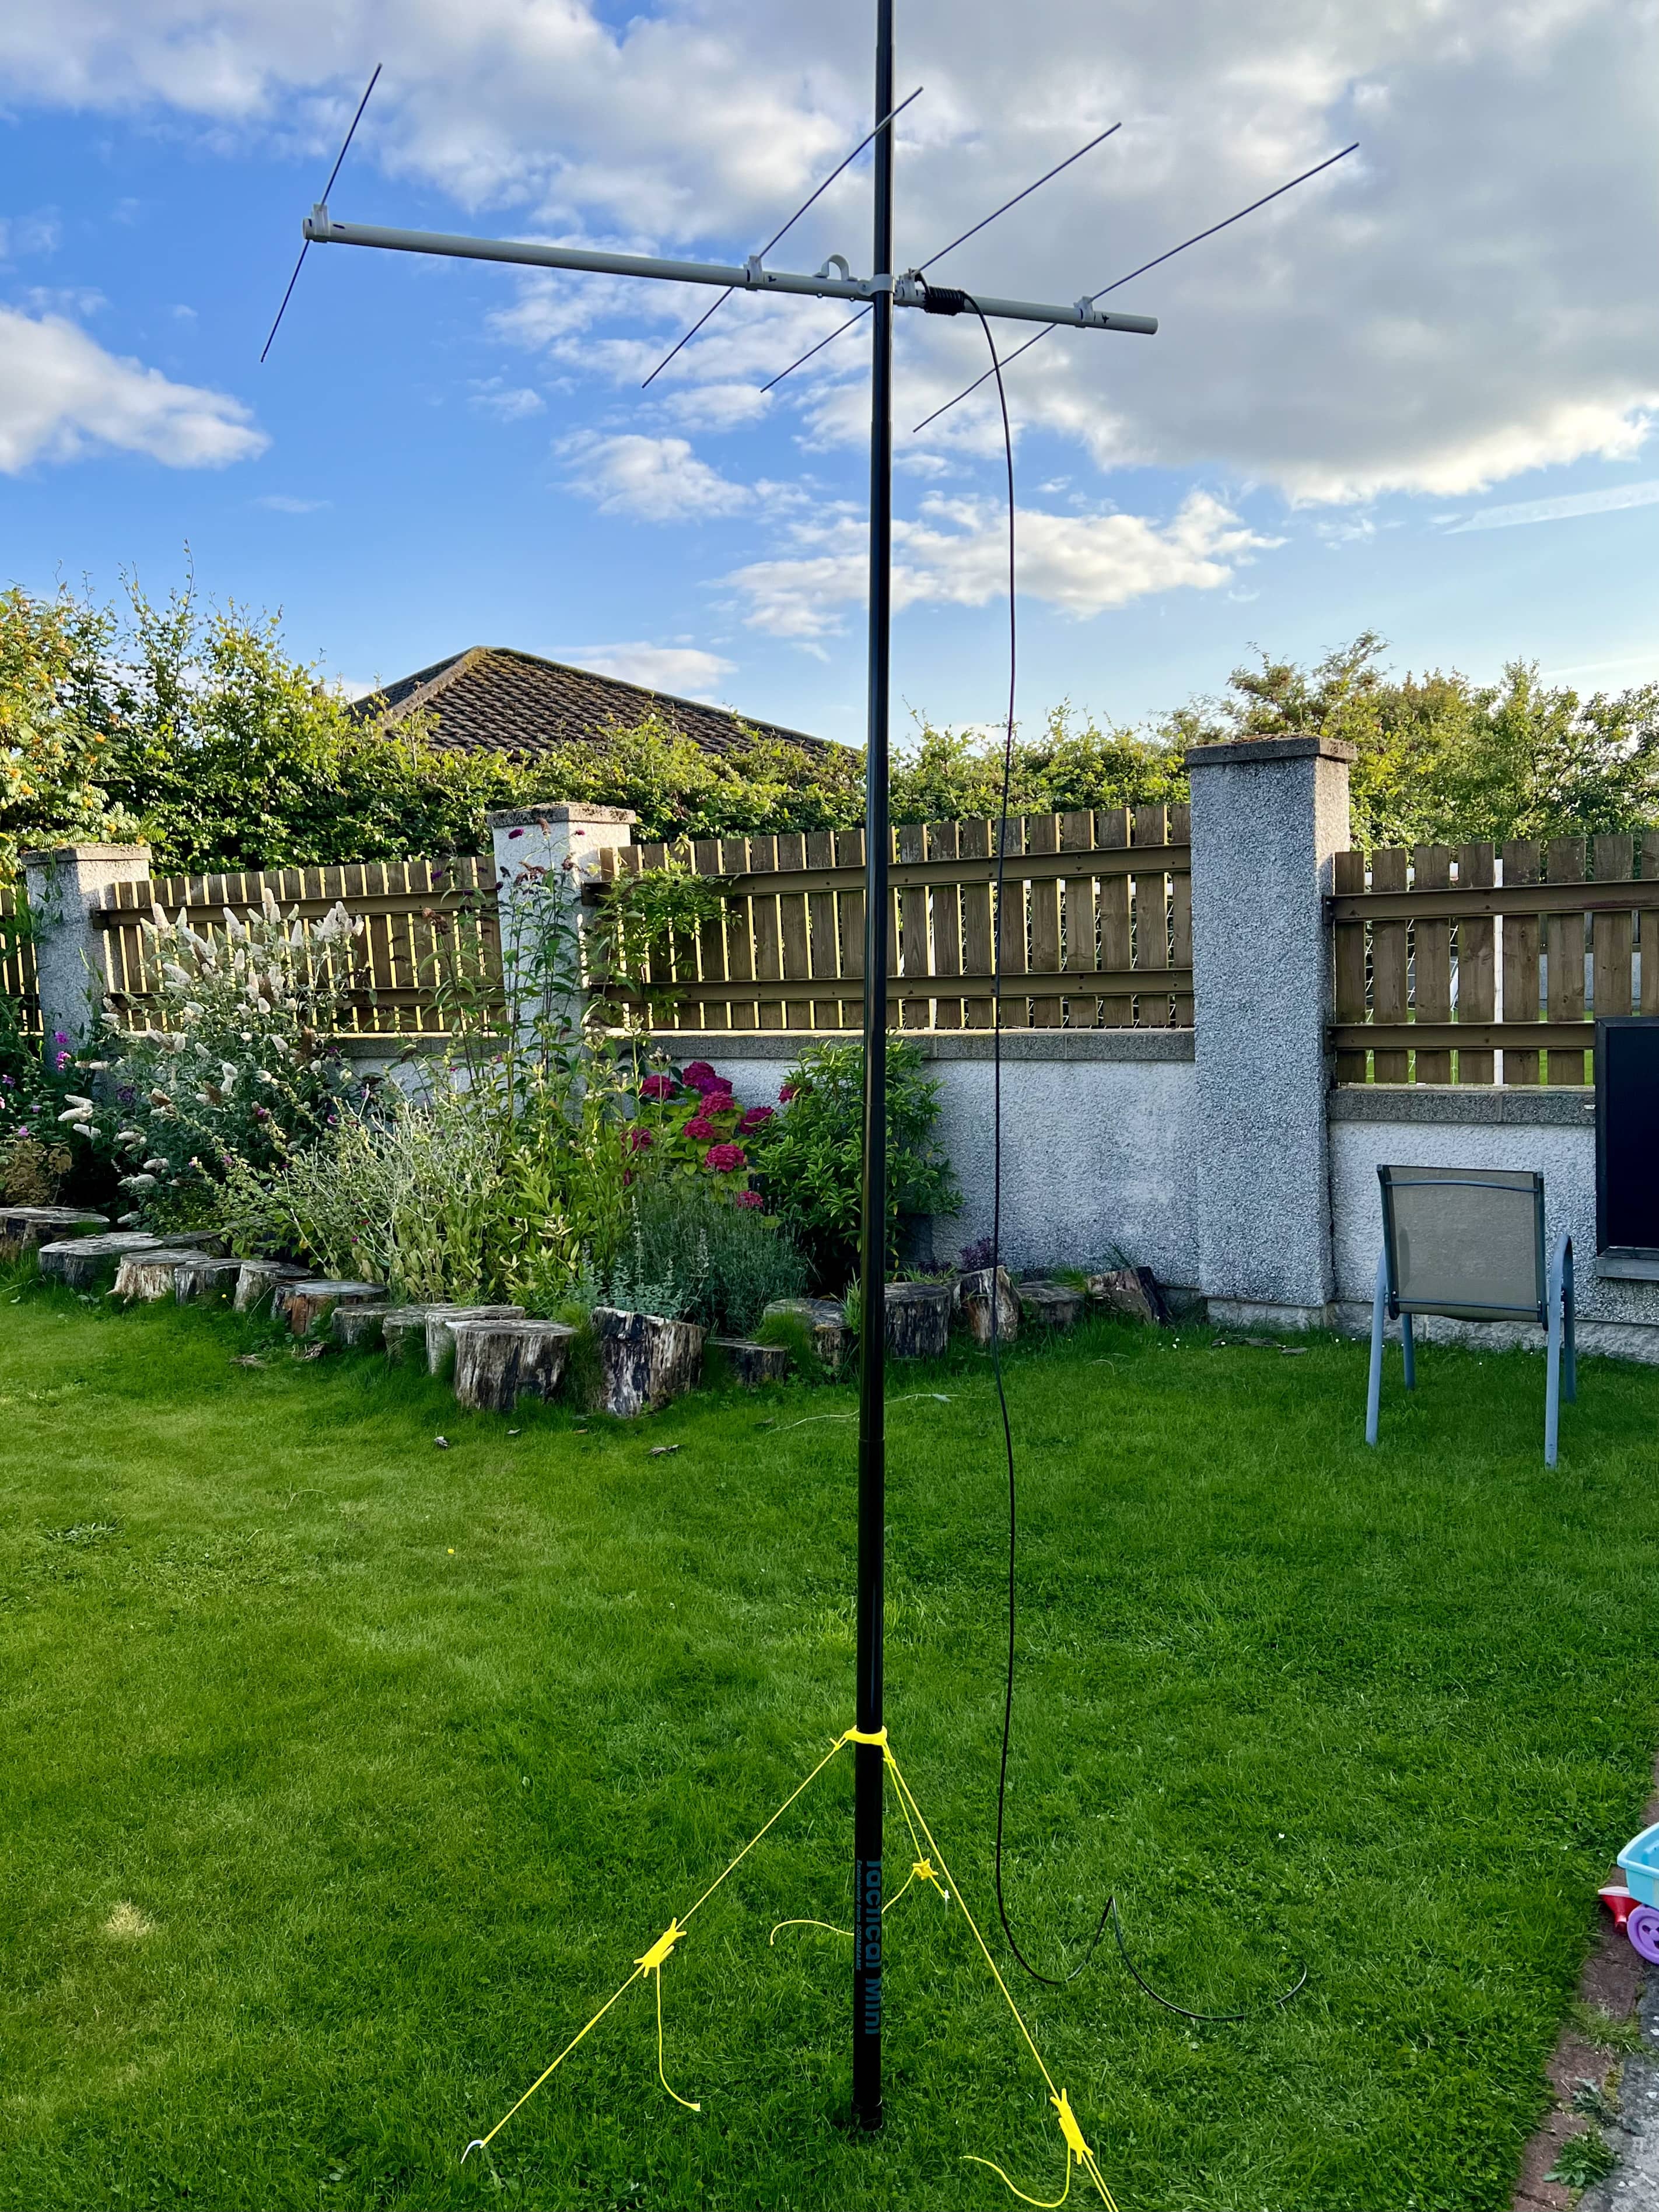
First test was in the garden, listening to the 2m lunchtime net…so it received well enough.
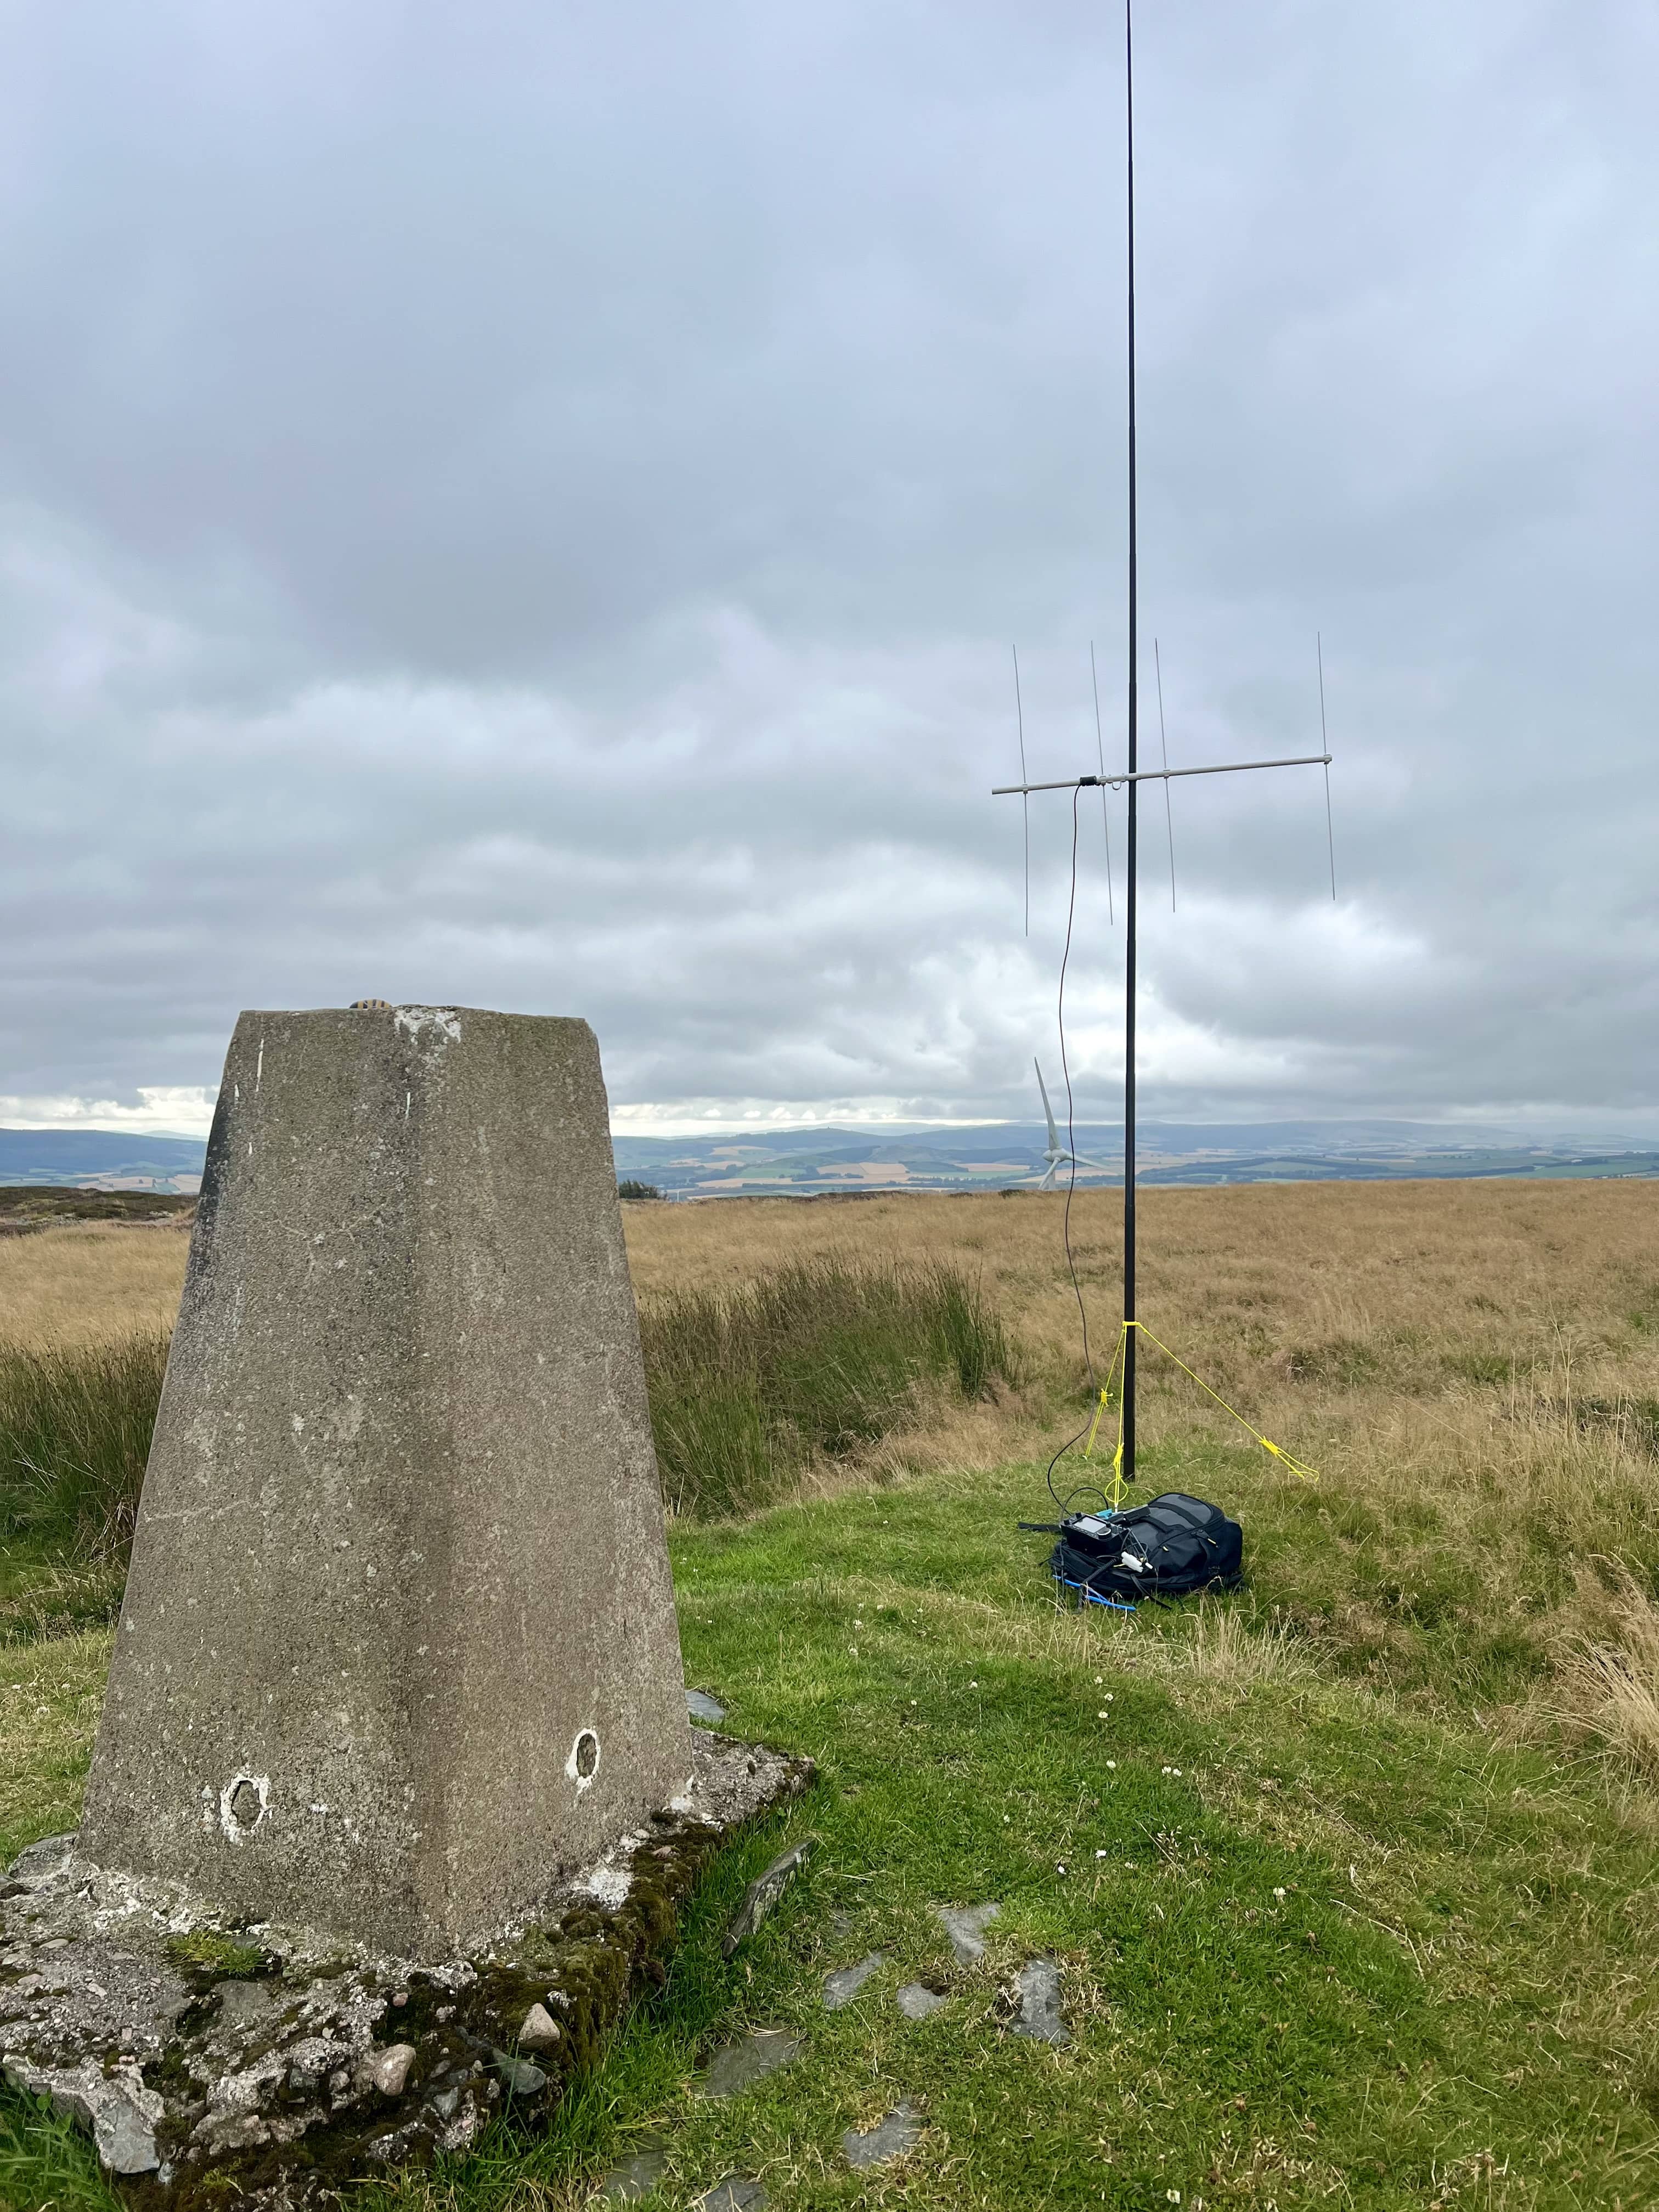
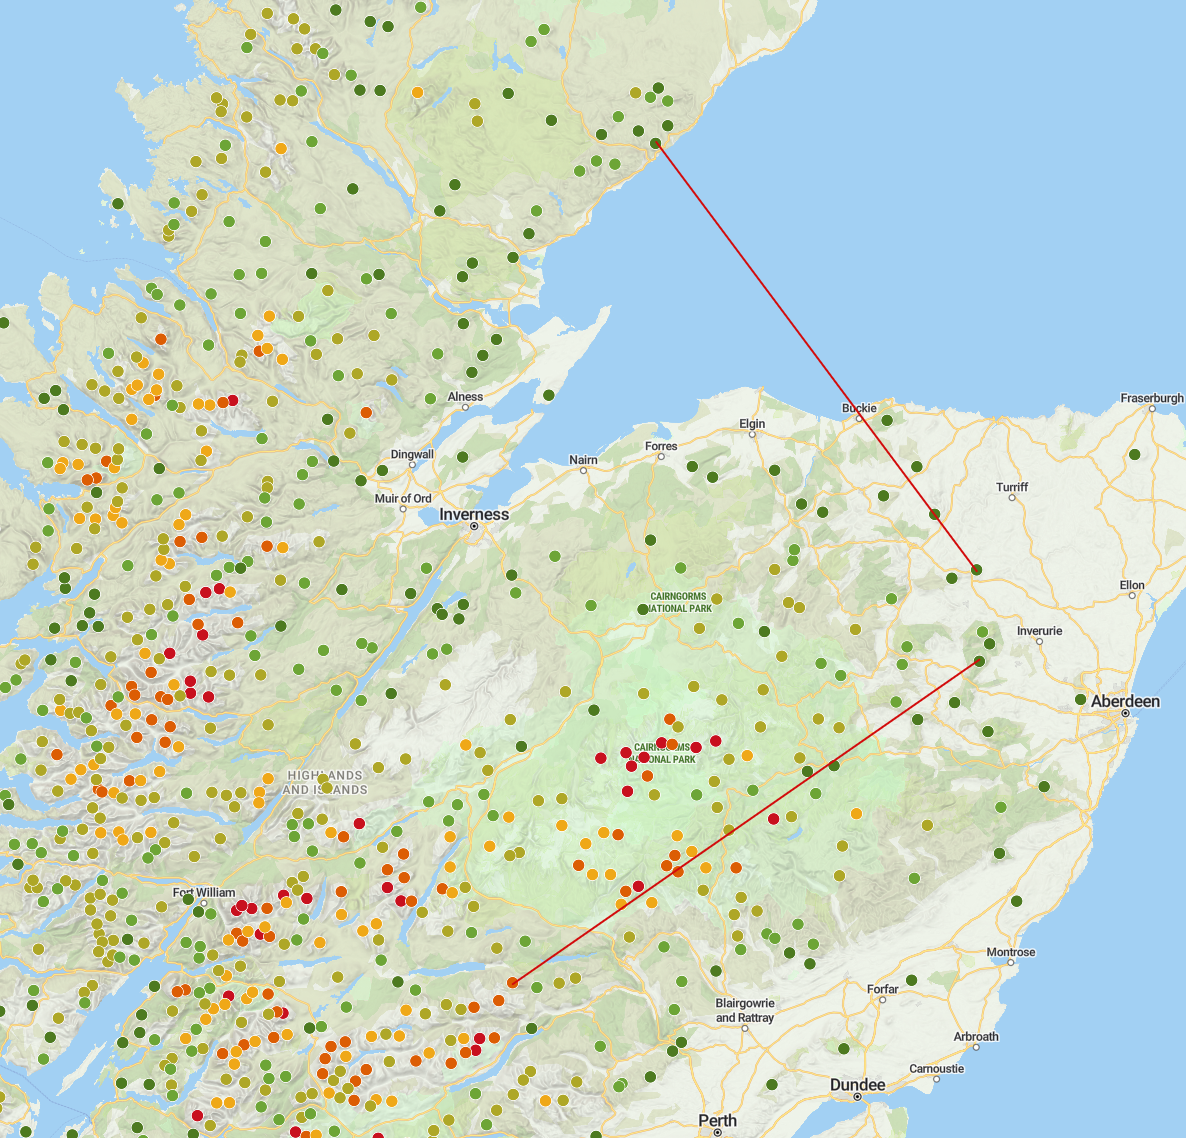
The first outing was to Cairn William, where I’d set it up on the top. We’d arranged SSB activity on another summit, although that guy had to pull out, however, we’d also prepared the locals to listen out. I started with SSB and managed to make four contacts locally with it. I then flipped it to FM and made a few more. Including a nice summit to summit with Schiehallion, around 112 km away! I brought it out later in the day on Tillymorgan, and managed a contact with Helmsdale, around 100 km to the north…whilst the yagi was pointing south! Turning it around turned me from a 53 and a 59 by the chaser
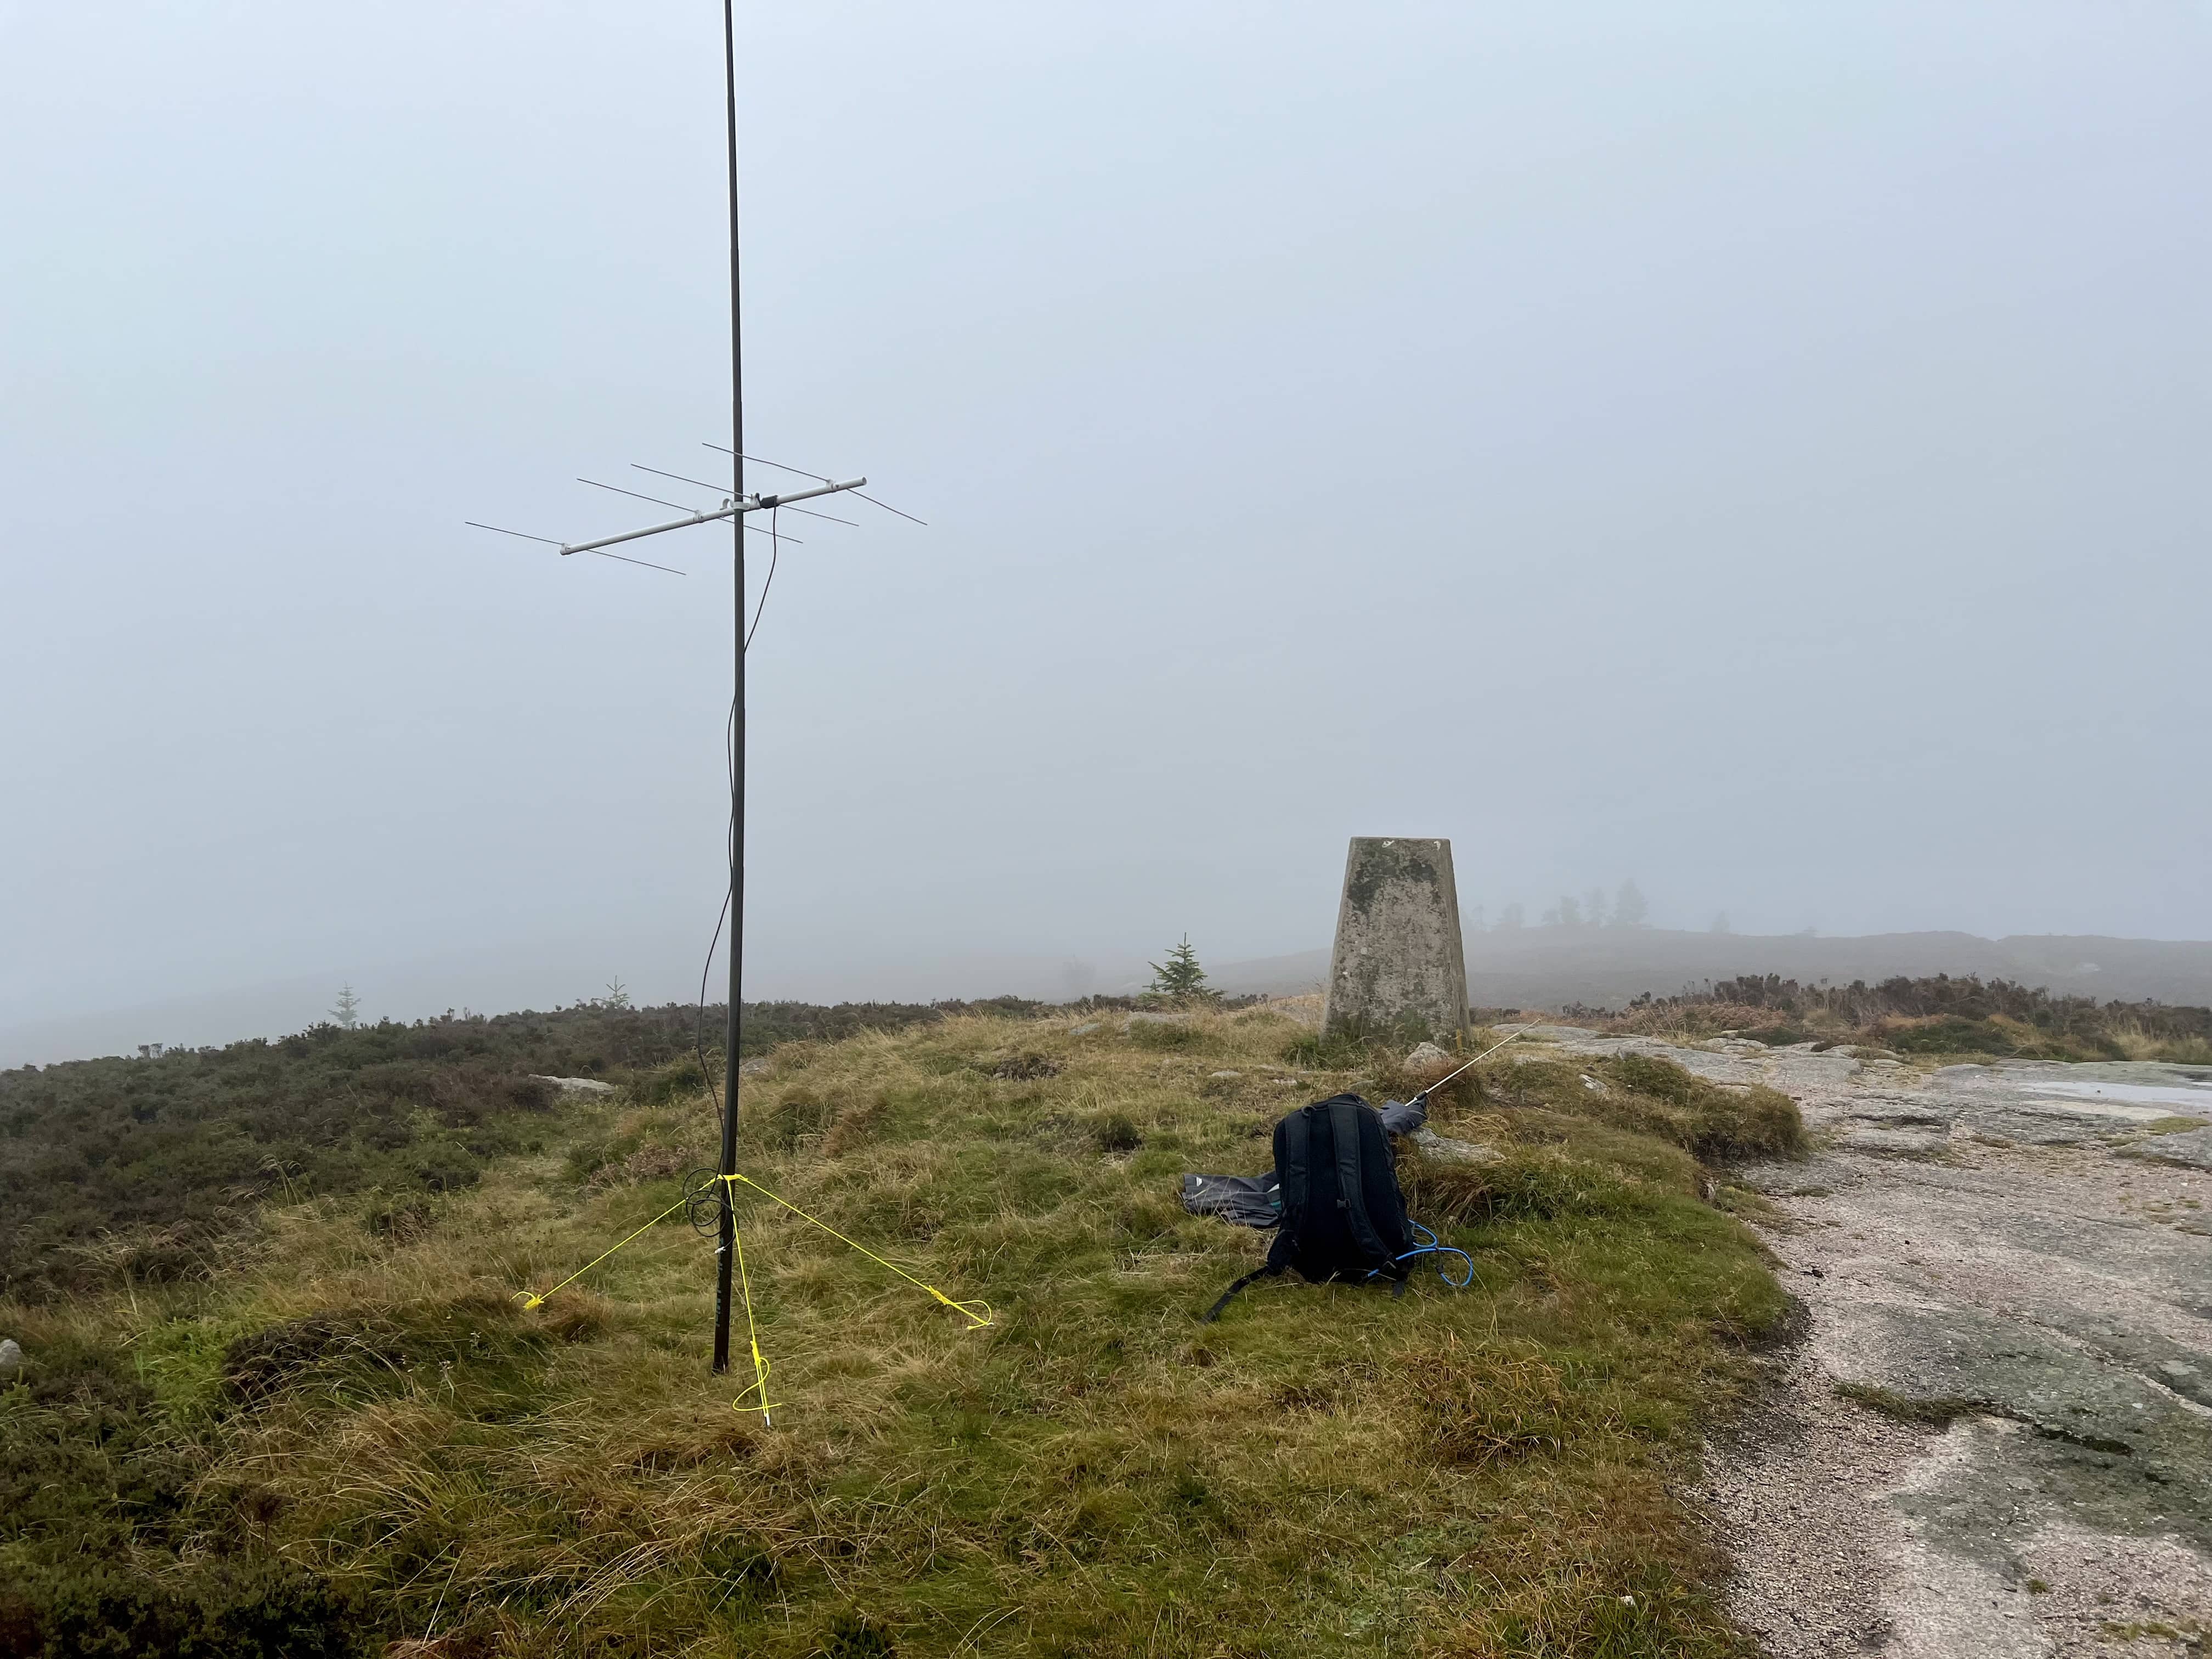
I’m pleased with the results and think it worked rather well! It wasn’t too tricky to setup and use in the field, nor heavy to carry. It takes a bit of getting used to the length of it, especially when walking through forests as I kept catching it on trees and causing them to dump all their water onto my back!
I think a different way to connect the coax and the driven element would improve it, and maybe a dedicated mast that was just the right length would be better.
I did find this design for a 100g yagi that looks nice, and have saved a few links to 2m moxon’s. Not sure when or if I’ll make these, as I do like the convenience of the slim G. I also printed a clip for it, so it doesn’t flap around in the breeze.
It’s been a few weeks since my last activation and I wanted to go out. I didn’t have much time as I was meant to be sorting out the garage, so I picked a summit close to home, Cairn-Mon-Earn (GM/ES-080).
It’s quite an easy walk following the loggers roads up to the summit. There are multiple towers there for mobile phones and other networks. The local repeater, GB3GN, is also here. The weather was dry, and I had the occasional blue sky, but showers were forecasted.
It was windy too, so I hunkered down by the cairn, however, this probably wasn’t the best place being so close to the towers. I setup my slim G 2m on the mast and called CQ. I didn’t get any response so setup on HF. The ground slopes away with heather and bushes, so I decided just to go for the random wire vertical. It has a 5.5m radiator and 2 counterpoises. I started on 20m, and two stations replied, Spain and Finland. This turned out to be my lot on HF. I tried other bands and calling other stations but no one could hear me. It was a shame as there were several other summits I could hear.
I managed to get MM0EFI on the HT, and so I was at 3 contacts. A SOTA summit needs 4 to activate. It had been about an hour and the rain started to come down heavily. I dashed across to some nearby trees and setup underneath one of them. After trying all the bands I came back to 20m, put out another spot and the same Spanish station came back to me…well at least I knew it wasn’t operator error with the radio or antenna!
This was meant to be a quick activation and I’d now been there for over and hour, and so decided to pack up HF. I could see the TV mast in the clouds and so walked over to get a better look. I then found what would be a great spot to activate (if it wasn’t raining) as it had clear views all around. I thought I might as well call on 2m and see if I could get anyone.
I spoke to Fraser again, MM0EFI, now /M as he was driving to work. We made a contact with his intermediate callsign, 2M0EFI/M, so technically I’d activated the site. However, I was determined to get four different people, and in my next CQ, George, MM0SAX/M, replied.
George was driving up from Glasgow on the A90 and has a radio in his work van. We had a nice chat for about 15 minutes, and that turned my “this has been a waste of time ![]() ” attitude into a “that wasn’t so bad
” attitude into a “that wasn’t so bad ![]() ” one!
” one!
I enjoy HF and setting up different antenna, but if I could reliably activate with just 2m/70cm I’d love to go up the hillside with just my HT.
It was back down and back home. The kids were soon home from school and the garage didn’t get sorted out. I’ll try again next week…
My previous attempt ended with just listening to the astronaut, and whilst fun, it wasn’t what I was actually meant to be doing. I’ve since read the manual and, mostly, figured out the D72. As the radio is quite old there is both lots of info online and also a lack of it, depending on where you like looking. By that I mean there’s info in email lists but virtually nothing on YouTube! Anyway, with combination of the manual and the Kenwood TH-D72 groups.io, I’ve worked out the essentials.
The summary of it all is, you must transmit from VFO B and receive on VFO A, and you have to enable DUP mode through the F(function) button and 0 (zero).
I’ve got Gpredict on my computer and also ISS Detector app (with the amateur satellites extra) so it was easy to see what was coming up when I had a bit of time this past weekend. Next up was SO-50. My radio already had frequencies stored for SO-50, so I felt confident that I could do this. I keep meaning to add frequencies for most of the FM satellites but I’ve not got round to it yet.
I realise I never took any pictures of my setup, mostly as I had about 8 minutes before the satellite started its pass, so I was in a hurry. The equipment is the D72 radio, my Sony voice recorder, the Arrow antenna and a rats nest of cables. I wanted to record the audio on the voice recorder, I also wanted to use headphones. The D72 has a 2.5mm headphone socket and I don’t have a 2.5mm to 3.5mm adapter. However, the fist mic has a 3.5mm headphone out on it, and so I had that plugged into the side, the splitter out the mic with cables to the recorder and my headphones. Phew, what a mess.
I did find it hard to figure out how to do everything at once. I was using my phone to try and see where the satellite was, I was holding the arrow yagi, I had the radio in my pocket, but also needed to hold the mic, had the voice recorder in my other pocket and headphones on my head.
Like most people, I only have two hands so I was juggling between everything and couldn’t find a good process, and struggled to track the satellite very well. I did eventually copy some calls and QSOs on the satellite for a brief period during its 14 minute pass. I’ve edited my recording to just the best parts.
At one point I had a lovely clear copy on OH1ON calling, but then it degraded into static and I was only getting weak signals as I mis-aimed the yagi.
A call I heard was G6UST, and looking at his QRZ page was interesting from satellite tracking. He has a nice picture of a homebrew tracker with PVC pipe and yagis mounted at an angle. Although looks like he’s moved on since then to a lovely G-5500 az/el rotator.
Overall some progress, but lots of room for improvements. Even though I didn’t transmit, I am thinking about how I manage the VFOs and changing frequency to manage doppler on the 70cm side. This means I’ll have to press buttons on the radio to do so, and that’s not feeling very practical with the fist mic. One option is to skip the mic, get a 2.5 to 3.5mm adapter for the headphones and use the PTT on the radio. This keeps it in my hand and then I can hit the A/B and up/down to manage the frequencies using the memories. Alternatively, Kenwood make a mic with three buttons on the top, the SMC-34, and you can use MCP-4A program to set these buttons. The idea being I can hit A/B, then press up or down, and A/B again ready for transmitting, or just up and down depending on what link 70cms is on.
The other factor is seeing where the satellite is. The ISS detector app has the AR mode, but I don’t have a hand left to use it. Thinking either mounting the phone to the arrow antenna, or mounting the antenna on a tripod, and maybe still mounting the phone to the antenna. The tripod also saves me having to hold the antenna the whole time. It is quite light but be nice not to have to hold it, plus it’s better at keeping still than I am.
So a few more improvements and plenty of practice needed. Not sure when I’ll next get out to try, and the weather doesn’t help. Still interested in building a rotator for satellite work, with elevation as well. Trying to avoid having to buy a G-5500 or equivalent as they’re very expensive, even used. They’ve been kits over time but they’ve all stopped and probably something like the SatNOGS rotator is a good build but it’s quite involved for me, plus a lot of 3D printed parts. It would be nice to set something up on the roof, so when it is dark and raining, I can sit inside and still try them out.
Review of the smallest portable 2m antenna on the market producing full size dipole performance and stows into your pocket.
The post Nelson Antennas 2m rollup antenna review appeared first on Ham Radio . Magnum Experimentum.
After three years of mobile operation, I review the Diamond Antenna NR770HBNMO with appropriate K515SNMO mount including pattern measurements.
The post Diamond Antenna NR770HBNMO with K515SNMO mobile antenna review appeared first on Ham Radio . Magnum Experimentum.
Thule roof rails increased my VHF antenna mounting options on my Subaru Forester.
The post Roof-racking VHF antennas on SUV appeared first on Ham Radio . Magnum Experimentum.
I built a prototype APRS beacon, dubbed Thor Hammer (big), to test back-packable APRS 2m beacon concepts.
The post BOB, the battery operated “beacon” for APRS appeared first on Ham Radio . Magnum Experimentum.