Lately, I’ve been getting questions about whether a ham needs to log radio contacts, whether they need to submit a log, and how to do it. Logging is a complex topic that can require a long and detailed explanation, but I am going to focus on the questions I’ve been hearing lately. I’ll also provide some links for further investigation. Continue reading Should I Submit A Log?→
Lately, I’ve been getting questions about whether a ham needs to log radio contacts, whether they need to submit a log, and how to do it. Logging is a complex topic that can require a long and detailed explanation, but I am going to focus on the questions I’ve been hearing lately. I’ll also provide some links for further investigation. Continue reading Should I Submit A Log?→
Recently, I’ve been getting questions about whether a ham needs to log radio contacts, whether they need to submit a log, and how to do it. Logging is a complex topic that can require a long and detailed explanation, but I am going to focus on the questions I’ve been hearing lately. I’ll also provide some links for further investigation. For starters, the ARRL has a good introduction to logging.
A paper ham radio log
Why Keep A Log?
The FCC does not require you to log your amateur radio contacts. Many radio amateurs, especially if they just operate casually on 2m and 70 cm, don’t bother to keep a log. Probably the most common reason for having a log is to have a record of your radio contacts, in terms of stations worked, on what band and what conditions. This might be just for your own personal satisfaction or you might want to keep track of these contacts so you can get credit for an award, such as the ARRL Worked All States (WAS) award.
Paper or Electronic?
The Old School way of keeping a log is on paper as shown in the figure above. This approach is simple and reliable technology but is quite limited in the information age. These days, most hams that record log information store it electronically. Imagine that you log thousands of contacts over time and then want to find a particular callsign or location. Much better to do this electronically. There are many good software programs available, too many to list here. I currently use Amateur Contact Log from N3FPJ. The good news is that there is a standard file format for storing and moving ham radio contact information: Amateur Data Interchange Format (ADIF). If you want to change logging software, you export an ADIF file and import into the new program.
I Worked a Contest Station, Do I Have to Submit a Log?
Sometimes radio ham works a few stations that are active in a particular contest and they wonder if they must submit a log to the contest sponsors so that these these stations get credit for the contacts. The almost universal answer to this is: No. Don’t worry about submitting a contest log if you aren’t really “in the contest.” The stations you work still get credit for your contact with them. (This is true for all major contests…I am still looking for a contest where this is not true.) Contests are designed to encourage activity, so they want everyone to join in, even if they aren’t all that serious about contesting. (The contest sponsors will appreciate any and all logs submitted, so consider that.)
If I Am Actively Working a Contest, What Do I Do?
If you are actively participating in a contest, you should use a logging program that is tuned for that particular contest. This is important because the contest logging software knows about the scoring for the contest and lets you know if you have already worked a station you hear. The most popular logging software for contesting is the N1MM Plus software. There are other programs you can consider. Typically, you would use N1MM during the contest and then export the info into an ADIF file, which is imported into your “main” logging program.
What is a Cabrillo File?
While the ADIF file format is most universal in ham radio logging, there is another file format used for contesting. This is the Cabrillo file format. Your contest logging software can generate a Cabrillo file for submitting to the contest sponsor. You may also want to generate an ADIF file to import into your normal logging program.
I Worked a POTA Station, Do I Have to Submit a Log?
Parks On The Air (POTA) is set up so that only the activator station submits a log. If you are working an activator station, you are a hunter station. The POTA scores are all based on the activator logs and hunters cannot submit a log. What you can do is register on the POTA website to see the contacts that the activators have submitted for you.
I Worked a SOTA Station, Do I Have to Submit a Log?
Summits On The Air (SOTA) is set up so that both activators and chasers submit logs to the SOTA website. However, the SOTA system operates on the honor system, so an activator can claim a contact with you without you submitting a log. So if you hear a SOTA station, go ahead and work them. You don’t have to submit a log. On the other hand, if you want credit for chasing a summit, you need to submit a log. So that activator is fine not having you submit a log but you may want to do that to get credit for you.
How Do I Get Credit For Working A Country?
The gold standard for chasing countries, I mean entities, is DX Century Club (DXCC). If you are interested in DX, you should register with Logbook of The World (LoTW) with the ARRL. To get credit for working an entity (country), you need to submit your log and it must match the log submitted by the DX station. This is a higher level of confirmation because both parties must submit the log info and it must match within reasonable error limits.
There are other award systems for working countries, offered by QRZ, eQSL, etc.
How Do I Get Credit For Working a Grid on VHF/UHF?
The VHF UHF Century Club (VUCC) is the VHF/UHF equivalent to DXCC. Here the emphasis is on working maidenhead gridlocators on the bands above 50 MHz. Again, Logbook of The World is the database that authenticates confirmed contacts on these bands. Both parties must submit the log info and it must match within reasonable error limits.
What If Someone Needs My Log Submitted?
Most of the time, us normal hams are not considered DX. That is, that other station in the Cayman Islands doesn’t really need our contact confirmed. But there are exceptions. You might be in a state the other station needs confirmed. Or maybe it’s your county they need. In such a case, you might want to make a special effort to provide your log information to the right database. It will depend on what the other station needs…if they are going for an ARRL award, then Logbook of The World is the right place to upload your log. But they might be after a QRZ award or eQSL award, in which case you would need to provide your log to those websites.
Wrap Up
These are some of the questions I’ve been hearing.
What did I miss?
Anything else to add?
Everyone wants to know how their signal sounds on the air and often the best way to find out is a signal report from other ham radio operators. The standard signal reporting method for amateur radio is the RST (Readability-Signal Strength-Tone) system. See Practical Signal Reports on HamRadioSchool.com. When using 2m FM on Summits On The Air (SOTA), we can Continue reading SOTA Signal Reports Using 2m FM→
Everyone wants to know how their signal sounds on the air and often the best way to find out is a signal report from other ham radio operators. The standard signal reporting method for amateur radio is the RST (Readability-Signal Strength-Tone) system. See Practical Signal Reports on HamRadioSchool.com. When using 2m FM on Summits On The Air (SOTA), we can Continue reading SOTA Signal Reports Using 2m FM→
Everyone wants to know how their signal sounds on the air and often the best way to find out is a signal report from other ham radio operators. The standard signal reporting method for amateur radio is the RST (Readability-Signal Strength-Tone) system. See Practical Signal Reports on HamRadioSchool.com.
When using 2m FM on Summits On The Air (SOTA), we can simplify the signal report. Because it is a voice mode, we drop the reading for Tone and just give RS reports, so a perfect signal on voice is RS 59 or simply “five nine.” The Readability report is a number between 1 and 5, while the Signal Strength report goes from 1 to 9. (See the listing at the bottom of this article.) The signal strength generally corresponds to the S meter reading on your radio but most FM rigs have very basic meters. Some don’t provide a meter reading at all. The photo to the left shows a typical bar graph on a Yaesu FT-60. Don’t expect high accuracy, so if the meter reads full scale, give an S9 report. If it reads half-scale, that’s probably S5, etc.
On VHF FM, signal reports may also be given in terms of FM quieting. A strong FM signal is said to “quiet the receiver” since there is virtually no noise present in the received audio. As the signal strength is decreased, noise starts to appear on the received signal. At lower signals levels, the noise increases dramatically and the signal becomes unreadable. This dramatic increase is called the threshold effect, meaning that FM signals do not gradually fade out, they tend to fade quickly into the noise. The key idea here is that you want your signal to be strong enough to be above this noise threshold. In terms of a signal report, a strong signal may result in a “full quieting” report. If the signal is less than full quieting, you may hear a report like “90 percent quieting” or “you have about 10% noise”, which both describe the amount of noise present in the signal. If the signal is really noisy, the report might be “50% quieting.”
Keep It Simple
For practical 2m FM operating, don’t overthink these signal reports. If the signal is easy to hear and is full-scale, give a 59 report. If it is easy to hear but the meter reading is less than full scale, reduce the signal level report to something like 56 or 57. If there is some noise present, you might want to reduce the readability to 4, so maybe give a 44 or 45 report. (Usually, if there is a readability issue, the signal strength will also be lower.) If you are having a difficult time hearing the signal, it’s probably a 33 or less. Readability of 1 or 2 is rarely used because it indicates you are not actually hearing the other station.
One final note is that sometimes the operator on the other end is looking for a more critical evaluation of his signal quality. If he says something about “checking out this new microphone” or “have been working on solving an audio problem”, that may be the clue to spend a little extra time really listening to the signal and providing more comments on how it sounds. For most of us, we don’t actually get to hear our own signal on the air, so it’s very helpful to get quality feedback from other radio amateurs.
Lately, I’ve encountered many people who apparently believe their radio is a Talisman. What is a Talisman, you say? Talisman – An object marked with magical signs and believed to confer on its bearer supernatural powers or protection. These people purchase some kind of two-way radio and have it stored away in their desk or closet, believing that having it Continue reading The Talisman Radio→
Amateur Radio Fun in the Colorado Mountains August 2 through 5, 2024 www.ham14er.org Amateur Radio operators from around Colorado will be climbing Colorado Summits On The Air (SOTA) peaks and communicating with other radio amateurs across the state and around the world. Join in the fun during the annual event by activating a summit or contacting (chasing) the mountaintop stations. Continue reading 2024 Colorado 14er Event (SOTA)→
News Flash: I found a cheap economical VHF/UHF handheld that I really like. The TIDRADIO TD-H3 is getting a lot of attention from YouTube reviewers. You can think of this as an improved Baofeng UV-5R, with a few key features that grabbed my attention: Improved Look and Feel: This radio looks like a quality product, much improved over the plastic Continue reading TD-H3 VHF/UHF Radio→
Lately, I’ve encountered many people who apparently believe their radio is a Talisman. What is a Talisman, you say? Talisman – An object marked with magical signs and believed to confer on its bearer supernatural powers or protection. These people purchase some kind of two-way radio and have it stored away in their desk or closet, believing that having it Continue reading The Talisman Radio→
Lately, I’ve encountered many people who apparently believe their radio is a Talisman. What is a Talisman, you say?
Talisman – An object marked with magical signs and believed to confer on its bearer supernatural powers or protection.
These people purchase some kind of two-way radio and have it stored away in their desk or closet, believing that having it will confer communication powers during an emergency. (Not to pick on Baofeng owners, but these radios are almost always a Baofeng UV-5R.) In many cases, they have the radio programmed with a long list of radio frequencies that have been identified as being good to have during an emergency. These are usually a mix of amateur radio, Family Radio Service, General Mobile Radio Service, Multi-Use Radio Service, search and rescue, and local fire and police frequencies.
Usually, the owner of the Talisman Radio has no real idea of how these frequencies are used. Again, someone told them they are good frequencies to have in a SHTF scenario. They often don’t know how to operate the radio or know what to expect in terms of its communication capabilities. It is simply a magical device that will save them when bad stuff happens.
Sometimes these people take the basic step of getting their amateur radio Technician license. I applaud this decision as it is the first step towards learning about ham radio. It also provides the proper license for legally using the radio on the ham bands. Unfortunately, many of these people just memorize the questions long enough to pass the exam and don’t gain any useful knowledge. This is a fundamental error. A much better approach is to focus on acquiring skills, knowledge, and equipment as part of their emergency preparedness plans. (Serious preppers know and practice this.)
If you are the owner of a Talisman Radio, I urge you to build your skills and get your ham license (if you don’t already have it.) There are many good license books available and the Ham Radio School online course is an excellent approach to learning this material. If you encounter Talisman Radio owners, please encourage them to get some training and learn how to use the radio. Don’t offer to program their radio with a bunch of frequencies they are not licensed to use and that may cause considerable trouble in the frequency spectrum. Encourage and help them but don’t enable their dependence on a Talisman Radio that will only let them down.
Training, training, training.
That’s what I think. What’s your opinion?
This is a really OLD video, but there is a lot of great material here:
-- Tubes. (Valves or Thermatrons)
-- Coax.
-- Frequency Division Multiplexing.
-- Negative Feedback and the fight against distortion.
-- Transistors and early experiments with semiconductors.
-- Fiber optics and Masers.
-- Satellite communications.
-- Early hopes for video communications.
The video is, by today's standards, extremely misogynist. And the sound experiment with the poor woman wearing a male head was just weird. But still, an interesting film.
Thanks to Mark KM4GML for reminding us of this wonderful Bell Labs (AT&T) video archive.
Amateur Radio Fun in the Colorado Mountains
August 2 through 5, 2024 www.ham14er.org
Amateur Radio operators from around Colorado will be climbing ColoradoSummits On The Air (SOTA) peaks and communicating with other radio amateurs across the state and around the world. Join in the fun during the annual event by activating a summit or contacting (chasing) the mountaintop stations.
This event is normally held the first full weekend in August. Again this year, we will add two bonus days to the Colorado 14er Event. The main two days remain Saturday and Sunday (Aug 3 & 4), while the bonus days are Friday Aug 2nd and Monday Aug 5th, for those SOTA enthusiasts that need more than two days of SOTA fun! Be aware that many mountaintop activators will hit the trail early with the goal of being off the summits by (1800 UTC) noon due to lightning safety concerns.
The 14er event includes Summits On the Air (SOTA) peaks, which provide over 1700 summits to activate. (See the W0C SOTA web page or browse the SOTA Atlas.) The Colorado 14er Event was started in 1991, about 19 years before the SOTA program was set up in Colorado. As SOTA grew in popularity, this event expanded from just the 14,000-foot mountains (14ers) to include all of the SOTA summits in the state. We still call it the Colorado 14er Event because, well, that’s where it all started and the 14ers are the iconic summits in the state.
Important: The recommended 2m FM frequencies have been changed to 146.58, 146.55, and 146.49 MHz, to align with the use of the North America Adventure Frequency for SOTA (146.58). The National Simplex Calling Frequency (146.52) may be used as appropriate. There will be plenty of action on the other ham bands, for more information see the operating frequencies page.
Amateur Radio Fun in the Colorado Mountains August 2 through 5, 2024 www.ham14er.org Amateur Radio operators from around Colorado will be climbing Colorado Summits On The Air (SOTA) peaks and communicating with other radio amateurs across the state and around the world. Join in the fun during the annual event by activating a summit or contacting (chasing) the mountaintop stations. Continue reading 2024 Colorado 14er Event (SOTA)→
News Flash: I found a cheap economical VHF/UHF handheld that I really like. The TIDRADIO TD-H3 is getting a lot of attention from YouTube reviewers. You can think of this as an improved Baofeng UV-5R, with a few key features that grabbed my attention: Improved Look and Feel: This radio looks like a quality product, much improved over the plastic Continue reading TD-H3 VHF/UHF Radio→
News Flash: I found a cheap economical VHF/UHF handheld that I really like. The TIDRADIO TD-H3 is getting a lot of attention from YouTube reviewers. You can think of this as an improved Baofeng UV-5R, with a few key features that grabbed my attention:
Improved Look and Feel: This radio looks like a quality product, much improved over the plastic Lego-style industrial design of the Baofeng radios. It feels and looks solid in my hand. The rubber duck antenna seems higher quality although I haven’t tested its performance.
One Radio, Three Modes: The firmware can be set to operate in three distinct configurations: Ham (transmit on 2m and 70cm ham bands only), GMRS (standard FCC Part 95 GMRS channels) and Normal (which is basically unlocked). You can easily switch between these modes but the memory information does get reset. So in most cases, you will need to reprogram the radio with your favorite frequencies after you change modes. The exception might be GMRS mode which will reset to standard GMRS channels. The flexibility of these three configurations is quite nice: The Ham configuration is great for normal ham operating with no risk of going “out of band.” I can loan out the radio in the GMRS configuration knowing that the user won’t inadvertently transmit on the ham bands. And, of course, the Normal mode provides access to a wide range of frequencies, to be used carefully, abiding by the relevant regulations.
USB-C Connectors: The radio battery has a USB-C connector for charging and a USB-C connector for programming (with Chirp or the TIDRADIO app). This may seem minor, but using a common industry-standard connector is a huge convenience factor. For example, I recently packed my gear for a trip and found that the USB cables I normally carry for my smartphone and tablet will handle the TD-H3 just fine. So there is no need for a drop-in cradle, extra charger or special programming cable.
Video Reviews
Apparently, TIDRADIO gave away a gazzillion radios to ham radio Youtubers and asked them to review the radio, so you’ll find many reviews out there. This one gives a good overview of the radio’s capabilities:
This radio is not quite the One Radio To Rule Them All, primarily because it won’t be convenient to switch between configurations. However, the radio is legal for GMRS and ham use, so that is definitely a plus. Will the FCC object to this kind of flexibility? Who knows, but they haven’t so far.
This video from KS6DAY shows how to switch between the three radio configurations:
Some Problems
Early on, several Youtube reviewers reported high spurious emissions coming from the radio. They fed this information back to TIDRADIO, who responded with a design change and some updated radios to test. They appear to have corrected this problem…the three radios in my possession tested out fine. There have also been some complaints about how a few features work and TIDRADIO has responded with a firmware upgrade to address those issues. So we can give TIDRADIO a good grade for responsiveness but poor marks for releasing a product that was not completely baked. Unfortunately, there are many videos in the etherwebz claiming the radio has problems and it is a challenge to sort through the actual situation today.
To become familiar with the radio, KS6DAY has a series of videos that explain how to use the radio. Lots of good information here:
Summary
As I mentioned, I have three of these radios and may be going back for more. For me, they fit the role of that “spare radio” that is kept in my vehicle, loaned out to other people, or just stored away for When All Else Fails.
Curious about what you can hear on shortwave ham radio? This video is a brief survey of the diverse world of communications on the shortwave spectrum. Expand your radio horizons and enhance your emergency communication preparedness by tuning in to the world of shortwave ham radio. If you’ve started delving into radio communications beyond local […]
Curious about what you can hear on shortwave ham radio? This video is a brief survey of the diverse world of communications on the shortwave spectrum. Expand your radio horizons and enhance your emergency communication preparedness by tuning in to the world of shortwave ham radio. If you’ve started delving into radio communications beyond local […]
We’ve recently added a new room to the Matrix HAM Radio Space for Digital Voice modes as this was an area of interest that didn’t really fit into any of the other rooms.
The new Digital Voice room has attracted a lot of attention from members, with a lot of the focus being on the AllStarLink system. Michael, DK1MI built an AllStarLink node in the cloud for us all to use for Matrix Nets and so I decided I had to get in on the fun.
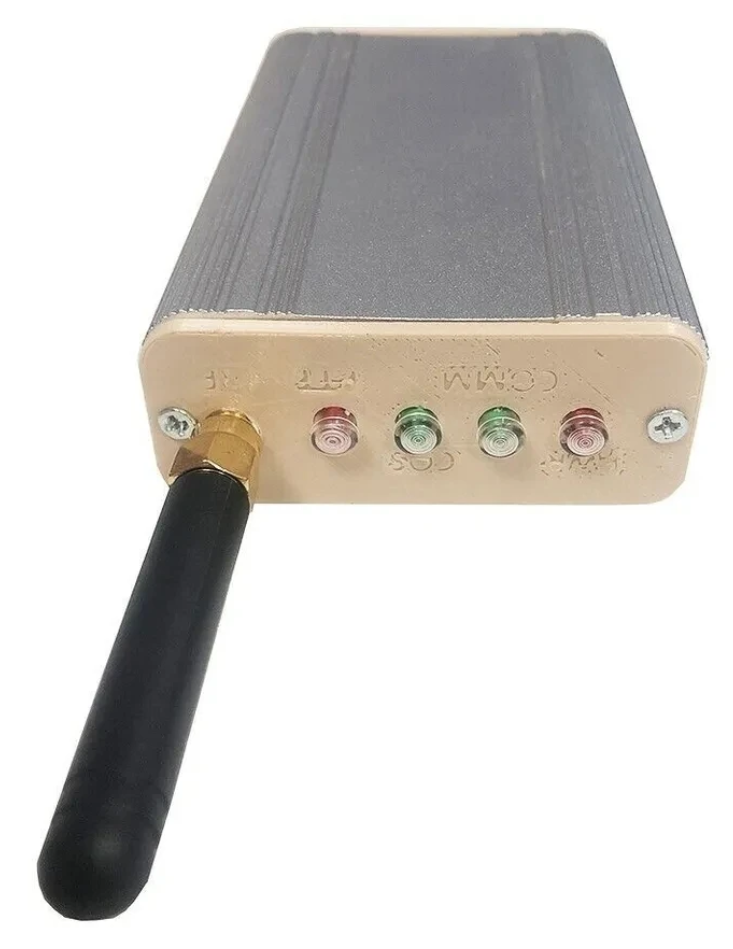
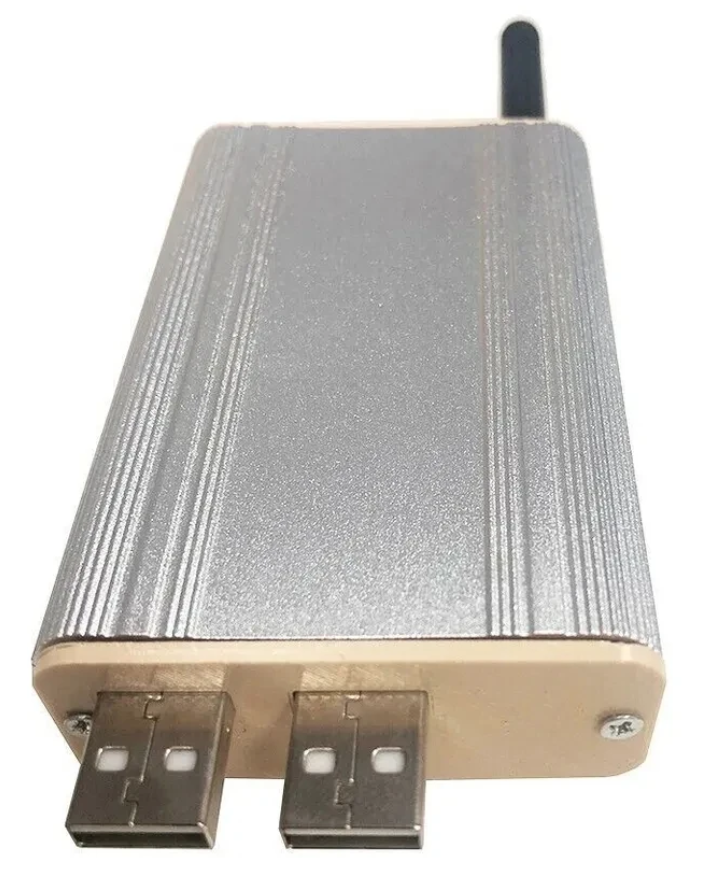
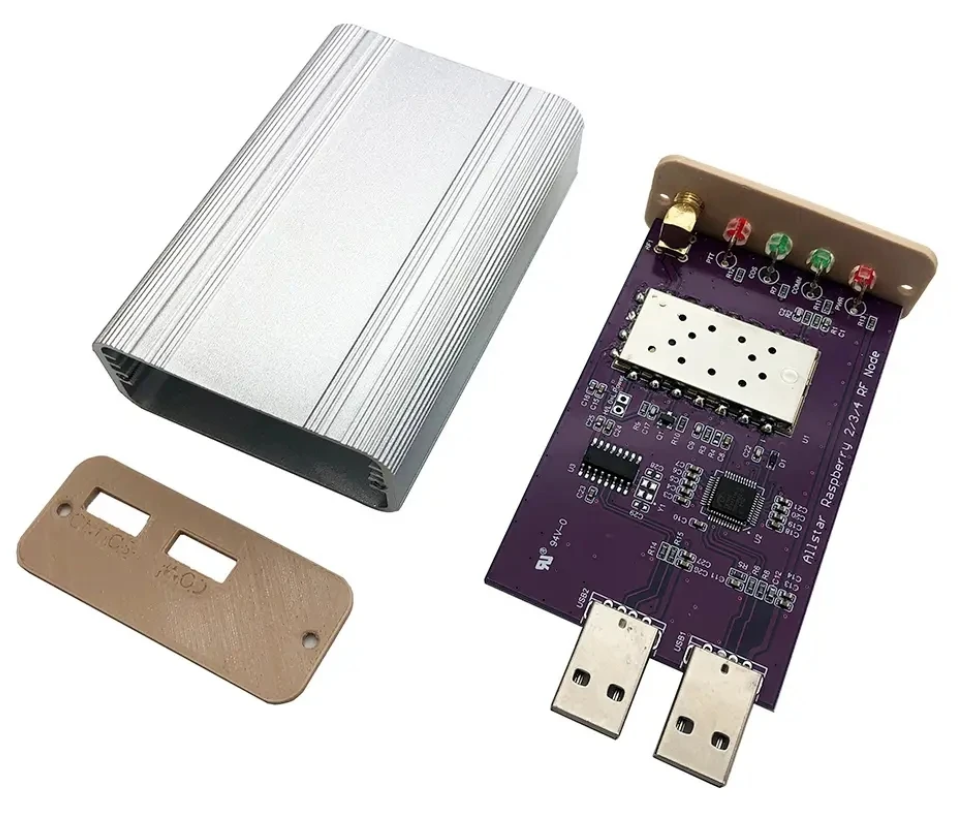
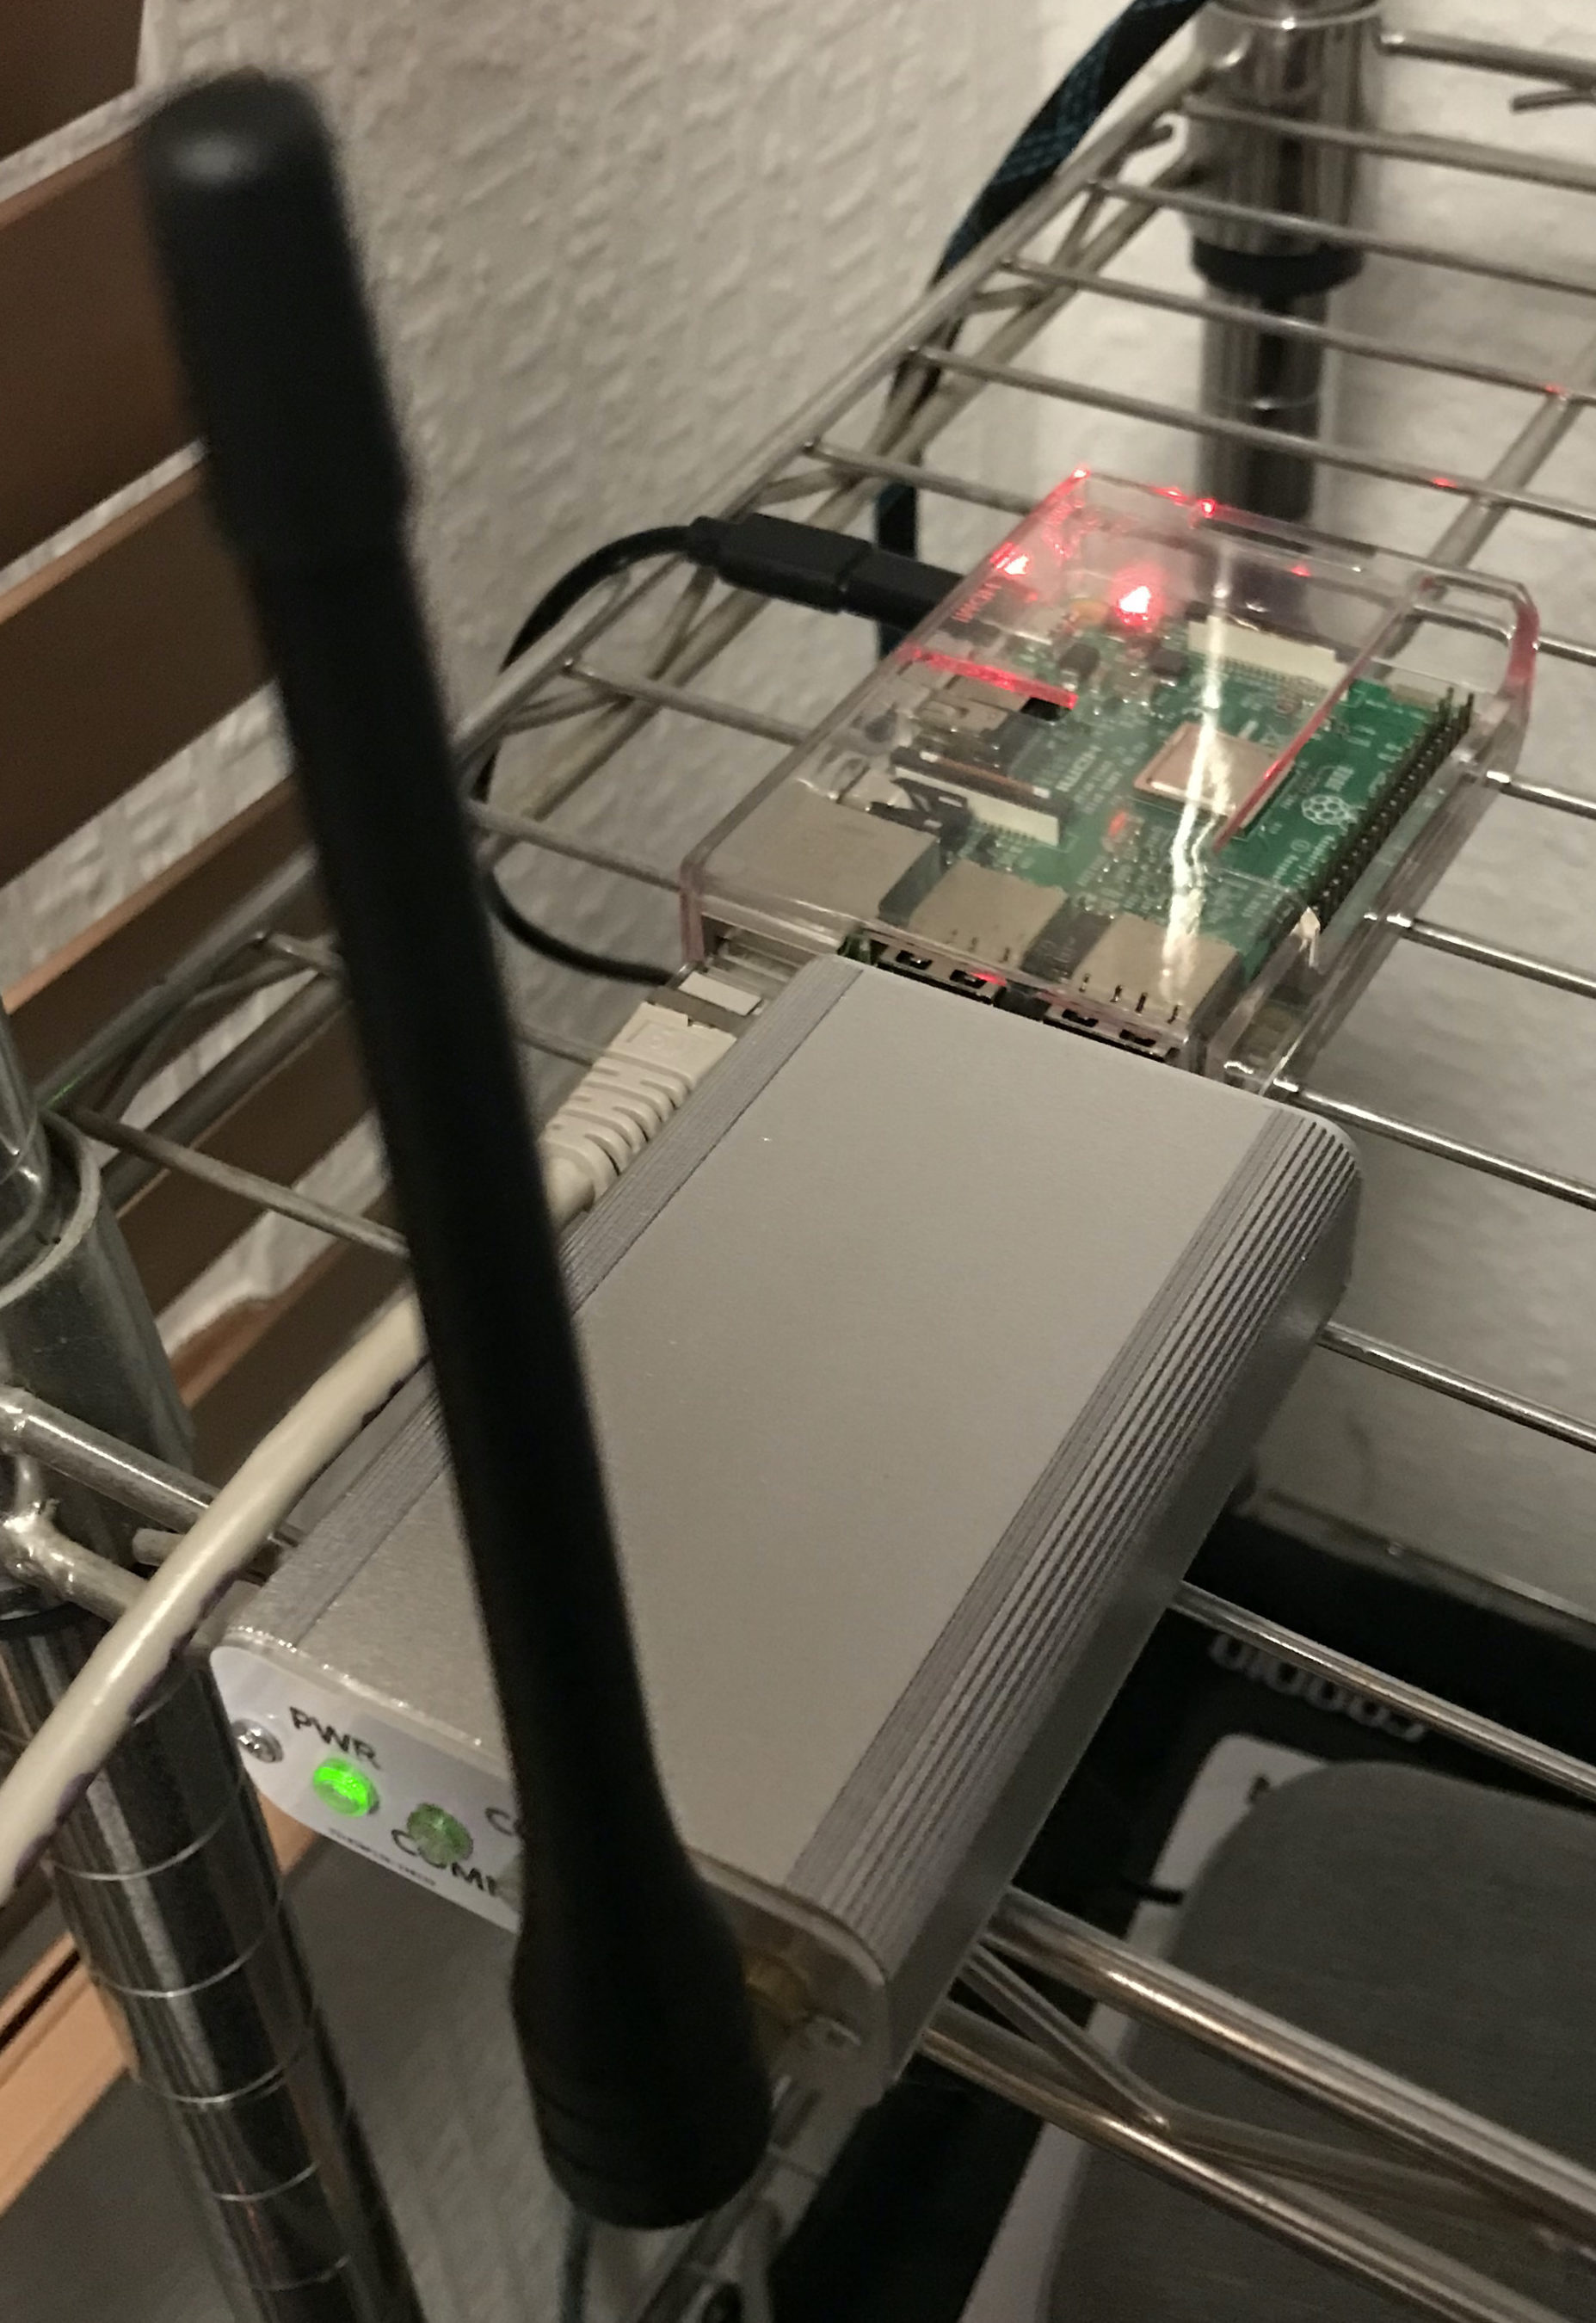
Jumbospot SHARI SA818 Amateur Radio AllStarLink Radio Interface Front Panel ViewJumbospot SHARI SA818 Amateur Radio AllStarLink Radio Interface Rear ViewJumbospot SHARI SA818 Amateur Radio AllStarLink Radio Interface stripped down View
The two USB connectors on the SHARI device are position such that they plug into two of the available 4 USB ports on the RaspberryPi without the need for cables. This keeps the whole solution together in one neat package.
Before you start you will need to obtain a node number and secret (password) from the AllStarLink Portal. To get this you will need to provide proof to the AllStarLink administrators that you are a licensed Amateur Radio (HAM) operator. This is done by uploading a copy of the first page of your HAM licence to the website for the admin team to check. This can take 24hrs to be completed so make sure you get this all done before trying to build your node. You cannot build a node successfully without a node number and secret.
Of course you will also need a transceiver that can operate on the 438.800Mhz frequency or other frequency of your choice on the 2m or 70cm HAM band.
You will also need to open port 4569 on your internet router and setup port forwarding to the IP Address that you will be using on your RaspberryPi node. It’s important to use a static IP Address on your RaspberryPi.
There are quite a few different Linux based operating system (O/S) images that are available for the RaspberryPi devices that have been specifically tailored for the AllStarLink node and include all the necessary software and library packages out the box.
Once downloaded you need to burn the ISO image onto a suitable SD card for your RaspberryPi. I use BalenaEtcher as it’s extremely quick and reliable at burning ISO images to SD cards.
Of course if you are a hardline Linux command line junkie you can always use dd to create the SD card.
Once you’ve got your O/S onto your SD card, slot it into your RaspberryPi making sure your SHARI device is connected to the two USB ports and then power it up. Make sure you have a good PSU for the RaspberryPi as the two devices together draw around 3A of current during the transmit cycle. (I use a 3.6A PSU from Amazon).
The default login for the Raspbian O/S is shown below. Login via SSH and configure your RaspberryPi for your local network. It’s important to use a static IP Address configured either directly on the RaspberryPi or via DHCP in your router.
Next you need to change directory into the asterisk config file directory using the command shown below:
cd /etc/asterisk
In this directory you will find all the default config files that come as part of the distro. For this build we’re not going to use them and so we need to move them out of the way ready for a set of config files that have already been configured correctly.
Using the following commands create a new directory, move into that new directory and then move all the unwanted configuration files into it:
mkdir ORIGINAL-CONF-FILES
cd ./ORIGINAL-CONF-FILES
mv ../*.conf ./
ls -la
cd ../
You should now be back in the /etc/asterisk directory which will now be empty apart from the custom directory which we left in place.
You now need to copy the correctly configured configuration files into the /etc/asterisk directory. Start by downloading the zip file containing the new configuration files
Once downloaded, copy the .zip file into the repeater users home directory (/home/repeater) using either scp on the Linux command line or if using Windows you can use the FileZilla Client in SFTP mode using the login details above.
Once you have the .zip file in the repeater user’s home directory you need to copy the file into the /etc/asterisk directory as user root:
Next as user root, change directory into the /etc/asterisk directory and unzip the .zip file:
cd /etc/asterisk
unzip ./AllStarLink-Config-v3.zip
Once the file is unzipped you will have a directory called AllStarLink-Config in the /etc/asterisk directory. You now need to cd into the directory, copy all the files out of it into the /etc/asterisk directory leaving a copy in the AllStarLink-Config directory for future reference:
cd /etc/asterisk/AllStarLink-Config
cp ./* /etc/asterisk
cd /etc/asterisk
You now need to move a couple of files into the repeater users home directory using the following commands:
The gpioBASH script and configuration details were supplied by Mark, G1INU in the Digital Voice room on the Matrix. It adds the COS light functionality to the setup. The COS light will now light every time the SA818 hears RF on the input.
The next thing you need to do is configure the SA818 radio device in the SHARI. The script I used was originally from https://wiki.fm-funknetz.de/doku.php?id=fm-funknetz:technik:shari-sa818 all I’ve done is change the entries to switch off CTCSS and change the frequency to 438.800Mhz. Configuring the SA818 is done by running the SA818-running.pyPython programme that you moved into the repeater user home directory. Making sure you are still user root, run the following commands:
cd /home/repeater
./SA818-running.py
At this point your SHARI SA818 device will be configured to operate on 438.800Mhz and CTCSS will be disabled.
If you want to change the frequency or enable and set a CTCSS tone to access the node you will need to edit the Python programme using your favourite text editor and change the entries accordingly. Once changed rerun the program as shown above and your SHARI will be reconfigured to your new settings.
Next you need to move the allmon.ini.php file into the correct directory so that it enables access to the Allstar Monitor web page on the device so that you can manage connecting/disconnecting nodes. Use the following commands as user root to achieve this:
The allmon.ini.php file needs to have your node name entered into it to work correctly. As user root, change directory and edit the file using your favourite editor.
cd /var/www/html/allmon2
Using your text editor, search for the line starting [XXXXX] and change the XXXXX to your node number. Save the change and exit the file.
At this point you are almost complete, all that is left to do is add your node number and node secret into the appropriate configuration files in the /etc/asterisk directory.
Since I am a Linux command line junkie I use vi to edit all the configuration files on the command line as user root, but you can use any editor of your choice.
cd /etc/asterisk
Start with the extensions.conf file. Search for the line starting with NODE = and delete the XXXXX entry and insert your node number. Save the file and exit it.
Next you need to edit the iax.conf file. This time search for the line starting with register= and change the XXXXX for your node number and the YYYYYYYYYYYY for your node secret. Be careful not to accidentally delete any other characters in the lines otherwise it will corrupt the configuration file.
In the same file search for the two lines that start with secret = and change the YYYYYYYYYYYY for your node secret. Once you have changed both of the secret entries, save and exit the file.
The final file to edit is the rpt.conf file. Once again open the file using your favourite editor and search for the line starting with XXXXX = radio@127.0.0.1:4569/XXXXX, change the XXXXX entries for your node number making sure not to delete any other characters next to the XXXXX entries.
Further down in the same file there is a line that starts with [XXXXX], once again change the XXXXX for your node number making sure to keep the square brackets at each end of the node number as you edit it.
Finally move down to the very bottom of the file and find the two lines that start with /home/repeater/gpio, once again change the XXXXX entries for your node number.
The final thing to change in the rpt.conf file is to replace my callsign with your own callsign so that the node identifies itself correctly. Scroll through the file until you find the two lines shown below, delete M0AWS and add your own callsign instead making sure you keep all the spaces between words as shown below.
idrecording = |i DE M0AWS
idtalkover = |i DE M0AWS
Once this is done, save and exit the file. At this point your node should be fully configured and will only require a reboot to get it working.
As user root, reboot your raspi using the reboot command.
reboot
Once your raspi comes back online, login using SSH as user repeater and then become root user using the sudo command detailed above.
You now need to create the admin user password for the Allstar Monitor web page on the device. This is done using the following commands as user root:
cd /var/www/html/allmon2
htpasswd -c .htpasswd admin
You will be asked to enter a password twice for the admin user. Make sure you make a note of this user/password as you will need it to login to the web page.
Finally check that the controlpanel.ini.php file is in the /var/www/html/allmon2 directory:
ls -la /var/www/html/allmon2/controlpanel.ini.php
If the file isn’t shown in the directory, enter the following commands to create the file in the correct place as user root and then exit the SSH session:
cd /var/www/html/allmon2
cp ./controlpanel.ini.txt ./controlpanel.ini.php
cd
exit
Once this is done your configuration is complete, logout from the terminal session by entering exit once more and your SSH session will terminate.
Using your favourite web browser enter the IP Address of your raspi into the URL bar as shown below:
http://<Your-Raspi-IP>/allmon2
Note: remove the <> from the URL once you have entered the required information.
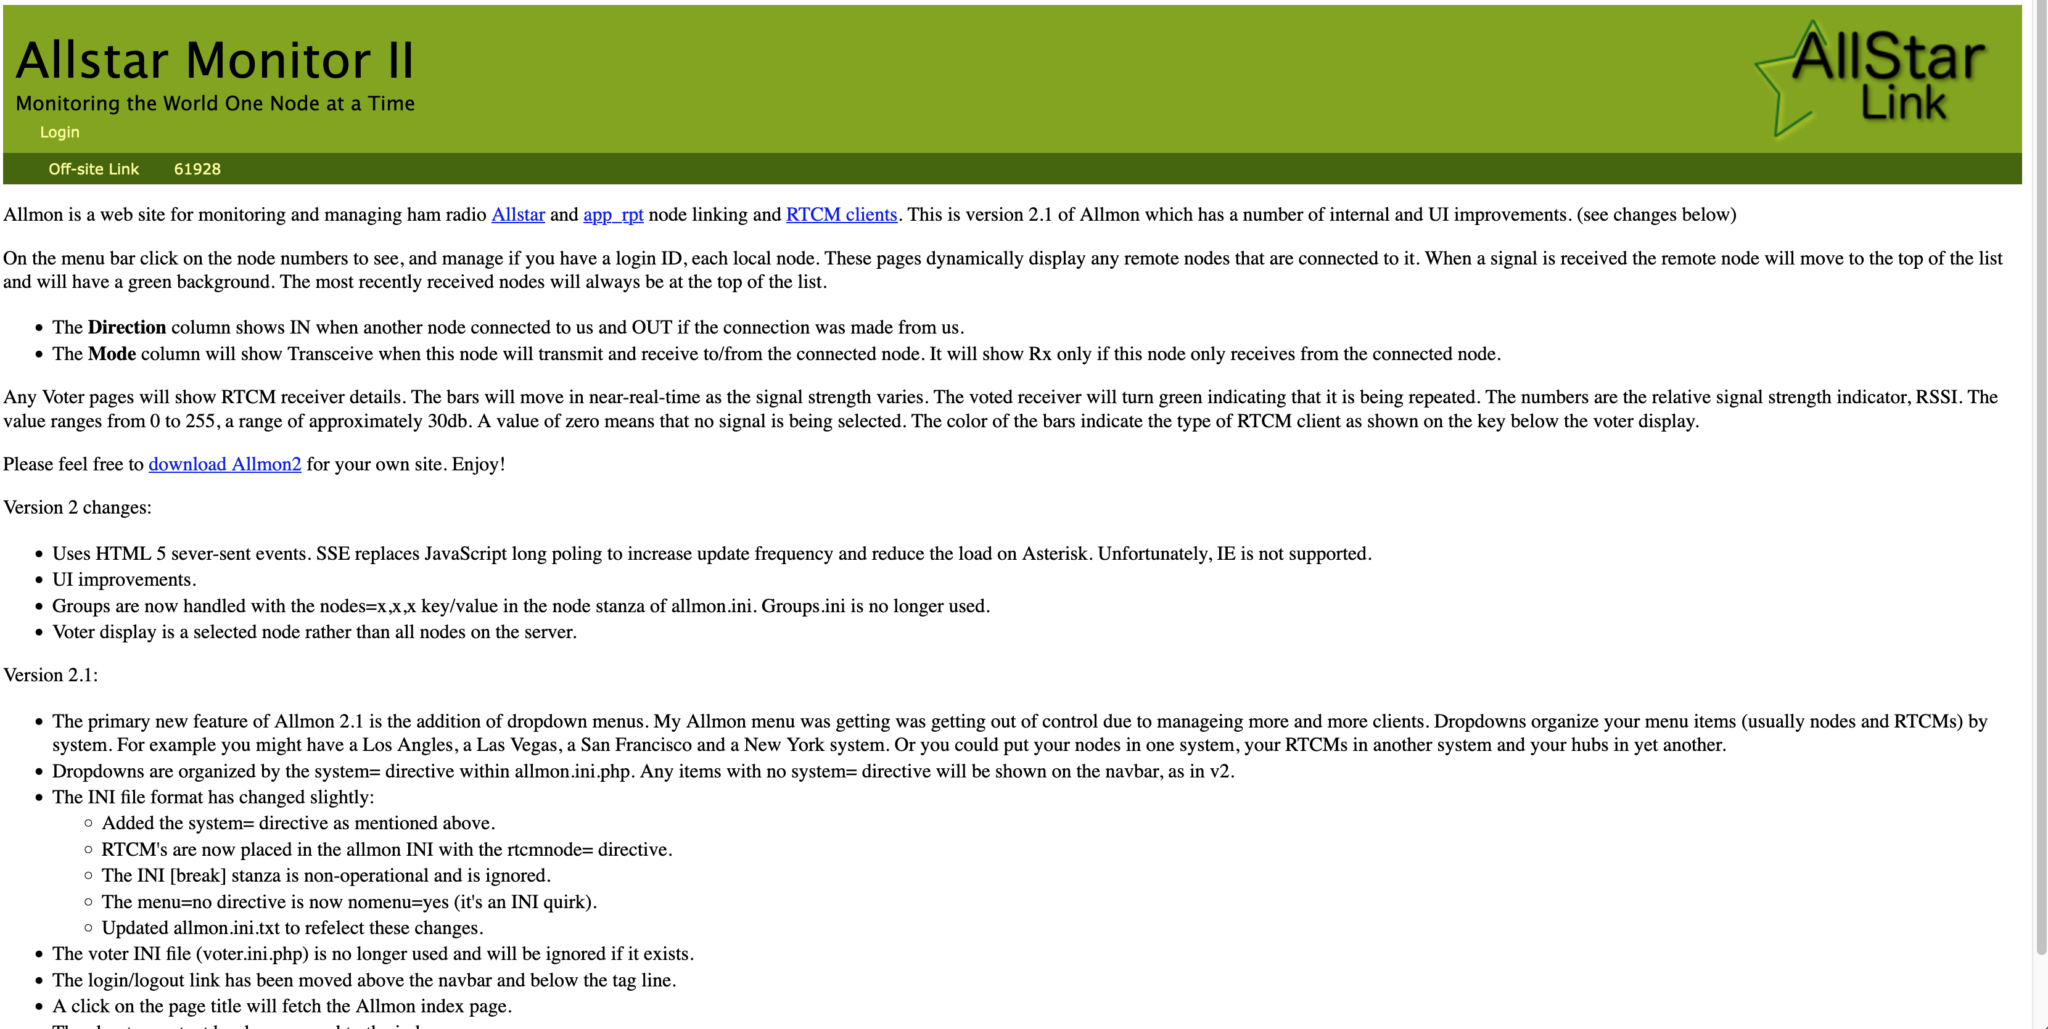
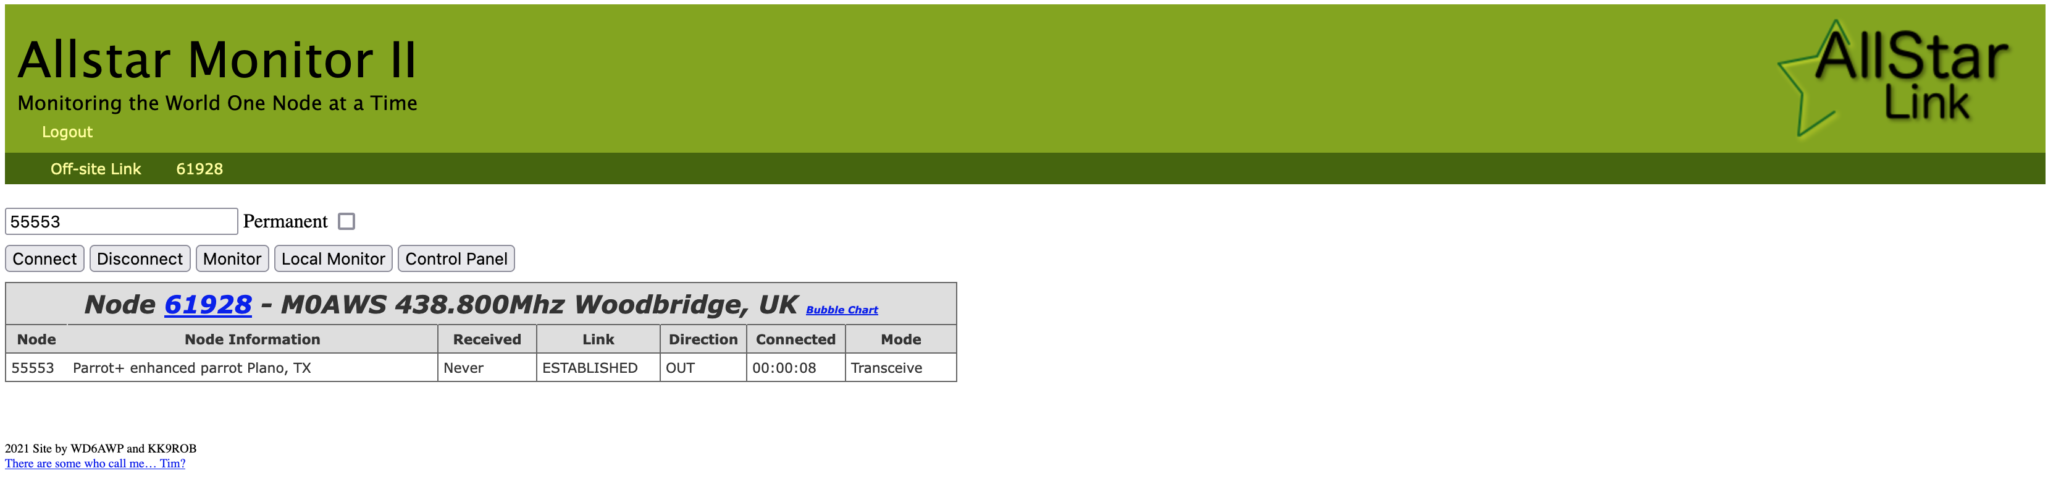
Once this is done you should be presented with your node control panel as shown below.
First visit to the AllStar Monitor Web Page
Login using Admin and the password you set above and you are now ready to start using your node.
It’s a good idea to connect to node 55553 which is a parrot test node to check your audio levels. You can do this by entering the node into the field at the top left and pressing the connect button.
M0AWS AllStarLink Node 61928 connected to 55553 Parrot
Once connected, tune your radio to 438.800Mhz FM and transmit a test message using your callsign and test123, or something similar. The parrot will then play your recording back to you so that you can hear how you sound. It will also comment on your audio level as to whether it is OK or not.
You are now connected to AllStarLink network and have the world at your finger tips. Below is a small list of nodes in the UK, Australia and America to get you started chatting with other HAMs via your node.
57881	Matrix HAM Radio Space AllStarLink Node (Hosted by Dk1MI)
55553	ASL Parrot for testing
41522	M0HOY HUBNet Manchester, UK
60349	VK6CIA 439.275 Perth, Western Australia
51077	VK6SEG South West Hub B Albany WA
2167	M0JKT FreeSTAR UK HUB 2 freestar.network
53573	NWAG NW AllStar Group Lancashire, UK
27339	East Coast Hub Wilmington NC USA
M0AWS AllStarLink Node 61928 sitting on the equipment rack
Thanks to Michael, DK1MI for building and hosting the Matrix HAM Radio Space AllStarLink Node (57881) and getting us all started in the world of AllStarLink!
We hope to be having regular Matrix Net’s on the node soon for all Matrix members and visitors. We’ll organise days/times via the Digital Voice room.