I’ve had a lot of fun with my Elecraft AX1 antenna since I bought it six or seven years ago. I’ve activated several parks with it, and it has yet to let me down. Running five watts into a 45-inch whip shouldn’t really work, but somehow it does. While I don’t always use it as my primary antenna, I always take it along on outings as a backup.
I have used my AX1 in a variety of settings, e.g., picnic table portable, with a car window mount, clamped to the handlebars of my bike, etc. While perusing the Temu website, I stumbled upon a tactical-style MOLLE pouch capable of holding the AX1 and all the accessories I typically use for those configurations. The cost was a mere $8.00 (USD) for a pair of them. (The original offering is no longer available, but a search for “molle pouch” on Temu or AliExpress should find this pouch or something similar.)
AX1 Kit (front). I have two of these pouches, so I used a nylon zip tie label to tell them apart. AX1 Kit (Rear). The pouch is MOLLE-compatible.
It measures 6.3 in. (16cm) x 4.33 in. (11cm) x 2.1 in. (5.5cm). For as inexpensive as they are, the quality is pretty good. The material is durable, and the zipper works smoothly. Each pouch came with an American flag velcro patch. At these low prices, you often get what you pay for. This time, though, I think it was a pretty good deal.
Everything fits comfortably in the little pouch, but there isn’t much room to spare.
This is what I carry in my AX1 kit. Not shown is a 3-foot RG-316 coax cable. (See text for list)
I normally carry my AX1 pouch in my backpack. When I have too much other stuff in my pack, I can use the MOLLE straps to attach the pouch to the outside of the pack.
It’s nice having all of this stuff in one place. Now my little AX1 is always ready to go, however I plan to use it.
by Teri (KO4WFP) After a five week break from POTA, it was time to get back in the game! I leave for my North Carolina camping/POTA trip Sunday, July 14th and frankly miss being out on an activation. To remedy that situation, Monday, July 8th, I headed to Tuckahoe Wildlife Management Area (WMA), POTA park … Continue reading Back in the Game for the POTA Babe→
The Frankentenna consists of parts from three different antennas to create a 25 foot tall vertical non resonant radiator that when combined with a remote antenna tune results in amazing performance on the bands. Join me at the Plover River State Fishery and Wildlife Area (POTA US-10054) in North Central Wisconsin as I put this park on the air.
As a bonus, patrons can view the full, unedited phone contacts for this Parks on the Air activation. Visit my page on Patreon for details: https://www.patreon.com/kb9vbrantennas
I do return QSL, if you made a contact with me and would like a QSL, please send me one. Return postage not necessary, but always appreciated. As they say, KB9VBR is ‘good in the book.
Links may be affiliate links. As an Amazon Associate, I earn from qualifying purchases. This does not affect the price you pay.
THE W3FF HOMEBREW BUDDIPOLE A PORTABLE ANTENNA DESIGN FOR AMATEUR RADIO History of the Buddipole
In January of 2000, Budd W3FF began experimenting with a “walking portable” ham station. Since then, thousands of stations have been worked on the amateur radio bands, mostly from 10 Meters through 60 Meters.
The radio of choice here is a Yaesu FT-857ND. The new Lithium Ion Nano-phosphate batteries, the A-123’s are the way to go for power. A two pound A-123 gives me two hours of SSB operating with 100 watts and the ‘857d. (A-123’s and chargers are under accessories at Buddipole.com.)
Instructions are on this website for two homebrew HF antennas that are easy to build and very effective…………the Buddipole and the Buddistick, a vertical antenna that uses PVC with a variety of whip options.
The mast is important. I have several, but in order to get the feedpoint up high, I use either a Buddipole commercial mast ( Buddipole.com ) or a painter’s pole with a Center Tee Adapter. That adapter changes the odd Acme thread to a half inch pipe thread. That’s the thread used on the homebrew and commercial antennas I will describe. My son, Chris W6HFP, suggested we go commercial with the Buddipole, and we did that back in July 2002. You can see the commercial products at Buddipole.com. Chris now runs the company, and I do the technical support and help the homebrewers with any questions.
So somehow I have the original Buddipole back to 2003 to the latest BuddiHex and bits and bobs in between (TRSB is a must) along with several masts and a Mastwerks. Do I have 5 zip cases of various Buddipole antennas and tripods? Yes Sir! Total Fan Boy maniac OCD
Heard them…worked them…logged them…
I have made several thousand contacts from 80 to 2m and have always been happy with the excellenet workmanship and proof of concepts actually prototyped for some time before release to market.
As some of you know I do some QRPp Parks on the Air activations using the QRP Labs QCX Mini. For the past couple of years I've had GREAT results using my 40 and 20 meter QCX Mini with what I call, "My Smoke Detector Battery" setup
This spring and so far this summer I've used both 40 and 20 meter QCX minis with a 9 volt/200mW battery for WSPR operations. And most recently I've used the 9 volt/200mW battery with my 40 meter QCX Mini for for early morning CW Parks on the Air activations.
While using my YouKits HB-1B during a POTA activation on April 29th, 2024, I set up another vertical antenna with my 20 meter QCX Mini to use as a WSPR station with a 9 volt/200mW battery. I ran this setup for almost an hour and was amazed with the distance and how many beacons picked up my less than a watt signal from Kentucky, USA.
QRP Labs QCXX Mini 20 Meters
A few days later on May 1, 2024; I decided to give it another try but this time on 40 meters when conditions were not quite optimal. And again, I was amazed with the number of stations picking up my signal with "My Smoke Detector Battery"
QRP Labs QCX Mini 40 Meters
As most of you may know, during the month of June 2024, the sun has presented several Earth facing regions which have been quite active with solar storms, solar flares, large sunspot regions, CME's and HF radio blackouts. These conditions have not been favorable for QRPp communications. Living in Kentucky, USA this time of year also represents days and weeks of hot, humid weather with potential for almost daily thunderstorms. So far in June 2024; we've seen record low morning temperatures of 82 degrees and several days of temperatures exceeding 95 degrees with heat indices well over 100 degrees.
Finally the Solar Space Weather forecast for the first few days of July 2024 looked like an excellent opportunity to try some Parks on the Air CW activations using QRPp. However, terrestrial weather was another issue. Heat advisories were forecasted for the last few days of June 2024 and first few days of July 2024. It was time to take advantage of this brief window to do some QRPp operating.
QRPp Equipment Set Up
The antenna I was going to use was the Tufteln 40 / 20 Linked EFHW. I made this antenna specifically for my QRP Labs 40 & 20 Meter QCX Minis.
Tufteln 40 / 20 Meter Linked EFHW
As for a keyer, I was going to use the American Morse Equipment Ultra Porta Paddle.
American Morse Equipment Ultra Porta Paddle
Upon awaking before daybreak, I checked the NOAA Space Weather Predication Center's website for Space Weather conditions. It all looked favorable. Terrestrial weather had a Heat Advisory forecasted for July 2, 2024, so I decided to head out for a near sunrise Parks on the Air activation at Beargrass Creek State Nature Preserve US-7956 which is less than 4 miles from my QTH.
Not knowing who would be hunting at 1130 UTC, I arrived on site; throw up my arborist line about 45 feet into a tree and pulled up my antenna in a sloper configuration, set up my 40 meter QCX Mini and was ready to go.
At 1142 I started sending CQ and 'BEHOLD" within a minute or two the hunters responded top my calls and kept me busy for the next 50 minutes. Below are the results of what a QRPp CW Parks on the Air activation yielded me.
The highlight of this day's activation was a QSO with Greg / VE3GSS Port Carling, ON, Canada. A little over 920 km from my Kentucky POTA site with less than 1 WATT.
At 1235 UTC the temperature had risen to 84 degrees. It made no sense in pushing it as I had already achieved more than I expected. To say I walked away with a HUGE grin on my face is an understatement. It was a GREAT Parks on the Air activation.
On July 3, 2024 my internal clock woke me at 0900 UTC with basically the same Space and Terrestrial conditions that were in play as the day before. So why not make this "Ground Hog Day in July. Same time, same set up on July 3, 2024. One difference; today I would try 20 meters.
Within less than a minute after my CQ on 40 meters at 1143 UTC, my activation began with hunters eagerly wanting to be acknowledged. I didn't disappoint and neither did they. QSOs were rapid fire for almost an hour.
At 1240, I switched over to my 20 meter QCX Mini to see what I could garner, knowing that at time time of morning in the U.S., the likelihood of getting any action on 20 meters was suspect. I did manage one 20 meter QSO. Here was my catch for a July "Ground Hog Day"
The highlight of this day was as try for a Park-to-Park QSO with a station in Japan. I tirelessly tried for several minutes to make a 40 meter contact with a Parks on the Air station JJVAS at JP- 0128. The QSB was pronounced and the strongest I could get was a 229. The operator was kind enough to send AGN? a few times but I was just trilled for that reply with less than 1 WATT.
This day like many others brought greetings from people who have become familiar with my operations as they get in their daily walks, runs and cycling before the heat sets in. Today though I met Dr. Tamekka Cornelius, Ph. D, who was out on her daily walk. She, like others are inquisitive about seeing a man sitting in a mostly open field connected to some wires, a bicycle close by and some weird equipment strapped to his legs. Dr. Cornelius and I had a nice chat about Amateur Radio, brief history of my broadcast career and my bicycling activities.
Operating QRPp reminds me of the country music singer Kenny Rogers' song:
"The Gambler"
You've got to know when to hold 'em
Know when to fold 'em
Know when to walk away
And know when to run
Once in your ham radio journey, try operating QRPp.
Curious about what you can hear on shortwave ham radio? This video is a brief survey of the diverse world of communications on the shortwave spectrum. Expand your radio horizons and enhance your emergency communication preparedness by tuning in to the world of shortwave ham radio. If you’ve started delving into radio communications beyond local […]
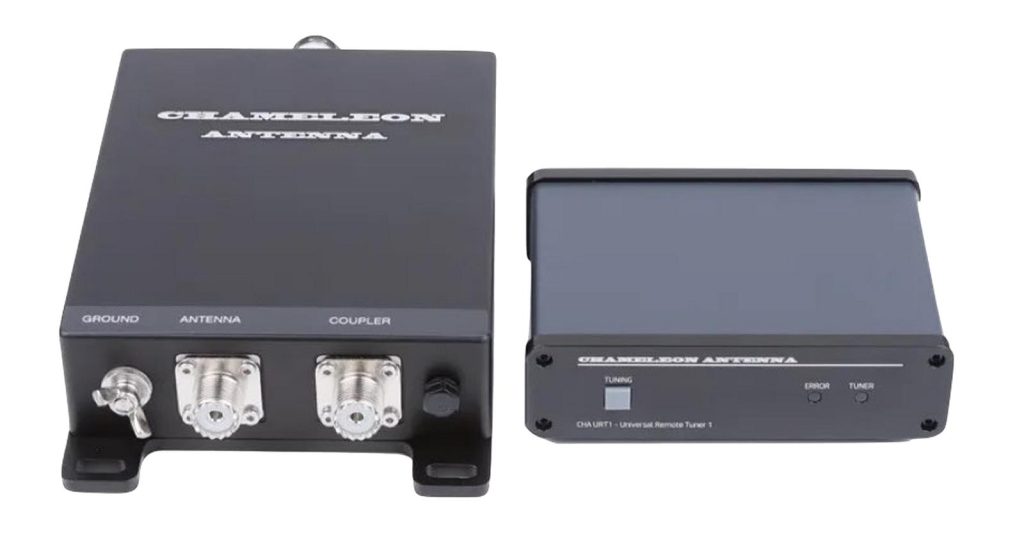
The Chameleon URT-1 is a remote outdoor antenna tuner for almost any type of antenna or model of transceiver. This wide range tuner matches resonant and non-resonant wires, verticals, and long wire antennas with its range of 5 to 1500 ohms of impedance. The URT-1 has a 50 ohm coaxial port and a wire beehive connector for added versatility. And the unit is weather proof so it can be mounted outdoors near the feed point of the antenna.
The purpose of an antenna tuner is not to ‘tune’ your antenna, but instead to provide a proper impedance match to your transceiver. Modern transceivers require a 50 ohm impedance and if there is a mismatch, the transceiver will respond, at the very least, by reducing output power, and at the worst, damaging the final amplifier components. So in order to deliver all available power to your antenna, a proper impedance match is required. This is a simplistic explanation, but sufficient for today.
Screenshot
Usually the tuner, either manual or automatic is placed near the transceiver. This is fine in most cases. If your feed line run is short, it won’t make a difference. But coaxial cable does introduce losses into the antenna system and if your antenna has a high impedance at the feed point, the mismatch will create standing waves, and the elevated SWR can be characterized as power lost in the feed line. Again that’s a simplistic explanation.
So how do we increase the overall efficiency of our antenna system? One method is to move the antenna tuner from the transceiver over to the antenna feedpoint. Situating the tuner at the antenna allows it to deliver the proper impedance match, which will be 50 ohms, to the feed line. Since impedance is matched at the coax, we can run longer pieces of cable without fear of losing energy due to high SWR on the cable.
Now remote tuners are typically used with non resonant antennas, either long wires or verticals. A resonant antenna, like a dipole or end fed half wave should have close to a 50 ohm impedance at the feed point. The tuner located at your transceiver will be used to fix slight mismatches or to extend the bandwidth of your antenna. Remote tuners would be overkill in these situations.
But with, say a 43 foot vertical antenna, the impedance may be between 400 – 900 Ohms. A 9:1 transformer could help knock that down, but using a remote tuner instead, will take whatever impedance the antenna is and deliver a consistent 50 ohms to the feed line, reducing overall system losses.
URT-1 Specifications
The URT-1 covers 1.8 to 54 Mhz and has 16,000 memories for quick recall when tuning. It can match any antenna with an impedance of 5 to 1,500 Ohms. That’s like a 30:1 match. And it can handle up to 125 watts sideband or CW and 60 watts on the digital modes.
Screenshot
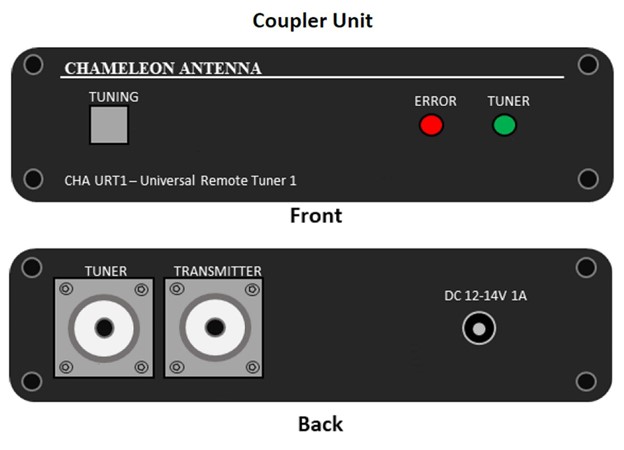
Opening up the box, things may look a little familiar. This tuner is custom manufactured by Mat Tuner for Chameleon. It does look very similar to their MAT 40 remote tuner, but there are some key differences.
The tuner comes in two parts, the first is the coupler box. This connects to the transceiver and to a 12 volt power source. Then your coax cable runs all the way out to the tuner box which sits at the antenna feed point. You will notice that there are not separate control cables for the tuner. Power and tuner control are fed through the coax cable by way of a Bias-T circuit. The benefit to that is that you don’t have to run a second cable to the tuner unit, but the downside is that you need to initiate tunes by pressing the tuning button on the coupler.
The tuner unit is constructed out a aluminum alloy and it weather proof. On the top of the unit is a beehive connector for feeding wire or vertical antennas. On the bottom is a counter poise and ground connector along with two UHF female connectors. One UHF connector connects to your coax run coming from the coupler and the second is for feeding antennas that have a similar SO-239 connection point.
The tuner comes with a set of rails so that you can mount it to a post or board using a pair of U-Bolts. An option 12 volt AC adapter is also available. So what’s different between the URT-1 and the MAT 40 tuner? Namely the addition of a 50 ohm coaxial output port and the removal of the brand specific control cables. The URT-1 is a bit more universal in that the coupler unit will work with just about any brand or model of transceiver.
How to use Use the URT-1
Using the URT-1 is pretty simple. We’ll first connect the coupler to our transceiver. My main antenna, a G5RV, is connected to my LDG auto tuner, so going to put this one onto the 2nd antenna port on my transceiver. A coax jumper goes from the radio to the coupler. The antenna coax is then connected to the other port on the coupler. Finally connect the power. The green power light should glow. If you see the red error light, that means the there is a short circuit somewhere in the coax connection between the coupler and the tuner.
When connecting the tuner, you can not have any devices like switches, diplexers, or meters in the path between the coupler and the tuner. These could cause a short circuit, potentially damaging the tuner or your device.
To initiate a tune, put your transceiver into a constant carrier mode like RTTY. Set the power level to 15 watts or less, briefly hit the tune button, and immediately key the transmitter. Watch the transceiver SWR meter and it will show the resulting SWR when the tuning cycle is complete. Unkey the transmitter. A complete tuning cycle will take five seconds or less.
At this point you can transmit normally. When changing bands, you will reinitiate the tune process. The tuner has 16,000 memories, so once the unit finds a good match, it will remember it for faster subsequent tunes.
Now let’s head outdoors and I’ll show you a couple of ways you can use the remote tuner in your portable amateur radio operations.
My experiences
What are my thoughts on the Chameleon URT-1 remote antenna tuner? First off, I must say that this unit is well constructed. The tuning unit consists of an aluminum alloy body that has a certain amount of heft to it. It wins points on that item alone. Taking this out into the field was a breeze as I didn’t have to run a separate control cable to the tuner for power. Operationally, it tunes fast and had no problem finding a match that was 1.5:1 or less. I think the only time I had issues with it getting a good match was with my 25 foot Franken-tenna on the 15 meter band. In that instance it gave up at about 1.8:1. But with the Frankentenna it did perform quite well on 10, 15, 20, and 40 meters despite the bands not being in the best condition. I made 210 contacts on those bands activating the Mountain Bay state trail, with the bulk of them on the 20 meter band.
Screenshot
With the end fed random wire antenna, I connected the tuner up to UHF connection on the antenna. The addition of the 9:1 transformer with the tuner made for super fast tune times. Every time it found a match at rocket speed. For that activation of Ackley Wildlife Area I ended up with 176 contacts on 10, 12, 15, 17, and 20 meters. The great thing about non resonant antennas is their agility. To switch bands, all I had to do was hit the tune button and I was good to go.
I had the same experience back here at home with the 71 foot non resonant wire. Once it learned the antenna, it would re-tune almost instantly. I was able to get matches with this wire from 10 meters all the way down to 80 meters. Operationally, the antenna performed just as well, maybe a bit better than with my other tuner located at the feed point. This antenna is being fed with 75 feet of RG-8X, so the better match at the feed point does make a difference.
As for things I don’t quite like about the tuner, First off these UHF ports are not labeled, so you need to look at the instructions to determine which goes to the coupler and which goes to the antenna. Also the ports didn’t come with covers. If you are using the bee hive connector, having a cover on the unused UHF port would be nice. I’ve got a friend that 3D printed some, so i did have something that worked. Finally, and probably the biggest, is that you have to press the tune button on the coupler to initiate a tune. If your SWR changes or you change bands, the tuner won’t automatically retune, it needs to be activated. That involves switching to a carrier mode like RTTTY, pressing the tune button, and then transmitting a carrier. Not the worst thing in the world, but also not fully automatic like some brands of remote tuners. But those require a separate control and power cable and up side of this tuner is that you don’t have to run a separate power and control cable to the tuner. Your power runs through the coax, which makes installation a breeze.
But, final words, I’ve been looking for a remote tuner at the hamfests. Everything I’ve seen is overpriced or in bad shape. It’s a bit serendipitous for Chameleon to be sending me this as it opens up the door to a bunch of different antenna configurations that I’ll be able to demonstrate. I’ve got some great ideas to use this tuner with, so you’ll want to stick around for that.
As a bonus, patrons can view the full, unedited phone contacts for this Parks on the Air activation. Visit my page on Patreon for details: https://www.patreon.com/kb9vbrantennas
I do return QSL, if you made a contact with me and would like a QSL, please send me one. Return postage not necessary, but always appreciated. As they say, KB9VBR is ‘good in the book.
Links may be affiliate links. As an Amazon Associate, I earn from qualifying purchases. This does not affect the price you pay.
The addition of a new product from the innovators at Chameleon Antenna is always reason for celebration—perfect timing since the Fourth of July is only a few days away. Want to add some QSO fireworks to your logbook? Looking for a reliable, weatherproofed outdoor antenna tuner for your permanent installations?
Covering 1.8 to 54 MHz, the Universal Remote Outdoor Antenna Tuner (CHA-URT1) works with most antenna types and transceivers. The tuner can be used with wire-fed antennas including verticals, random wires, and long wires, as well as with coaxial-fed antennas like inverted-Vs and dipoles. The tuner can match any antenna with an impedance of five to 1,500 ohms within seconds. Tuning time is five seconds for full tune and 0.1 seconds for memory tune.
(Image/DX Engineering)
The package comes with a compact coupler (5.04″ x 4.13″ x 1.69″) and tuner (8.78″ x 5.12″ x 1.77″).
The rugged, weatherproof tuner contains the antenna matching network and controller and is designed to be permanently installed outdoors at or near the antenna feedpoint to avoid loss due to high SWR on the feedline. The coupler contains the operator controls and status indicators. It uses a bias-T circuit to send power and control signals to the remote tuner over the connecting coaxial cable, so there is no need to order or install a separate transceiver-specific control cable. The coupler is not weatherproof and must be installed inside near the operator and transceiver. Also included is 12V hardwire power cable, brackets, and hardware.
Power Handling:
125W SSB phone/CW
100W SSB phone/CW – 50 MHz
60W all other modes
(Image/DX Engineering)
The CHA-URT1 features 16,000 memories for quick recall and tuning with previously used settings. Once the tuner is tuned, the relay’s latch and power is turned off, saving on battery drain. The tuned frequency will be stored in memory.
Thinking of upgrading your portable operating prowess? Visit DXEngineering.com for the full lineup of Chameleon Antenna gear, including portable HF antenna systems, portable resonant vertical antennas, tactical delta loop antennas, receive loop antennas, F-loop antennas, EMCOMM antennas, end-fed halfwave slopers, off-center fed dipoles, counterpoise kits, and more.
I get quite a few emails from readers of my blog asking how my QO-100 satellite station is put together and so, I thought perhaps now is a good time to put together an article detailing the complete build.
My QO-100 satellite ground station is built around my little Icom IC-705 QRP transceiver, it’s a great little rig and is ideal for the purpose of driving a 2.4Ghz transverter/up-converter.
Of course all the software used for the project is Opensource and freely available on the internet.
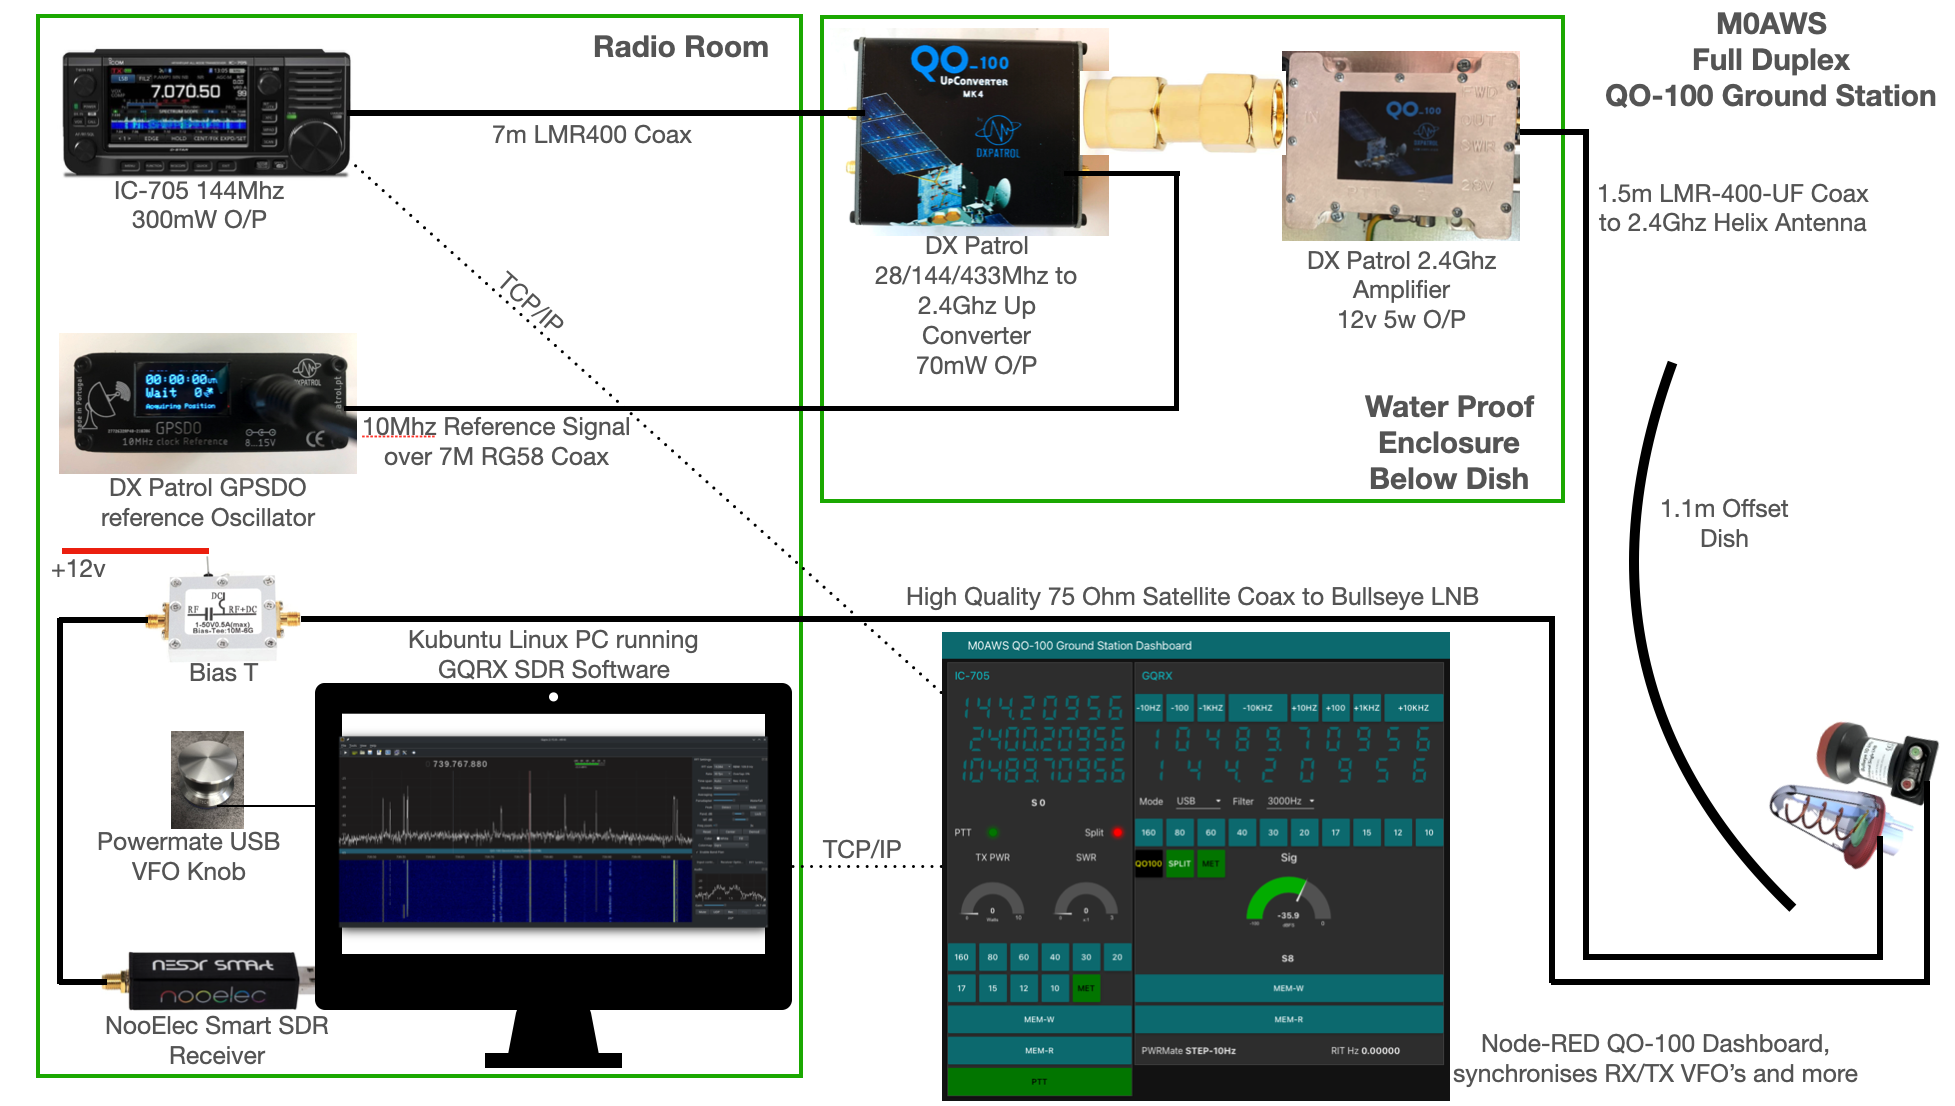
M0AWS QO-100 Ground Station Build Visual (Click to Enlarge)
The station comprises of the following building blocks:
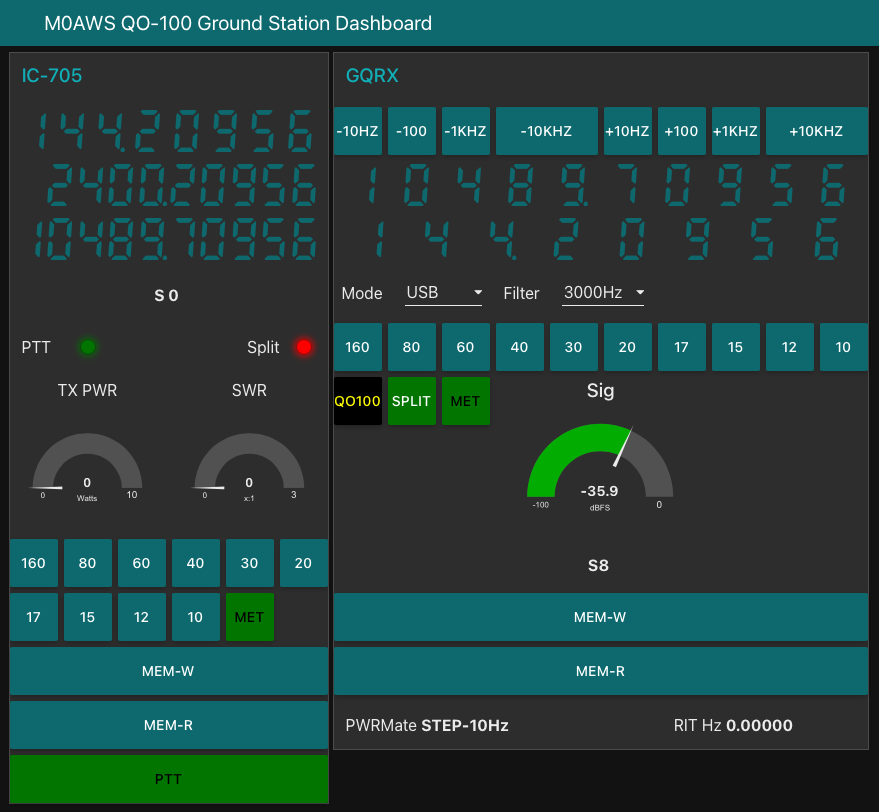
QO-100 Ground Station Dashboard developed using Node-RED
LMR400-UF/RG58 Coax Cable
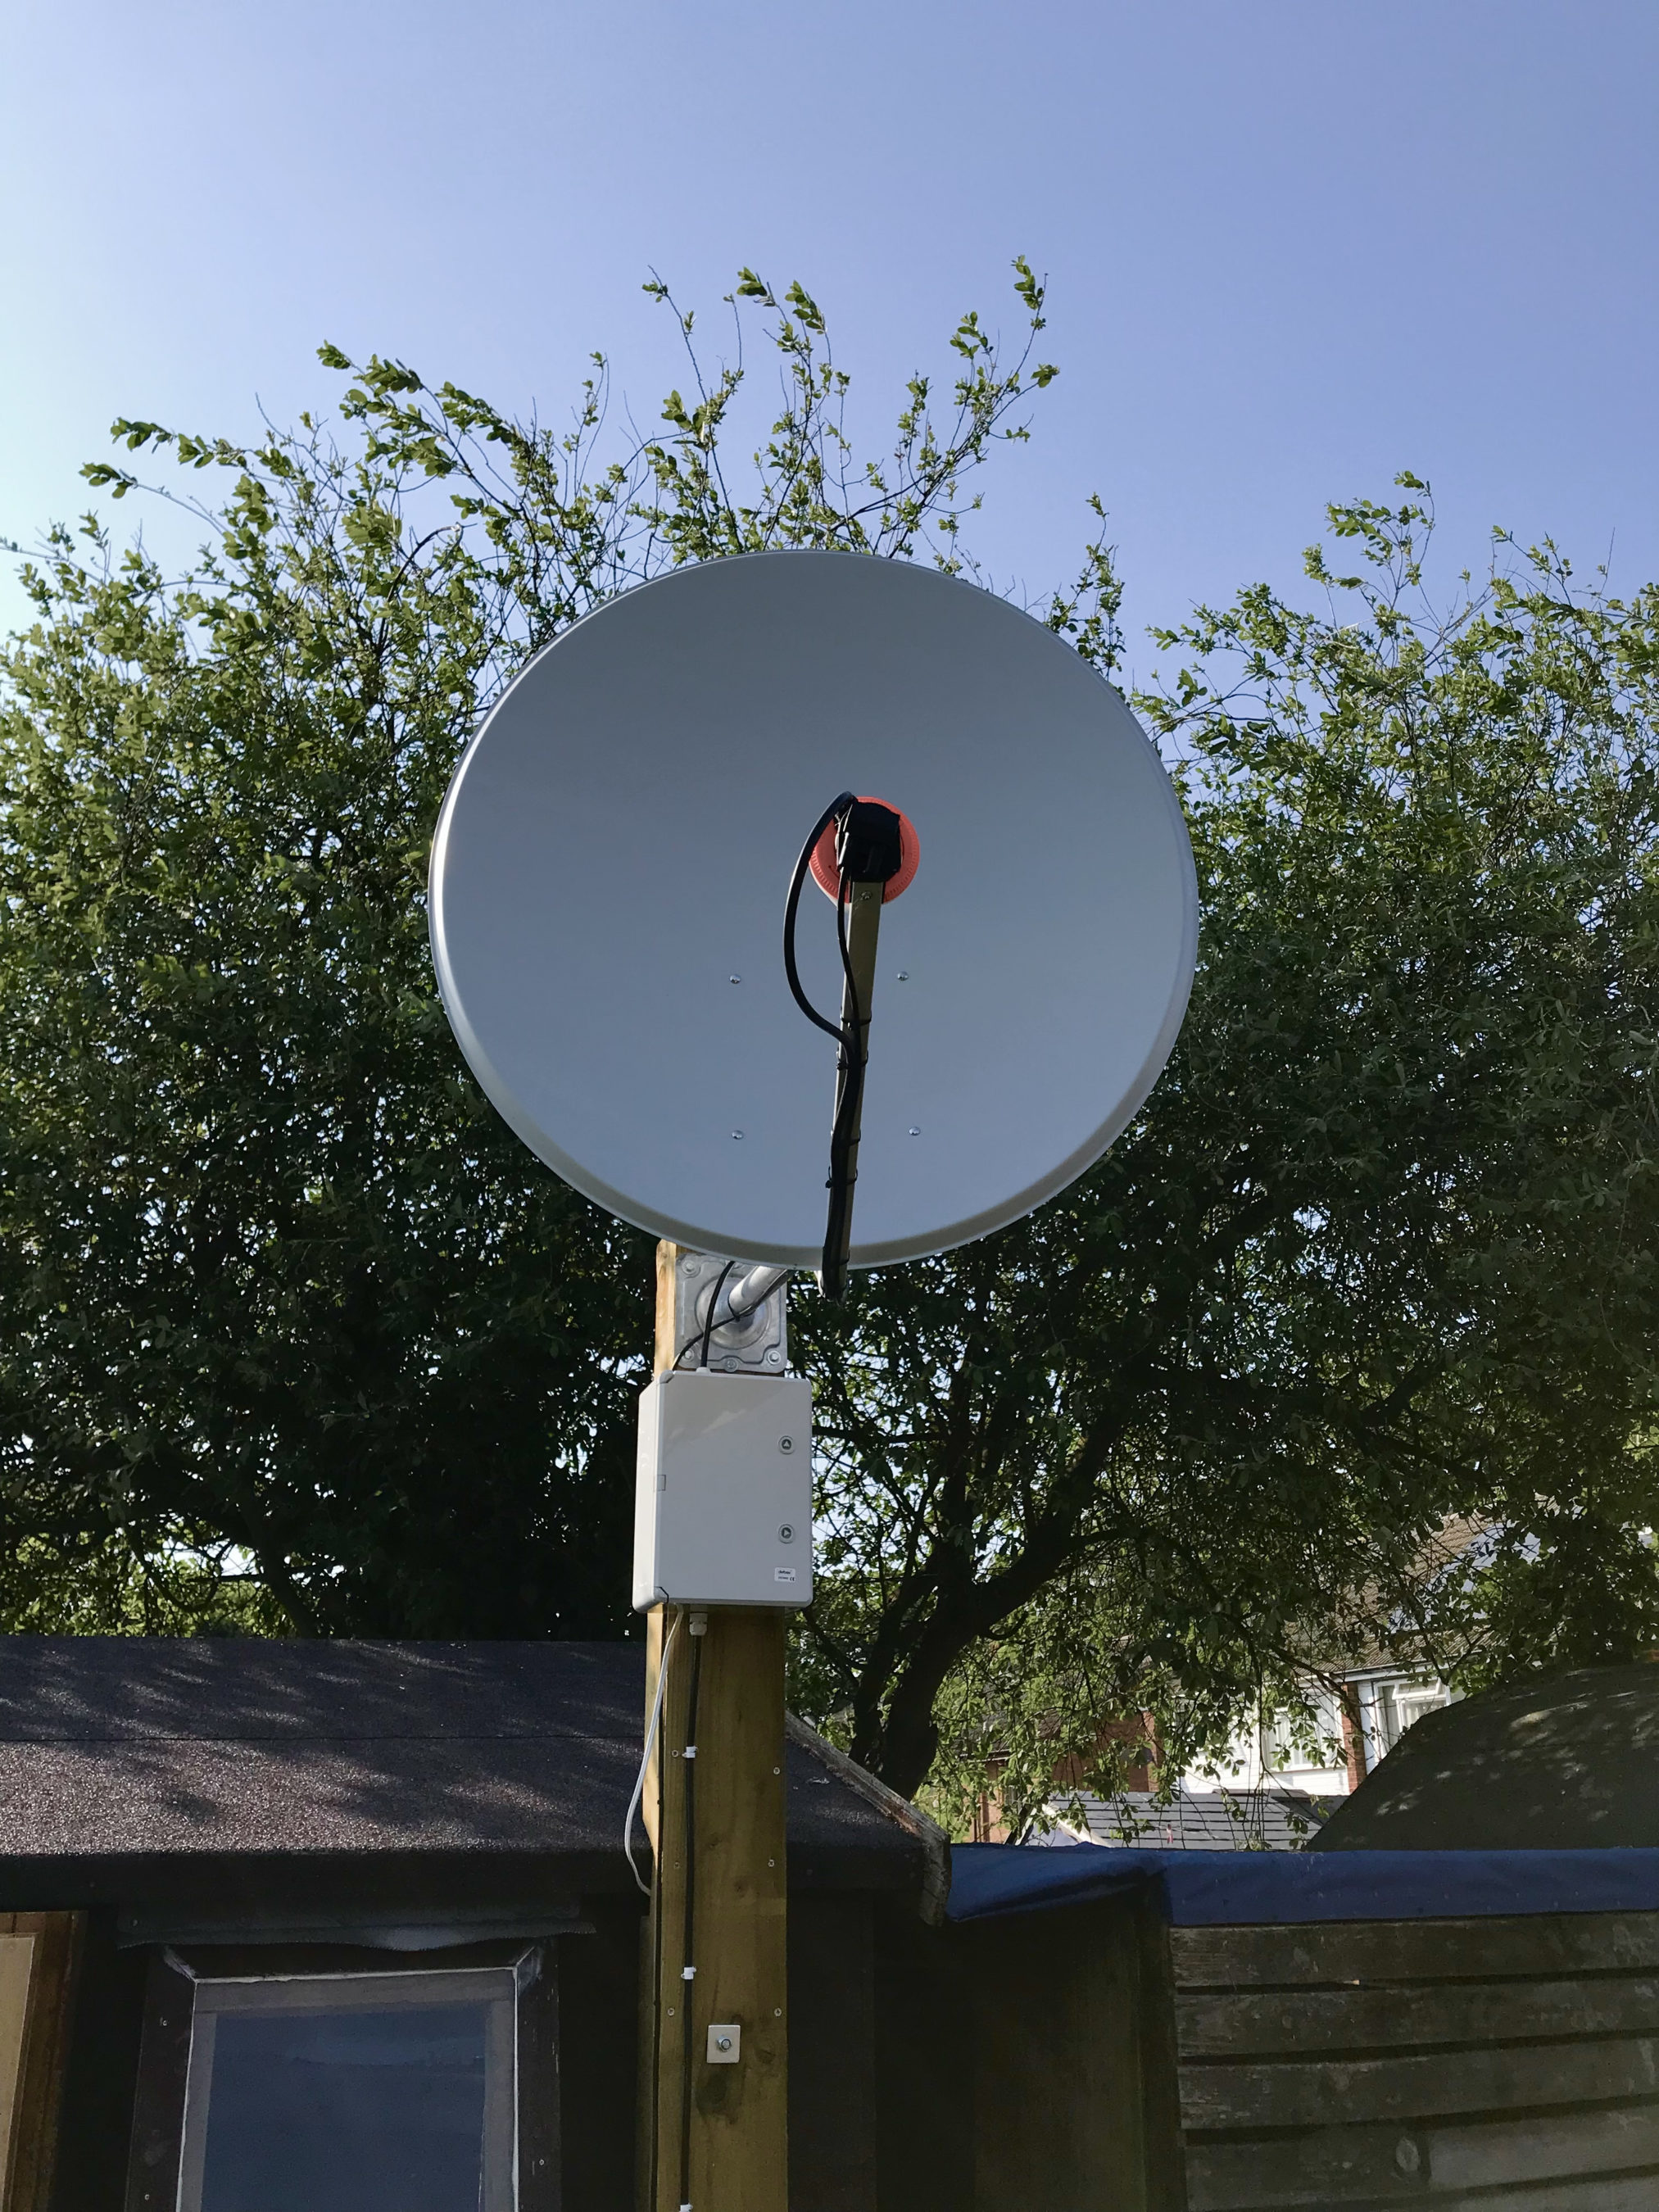
M0AWS QO-100 1.1m (110cm) off-set Dish with IceCone Helix antenna and Bullseye LNB.
To get a good clear view of the QO-100 satellite I have the dish mount 3.2m above the ground. This keeps it well clear of anyone walking past in the garden and beams the signal up at an angle of 26.2 degrees keeping well clear of neighbouring gardens.
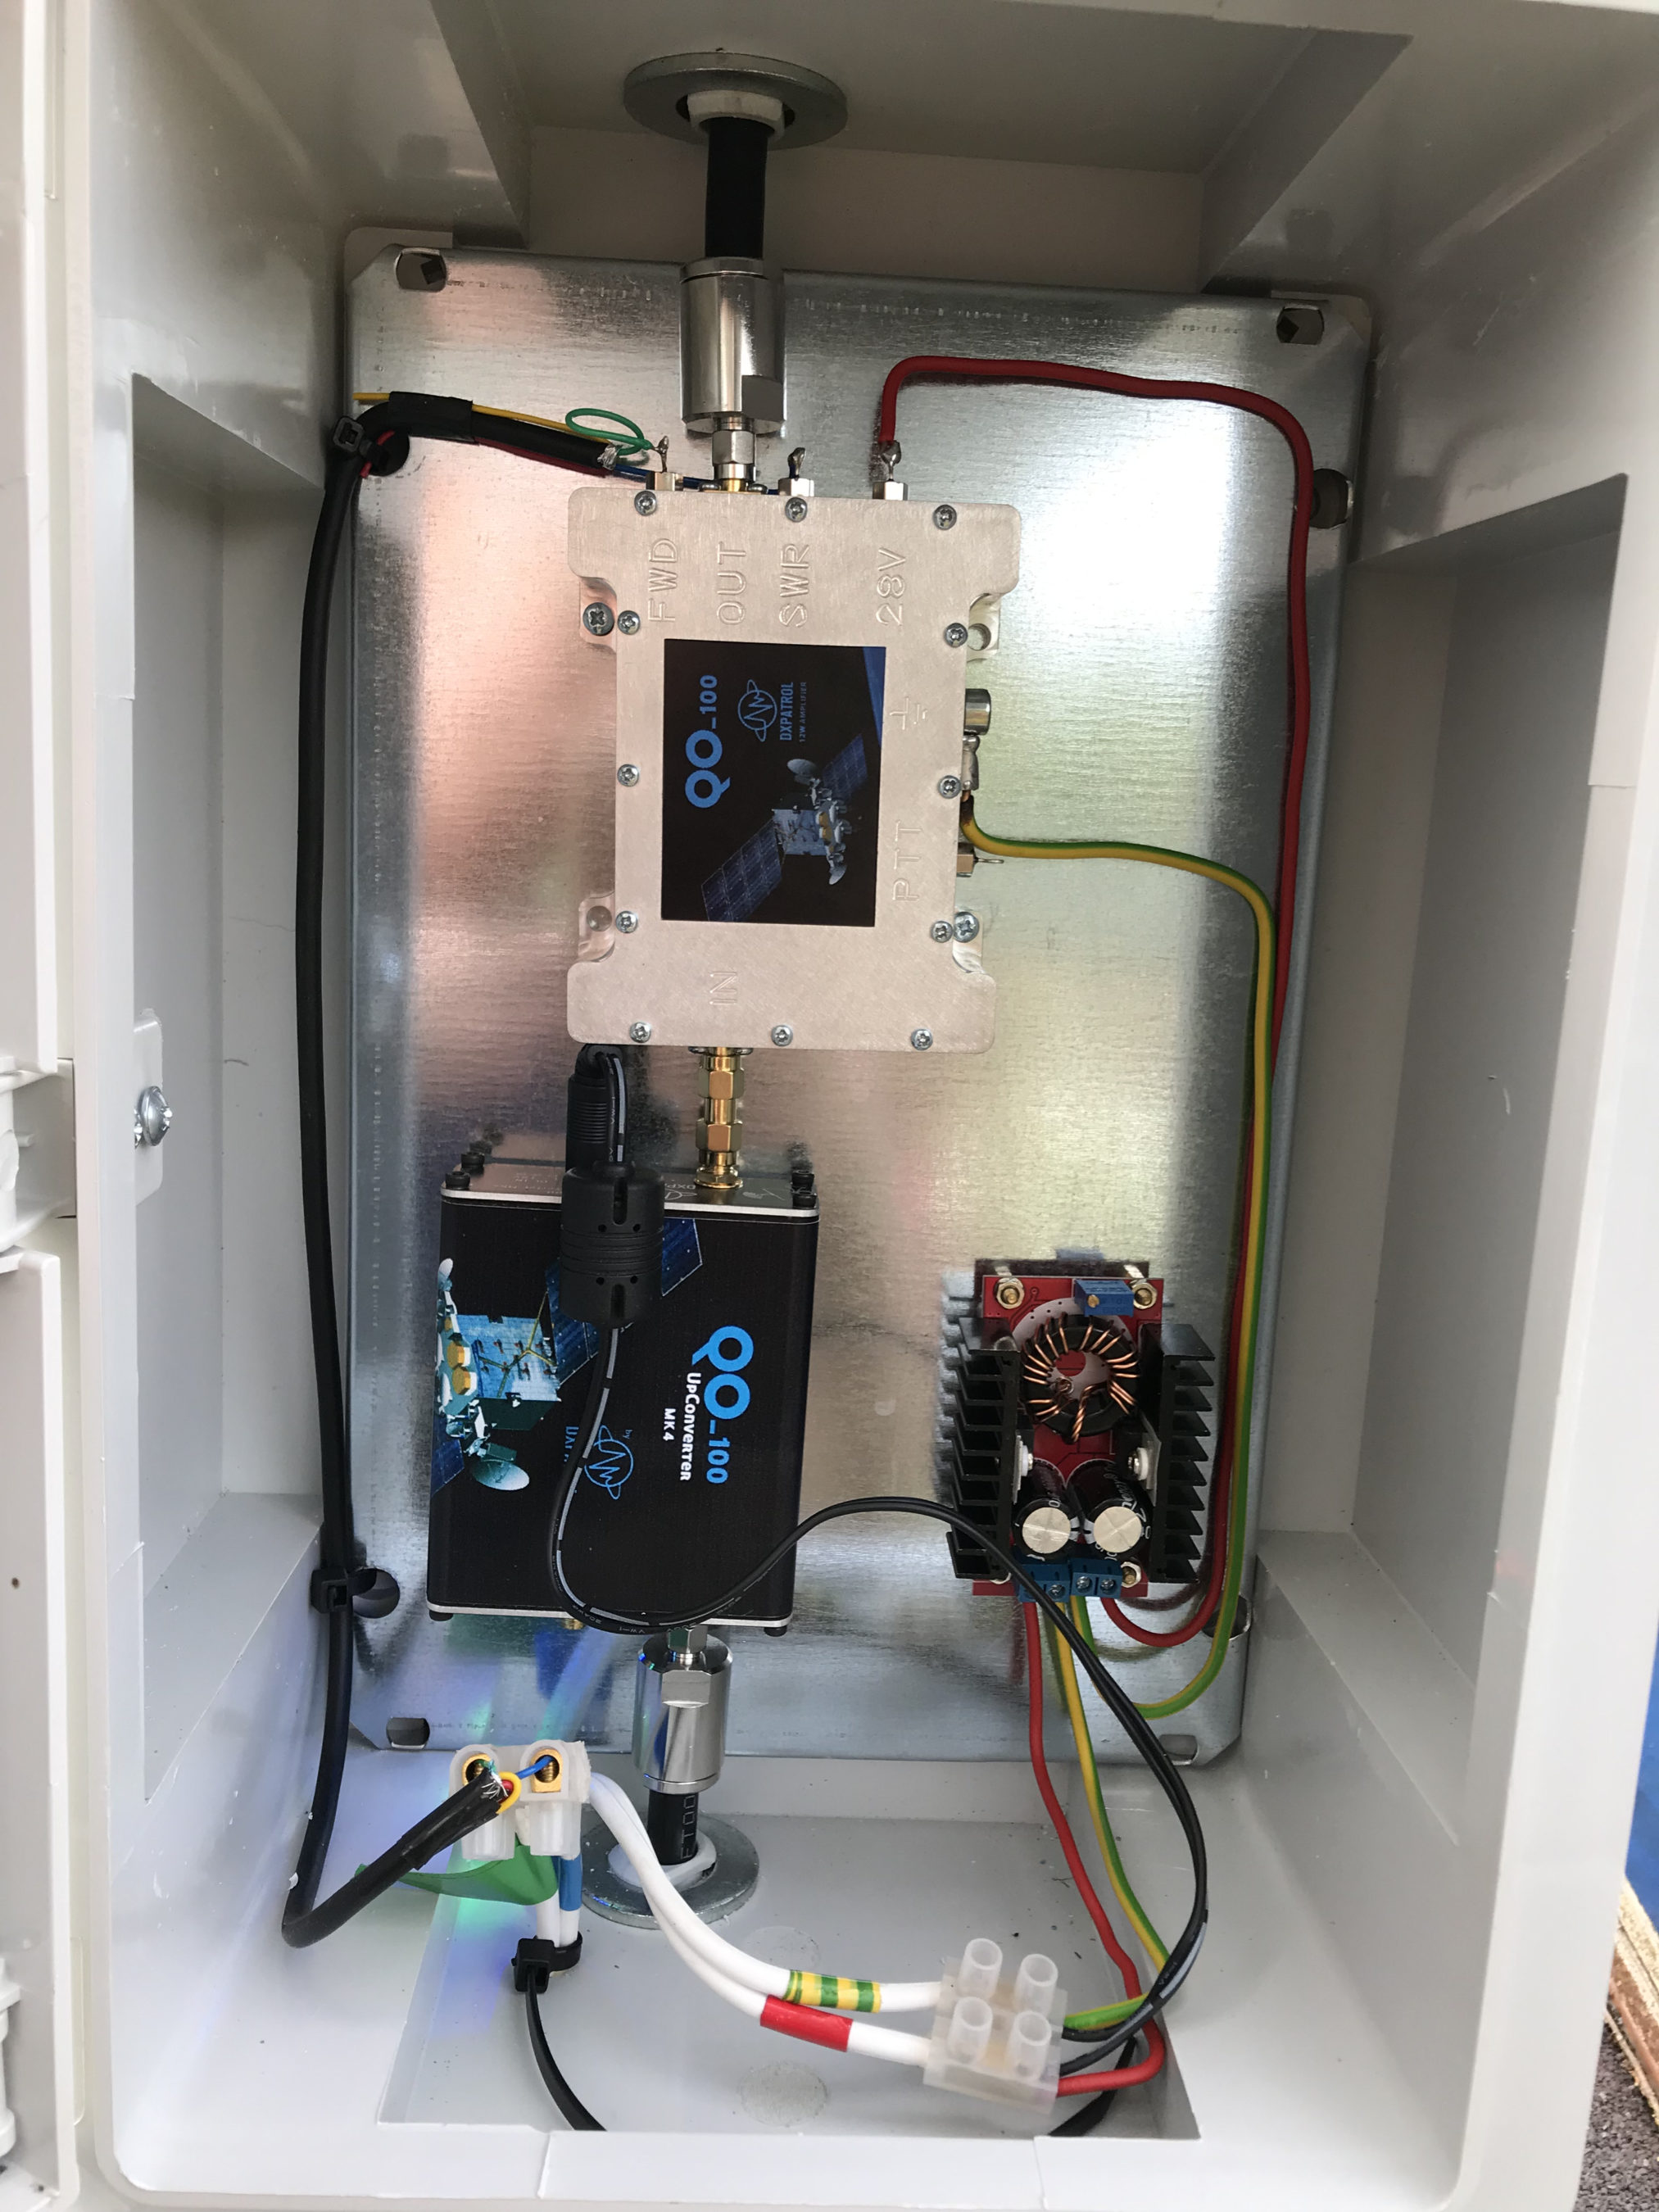
The waterproof enclosure below the dish houses all the 2.4Ghz equipment so that the distance between the feed point and the amplifier are kept to a minimum.
The DXPatrol amplifier is spec’d to run at 28v/12w or 12v/5w, I found that running it at 28v produced too much output for the satellite and would cause the LEILA alarm on the satellite to trip constantly. Running the amp at 12v with a maximum of 5w output (average 2.5-3.5w) is more than enough for me to have a 5/9+10 signal on the transponder.
The large 1.1m dish gives me quite an advantage on receive enabling me to hear the very weak stations with ease compared to other stations.
2.4Ghz ground station enclosure ready for testing
The photo above shows the 2.4Ghz equipment mounted in the waterproof enclosure below the dish. This photo was taken during the initial build phase before I rewired it so, the amplifier is shown connected to the 28v feed. To rewire the amp to 12v was just a matter of removing the 28v converter and connecting the amp directly to the 12v feed instead. This reduced the output from a maximum of 12w down to a maximum of 5w giving a much better (considerate) level on the satellite.
It’s important to keep all interconnects as short as possible as at 2.4Ghz it is very easy to build up a lot of loss between devices.
For the connection from the IC-705 to the 2.4Ghz Up-Converter I used a 7m run of LMR-400 coax cable. The IC-705 is set to put out just 300mW on 144Mhz up to the 2.4Ghz converter and so it’s important to use a good quality coax cable.
Once again the output from the 2.4Ghz amplifier uses 1.5m of LMR-400-UF coax cable to feed up to the 2.2 turn Icecone Helix Antenna mounted on the dish. This keeps loss to a minimum and is well worth the investment.
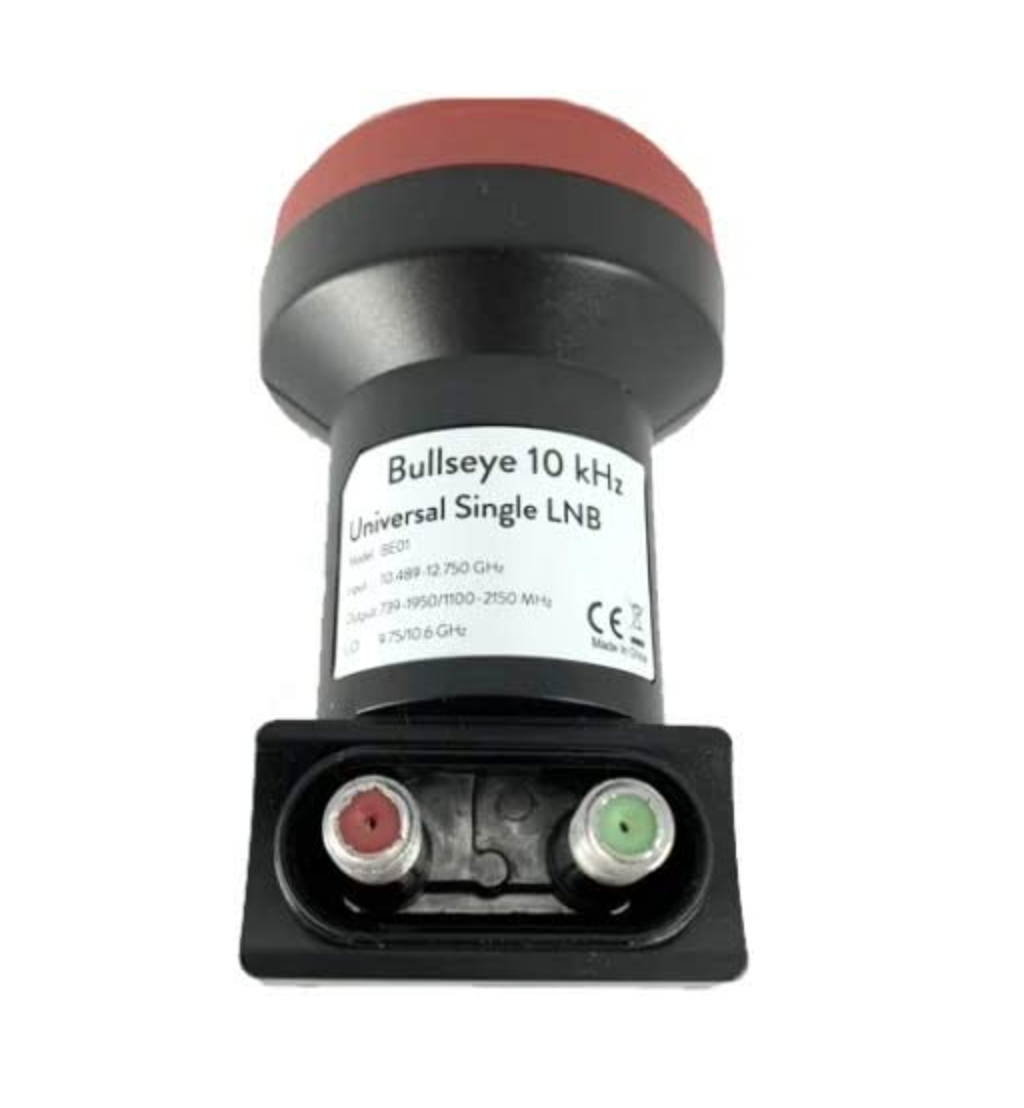
Bullseye 10Khz High Stability Unversal Single LNB for 10.489-12.750Ghz
The receive path starts with a Bullseye LNB, this is a high gain LNB that is probably one of the best you could use for QO-100 operations. It’s fairly stable frequency wise but, does drift a little in the summer months with the high temperature changes but, overall it really is a very good LNB.
The 12v feed to the LNB is via the coax and is injected by the Bias-T device that is in the radio shack. This 12v feed powers the LNA and associated electronics in the LNB to provide a gain of 50-60dB.
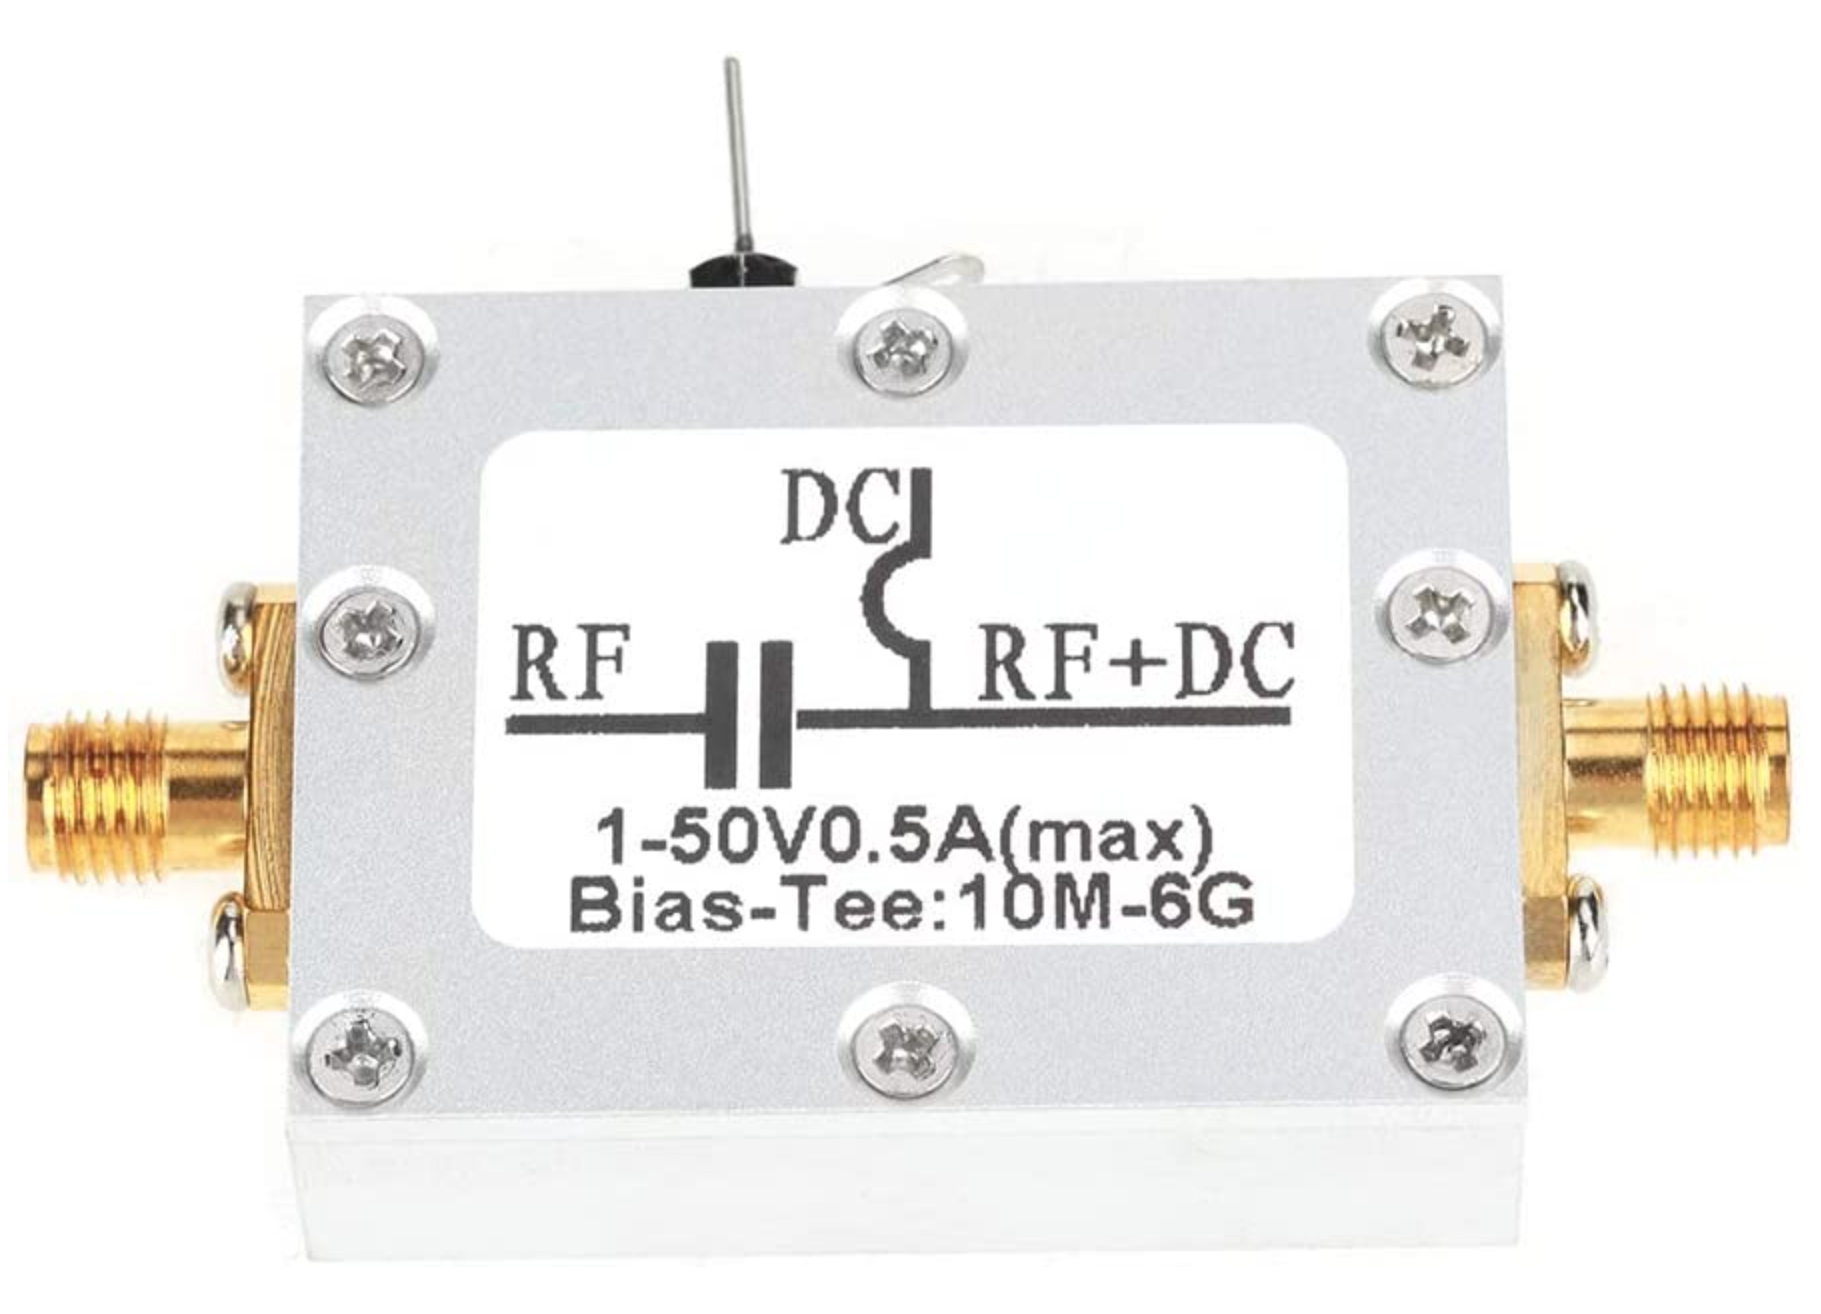
Bias-T to inject 12v feed into the coax for the Bullseye LNB
From the Bias-T the coax comes down to the NooElec SmartSDR receiver. This is a really cheap SDR device (<£35 on Amazon) based on the RTL-SDR device but, it works incredibly well. I originally used a Funcube Dongle Pro+ for the receive side however, it really didn’t handle large signals very well and there was a lot of signal ghosting so, I swapped it out for the NooElec SDR and haven’t looked back since.
The NooElec SmartSDR is controlled via the excellent Opensource software GQRX SDR. I’ve been using GQRX SDR for some years now and it’s proven itself to be extremely stable and reliable with support for a good number of SDR devices.
To enhance the operation of the SDR device I have added a Griffin Powermate VFO knob to the build. This is an old USB device that I originally purchased to control my Flex3000 transceiver but, since I sold that many moons ago I decided to use it as a VFO knob in my QO-100 ground station. Details on how I got it working with the station are detailed in this blog article.
Having the need for full duplex operation on the satellite this complicates things when it comes to VFO tracking and general control of the two radios involved in the solution and so I set about creating a QO-100 Dashboard using the great Node-RED graphical programming environment to create a web app that simplifies the management of the entire setup.
M0AWS QO-100 ground Station Control Dashboard built using Node-RED.
The QO-100 Dashboard synchronises the transmit and receive VFO’s, enables split operation so that you can transmit and receive on different frequencies at the same time and a whole host of other things using very little code. Most of the functionality is created using standard Node-RED nodes. More info on Node-RED can be found on the Opensource.radio Wiki or from the menu’s above.
I’ll be publishing an article all about the QO-100 Dashboard in the very near future along with a downloadable flow file.
I’m extremely pleased with how well the ground station works and have had well in excess of 500 QSO’s on the QO-100 satellite over the last last year.
With the recent explosion of artificial intelligence (AI) art generators that are making the news of late for all the wrong reasons, I decided to see if I could put it to good use and design some futuristic QSL cards.
Having recently been contacted by the Special Callsigns QSL Manager and being advised that there were 18 QSL cards waiting for me, I decided it was time to create some QSL cards of my own for future use.
Having never used any form of online AI and not having any artistic abilities I was amazed how easy it was to create images using nothing more than a paragraph or so of text to describe what it was I wanted to create.
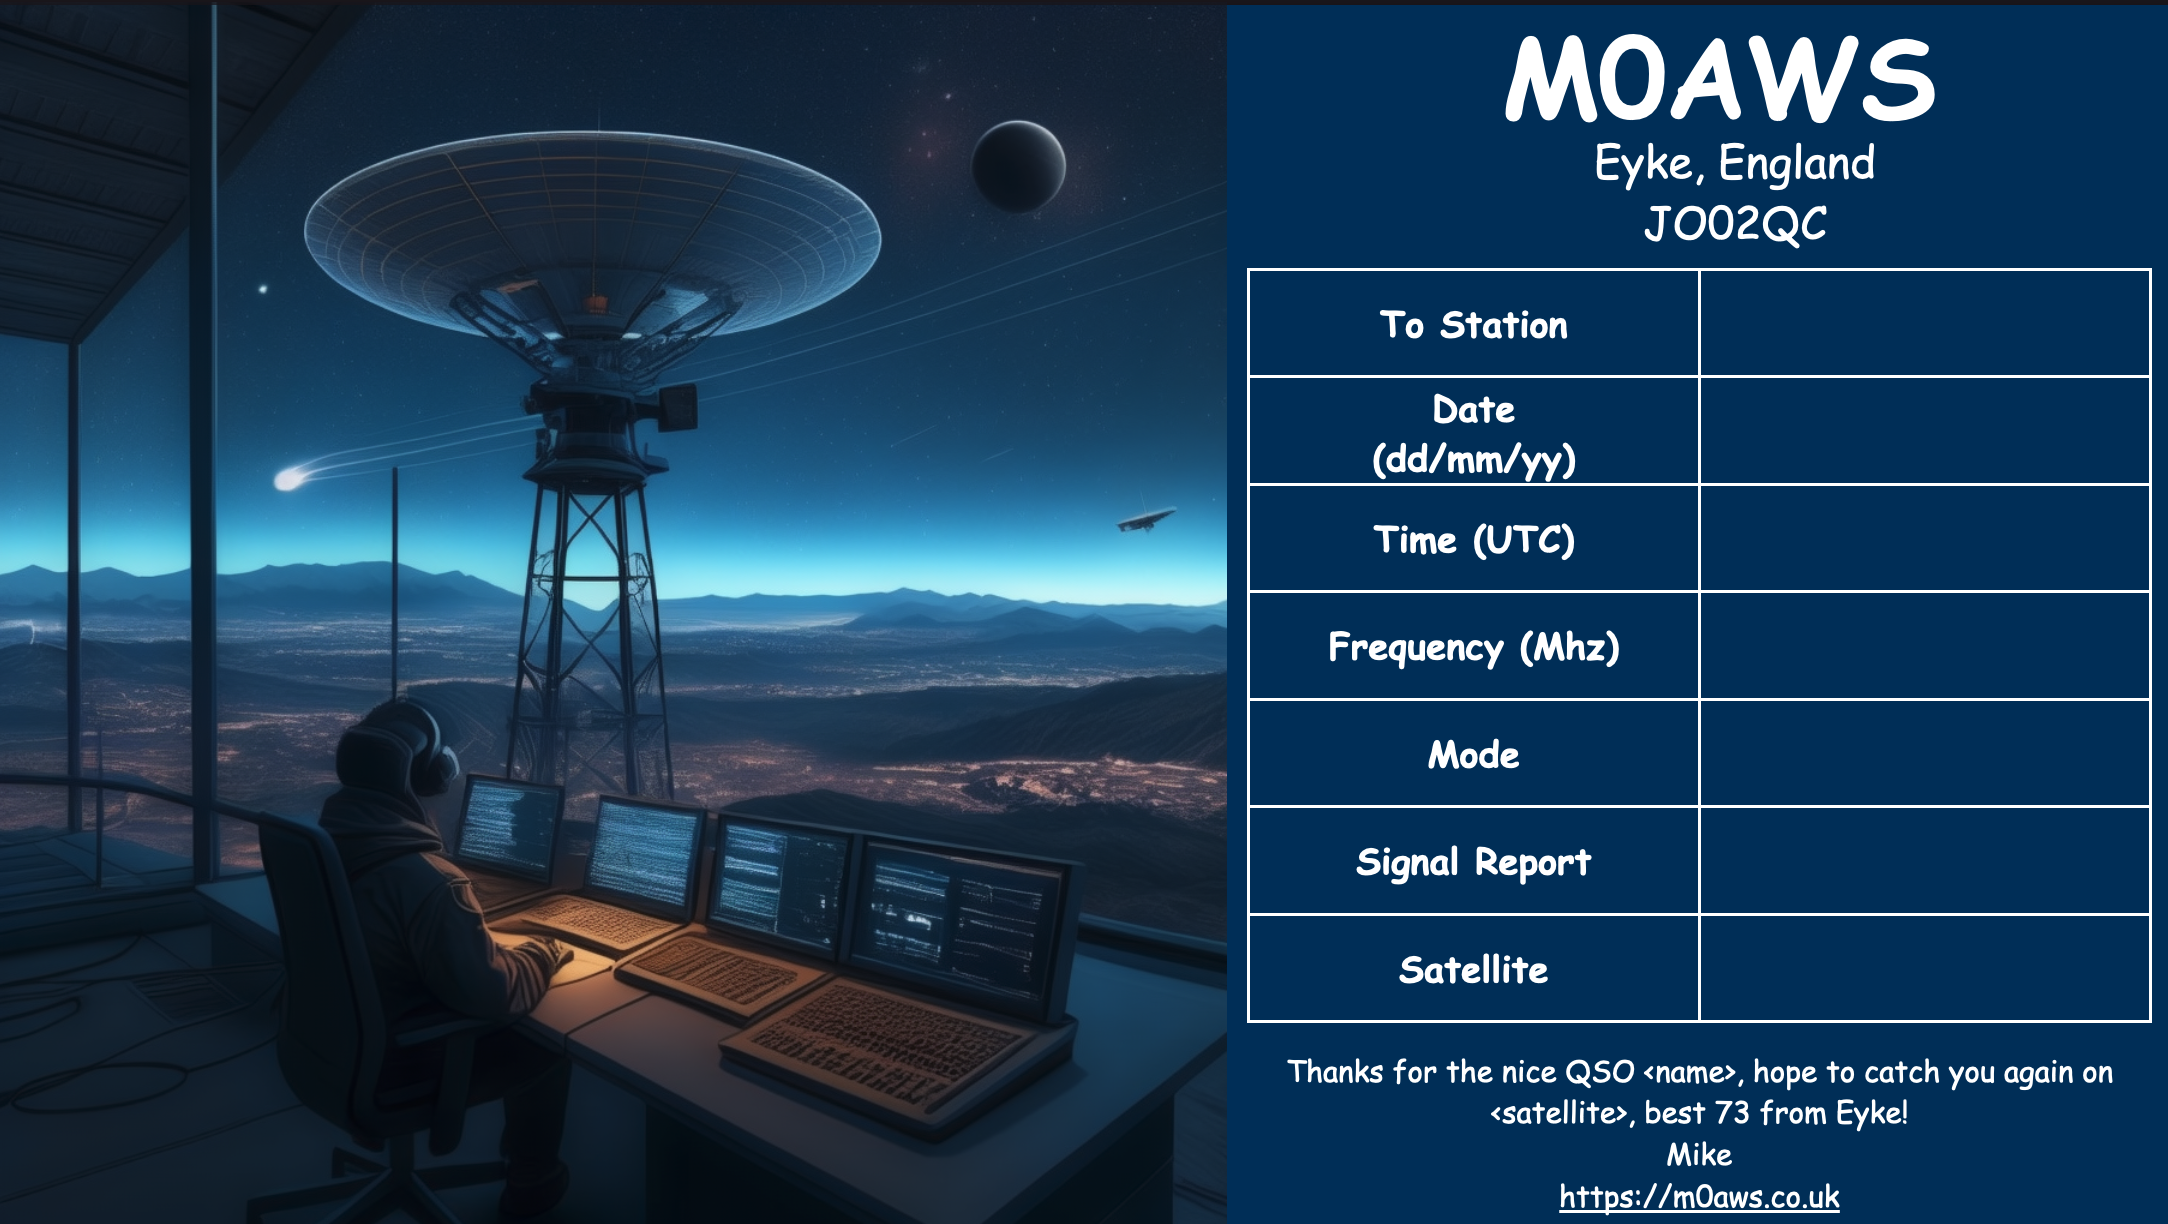
Since all the QSL cards I received were for contacts on the QO-100 satellite, I set out to create a visually futuristic QSL card that was based around a radio HAM operator and satellite communications.
M0AWS – 1st attempt at creating a futuristic QSL card image using AI Art
To my surprise the results of my first image generation were surprisingly good. The AI generated an image that resembled the simple text that I entered, although I never requested a one legged HAM operator!
Pleased with my very first attempt I gradually improved the description of what I was looking for, adding more and more detail to the text and including things that I wanted to see in the image. Over a fairly short period of time this approach started to generate some very interesting images.
M0AWS – AI Art QSL Image attempt 2M0AWS – AI Art QSL Image attempt 3M0AWS – AI Art QSL Image attempt 4
With each iteration I gradually got closer to what I was trying to achieve but, never quite got exactly what I wanted so, I decided to rewrite the descriptive text adding even more information than before. The text was now a full blown paragraph with quite specific things described including the angle at which the scene was being viewed from.
The other option I wanted to try out was the theme functionality that the AI offered. This allows you to set a theme for the image from things like steampunk, cartoon, manga, real world and many more. The results were quite impressive and added yet another angle to the image generation.
M0AWS – AI Art QSL Theme 1M0AWS – AI Art QSL Theme 3M0AWS – AI Art QSL Theme 2
I disappeared down the theme AI Art generation rabbit hole for quite some time and generated some very interesting and fun results. The best by far though was the Thunderbirds themed image, this did put a smile on my face!
M0AWS – AI Art QSL Thunderbirds Themed
At the other end of the spectrum I tried the Salvador Dalli theme, it produced an image that was very like the work of the famous artist but, wasn’t quite what I was looking for.
M0AWS – AI Art QSL Salvador Dalli Themed
After much fun I eventually settled on the image I was after, a futuristic scene of a radio HAM with a satellite ground station over looking a mountain range and city below.
M0AWS Satellite QSL Card generated using online AI
I’m really pleased with the results from my ventures into AI generated art. The next challenge is to create a QSL card for HF bands Contacts.
While still on my extended stay at my daughter’s house in central Pennsylvania, I wanted to do some casual operating. So, I set up in the backyard to make a few contacts.
Today, I decided to give my Gabil GRA-7350TC vertical some air time. It’s been a while since I’ve used it. I set it up using the Gabil GRA-ULT01 MK3 tripod. I had forgotten how well engineered the Gabil stuff is. Anyway, I used four 15-foot speaker wire radials spread out on the ground. For the coax, I used 20 feet of RG-174.
My Gabil GRA-7350TC vertical on the Gabil GRA-ULT01 MK3 tripod
I started out on 40M. Using an antenna analyzer, I got the SWR down as far as I could and let the KX3’s tuner do the rest. Taking a quick dial spin down the band, I didn’t hear much at all. Eventually, I came across WA2NYY activating a park in New York and called him. Despite the horrendous band conditions, he heard my 5-watt signal on the first call. Next, I heard an activator in North Carolina, but I had a rough copy. We still managed to complete the contact.
My KX3 and 6Ah LiFePO4 battery
I then moved up to 20M and found the same crappy conditions. Eventually, I found and worked two more POTA activators.
I checked the POTA spotting page and saw that there were a couple of European activators on 15M. I tuned up the antenna and did a quick check. Nothing but dead silence across the band.
It was at that point that I checked the band conditions online and saw that there was a severe geomagnetic storm in progress. It showed poor conditions on all the HF bands. That certainly explained the lousy band conditions.
Yikes! This explains the lousy band conditions today.
Not being a glutton for punishment, I shut down for the day. Still, I was thankful for the four contacts I made with five watts of CW into an eight-foot base-loaded whip during a severe geomagnetic storm.
Whether you enjoy portable ops during Field Day, POTA, or SOTA, or just want a space-saving efficient way to get on the 40 to 10 meter bands, the high-inductance Recon 40 HF coil from REZ Antenna Systems is a great addition to your 17-foot HF vertical antenna.
In the video below, DX Engineering technical support specialist Michael Murphy, KI8R, gives you an in-depth look at this versatile HF coil and explains how its fast, easy HF band change capabilities make it a great choice for your amateur radio station.
Check out DXEngineering.com for the full lineup of gear from REZ Antenna Systems, including the Ranger 80 (80-10M) Portable Antenna System featuring HF coil assembly, heavy-duty military whip, radial kit, ground spike or aluminum tripod mount, and MOLLE backpack in your choice of five colors.
This is a video of the German Weather Broadcast from DWD, Hamburg, on shortwave (HF), using teletype (RTTY). I demonstrate two decoding software options: JWcomm32 (older), and, FLdigi. Note the in FLdigi, the “Reverse” feather is selected to properly decode the signal (in either USB or LSB, you still need to select, “Reverse”). The radio […]
This video is an introduction to an international public-service and technology hobby known as ‘amateur radio’ (or ‘ham radio’). Amateur radio (also called ham radio) describes the use of radio frequency spectrum for purposes of non-commercial exchange of messages, wireless experimentation, self-training, private recreation, radiosport, contesting, and emergency communication. The term “amateur” is used to […]


.png)