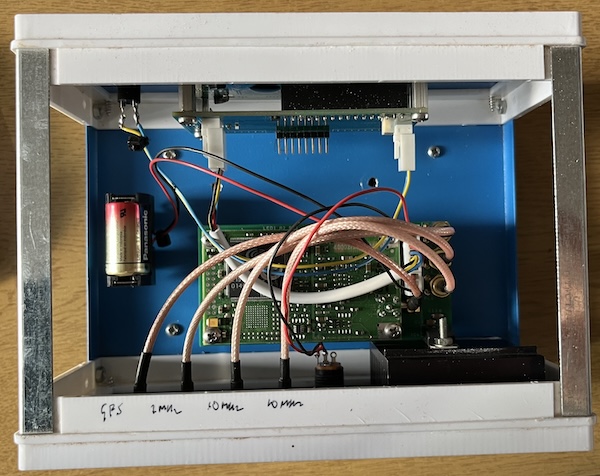
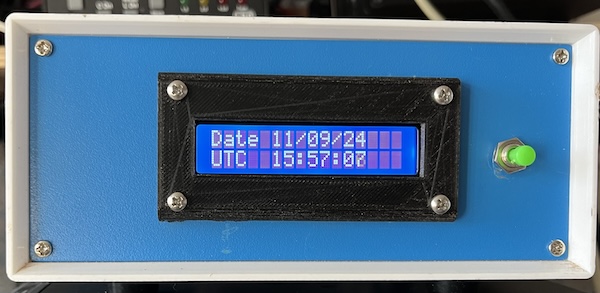
I built a thing! This is a GPSDO using a PCB and kit of parts supplied by G8CUL and a OXCO from G1OGY. It uses a Jupiter GPS module which provides the PPS signal and a 10kHz output and the completed module provides 2x 10MHz and 1x 1MHz outputs. Although there are a number of such designs this one is nice in that it also has a display and shows the current date and time as UTC.
This was, I think my third SMD construction and certainly the Mose SMD devices including multi-legged chips. No issues in construction especially given the quality of the PCB that G8CUL had made.
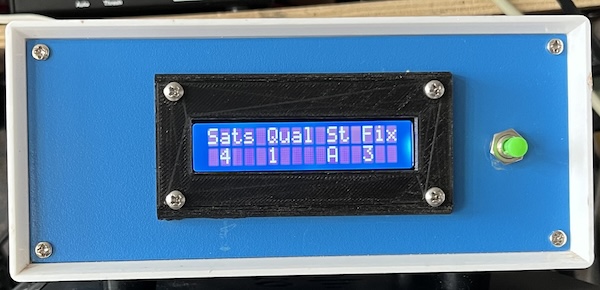
The backup battery is a CR2 3.3V type and helps with warm starting. As the regulator gets hot I managed to fit a heatsink between it and the rear of the case and hopefully this will sort out heat transfer, otherwise I may need to bolt another heatsink on the rear. Construction in a die cast box would have been better maybe but the blue/white box fits in with others in the shack, plus I had it already! The bezel is cut down from a 3D printed one from Printables.com designed specifically for the 2×16 LCD displays. The button – which is not the best but I had one etc. – selects the various displays which include date and time, satellites seen, latitude, longitude, altitude and QRA locator.
As always there are lots of links within the article. Click one! Click them all! Learn all the things! ? by Vince (VE6LK) In August and September 2024 I was travelling around Southern Ontario for some family matters and naturally I brought my radio kit with me to squeeze in some radio therapy stops along … Continue reading CW Three Band Activation Among the Giant Timbers→
Let’s start with a story about how NOT to strip wires. Back in the day, I worked with a fellow who had the unique talent of stripping wires with his teeth!
Well, just two of his teeth, actually.
It seems that at some point in his youth, he chipped the adjacent corners of his two front teeth just a little bit. The size of that little gap was just right for hookup wire, telephone wire, and all sorts of other wires. He would put the wire between his teeth, bite down just a little, and pull. Voila! Wire stripped and insulation spit out.
DON’T TRY THIS AT HOME!
Lucky for us, there are many great and inexpensive tools for getting insulation off of wires. You might only need to do that occasionally or you might need to strip dozens of wire ends. Whatever your need, there is a tool for you.
Let’s start with the most common and inexpensive manual stripper.
Basic Wire Strippers
My first order of business is to warn you about the too-cheap, no-name combo tools. While it might be nice to have one of those in the glove compartment for emergencies, they really aren’t quality workbench and toolbox tools. Good tools will last and last while doing the job right, so spend the extra few bucks on a “real” wire stripper from a solid tool company. If you need to spend a few bucks to qualify for free shipping, you could do a lot worse than to buy a good spare stripper.
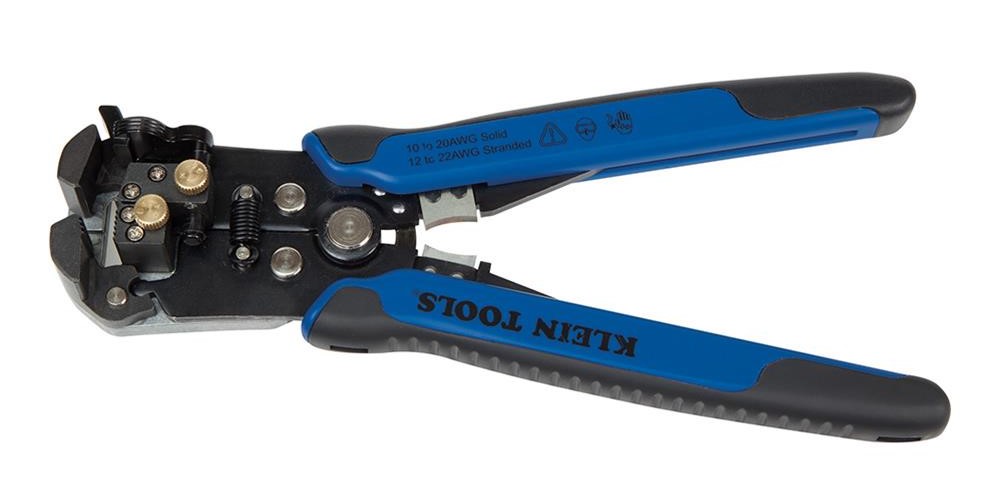
Below is the Klein 1010, a basic wire stripper from Klein Tools, a well-known and trusted name in the electrical industry. As you can see, it not only strips and cuts wires from 10-22 AWG but crimps terminals, cuts small screws, bends wire, and has small plier jaws.
This is a low-maintenance tool. Keep it clean and free of rust and it will be your toolbox buddy forever.
(Image/DX Engineering)
Once I discovered it, I’ve used the small-screw cutter many times, making a short screw that was just right for the job. The important thing is to insert the screw so that after it’s been cut, you use the threaded part of the cutter to clean and re-align any distorted threads as you removed the screw. And sometimes, the little studs that are left can be used to join nuts or spacers.
You can tell I never throw anything away!
If you do a lot of home AC wiring, you can also find heavier strippers designed for the Romex-style cable and wire sizes you’ll encounter in those jobs. These will do a better job than the small strippers for electronic and radio work. They are also a little easier on your hands for the harder squeezing and pulling necessary for that type of work.
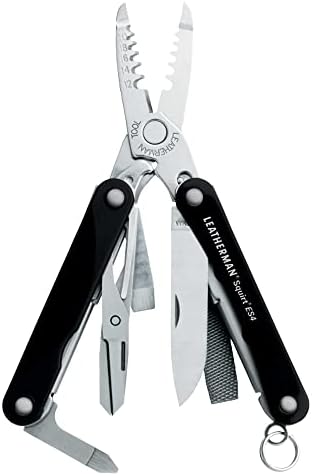
The pocket-friendly Squirt ES4 is a nice variation in the Leatherman line of multi-tools. Widely available used and occasionally new or in similar models, it includes a dandy little combination of wire stripper/cutter/needle-nosed pliers.
Folded up, the tool is less than two inches long. You’ll forget you’re carrying it, which is a bad thing if you try to take it through airport security! I’ve had to give up a couple of these that way, which is probably why they’re available used! Larger Leatherman multi-tools are also available with wire strippers.
(Image/DX Engineering)
Using manual strippers is pretty straightforward: insert the wire into the appropriate hole, squeeze, and pull. But there are a few fine points:
Be sure to use the right size hole, otherwise you’ll nick solid wire (leading it to break when bent) or cut off strands of stranded wire.
Using a too-large hole means you’ll get a ragged edge on the insulation and often pull the wire out of a multi-conductor cable.
Don’t rock the stripper back and forth because that will nick the wire. If you have to do this to get the insulation off, either you’ve used the wrong hole or the jaws are dull and the tool should be replaced.
Pull the wire straight through the stripper and don’t bend it, causing nicks and cutting strands.
If you find the stripping force pulling one wire out of a multi-conductor cable, use needle-nosed pliers to hold the wire while it’s being stripped.
Using a diagonal wire cutter as a stripper is a skill many of us old-timers have developed. Like my friend with the chipped teeth, there is a knack to doing it without damaging the wire. A gentle squeeze will put a nick in the insulation which will then break and slide off the wire. This will only work reliably on insulation that breaks cleanly and won’t leave a clean edge on the insulation.
Automatic Strippers
Sometimes you’ll find yourself faced with having to strip many wires for a big wiring job or preparing multi-conductor cable for a rotator or control circuit. If you are installing crimp terminals or connector pins, you need to strip all of the wires consistently and with the right length of exposed wire. This is where a self-adjusting wire stripper comes in very handy.
Properly set, these strippers will make a consistent, clean strip over and over. That results in higher quality work with better reliability.
Another item in the Klein Tools catalog, the Klein 11061 is a typical example of these tools. They don’t have all of the accessory features of the 1010 but make short and consistent (there’s that word again) work of stripping a lot of wires. After you insert the wire between the jaws, squeeze the handles—the jaws clamp the wire, and the blades come together to cut and pull off the insulation.
The Performance Tool W200 is a variation of the automatic strippers. It has jaws to hold the wire and a pair of cutting blades that come together and pull off the insulation. The sequence is completely automatic and the design of these tools to make this sequence happen is pretty nifty.
(Image/DX Engineering)
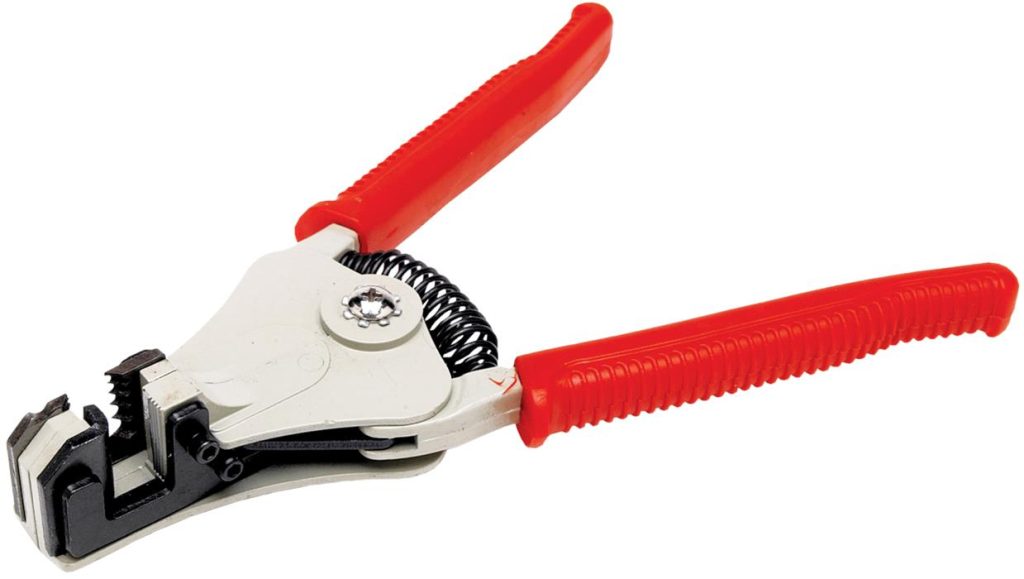
Pistol-grip adjustable automatic strippers are also available, such as the Tool Aid 19100. The wire is inserted in the end of the jaws until it contacts the adjustable stop. Squeeze the jaws and the tool does the rest. This tool is intended for smaller gauge wire from 12 to 22 AWG.
I’ve used all of the different types of strippers and each has their appropriate role. I carry a manual and an automatic stripper in my tool kit. These are also fairly inexpensive and worth adding to your tool roster. You might also enjoy Adam Savage demonstrating how these work in this entertaining video.
Stripping Enameled Wire
So far, we’ve focused on wire with plastic insulation, and that is most of the jobs you’ll encounter. However, if you wind toroids or impedance transformers or baluns, it’s common to use enameled wire which is harder to strip. You want to avoid nicking the wire with a cutter or knife—it will break from mechanical or thermal flexing—so a different technique is required.
A convenient method for occasional use is to use sandpaper or emery boards. A small strip of sandpaper held between your fingers to squeeze the wire is an easy skill to learn. Squeeze the wire, rotate it, and pull it in and out of the sandpaper. This scrapes off the enamel without damaging the wire underneath.
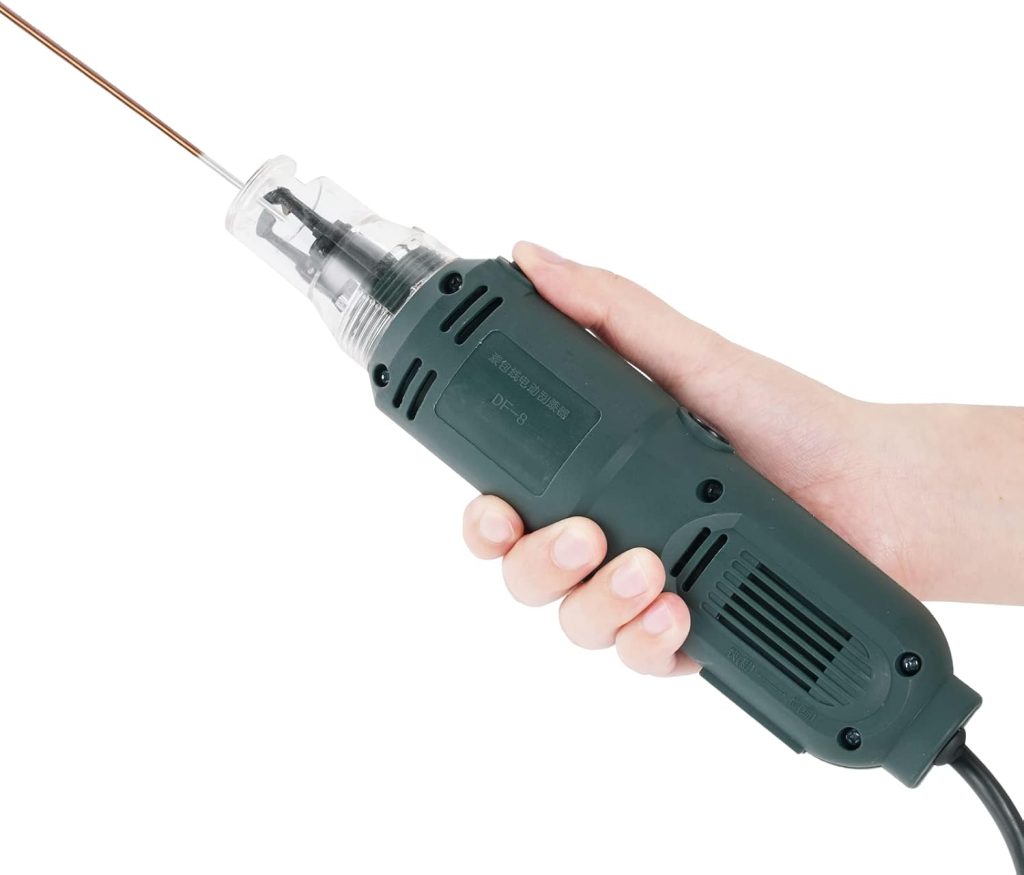
If you have a big project with a lot of inductors or transformers, you can save yourself a lot of work (and sore hands) by using a power tool to scrape off the enamel. The Abisofix tool shown in the photo and this video will do the job on a wide range of wire sizes from 12 to 24 AWG. For very fine wires, the manual method is best for the home builder.
(Image/DX Engineering)
Removing Heavy Insulation
A situation you’ll encounter frequently is removing the outer insulation from multi-conductor cables like rotator control or networking cable. If you don’t have a special cable stripper, you’ll have to use a knife or razor blade to remove the insulation. Be sure to use a SHARP, new blade for a utility or craft knife. A dull blade will make this job hard to do well.
Score the insulation—cut the insulation but not all the way through. You can hold the cable in one hand and cut with the other, but an easier and more controlled way is to place the cable on a work surface and roll it under the blade.
Do not cut into any of the inner conductors. It’s best to cut too shallowly at first, then go deeper as needed.
Bend the insulation back and forth so that it breaks along the score. You may need to touch up the scoring in spots.
Twist the insulation off in the same direction that the individual strands twist.
If you are working with coaxial cable, use a stripping tool for coax if possible. Those tools are well-covered in other On All Bands articles and videos.
However, sometimes you have to strip coax manually. First, when removing the outer insulation, be extra careful not to cut through the fine strands of shield braid. Take your time and work through the outer insulation. Use your sharpest wire cutters when removing the braid. Then repeat the score-and-bend technique to loosen the center insulation.
It’s often hard to pull off coax’s solid center insulation without pulling it partially out of the braid. You can use manual wire strippers to hold the remaining insulation while pulling off the unwanted part. Carefully close the strippers on the center conductor using a stripper hole one or two wire sizes larger than the conductor so it doesn’t nick the coax conductor. Then slowly pull off the center insulation, remembering to twist the insulation in the same direction as the strands of wire.
Use the Right Tool
Just to repeat the message, use the right tool for the job and learn how to use it properly. So many problems in the ham station trace back to connectors and wires breaking or pulling loose. By doing it right the first time, you can save yourself a lot of headaches and keep ham radio fun. No matter what the type of wire or cable, there has probably been a special tool designed for it.
Many are quite inexpensive—don’t you have a birthday coming up?
Everyone wants to know how their signal sounds on the air and often the best way to find out is a signal report from other ham radio operators. The standard signal reporting method for amateur radio is the RST (Readability-Signal Strength-Tone) system. See Practical Signal Reports on HamRadioSchool.com. When using 2m FM on Summits On The Air (SOTA), we can Continue reading SOTA Signal Reports Using 2m FM→
I meet up with Chris, N9CVR, of The Ham Radio Experience. He shows off his fishing pole vertical antenna and we use it to catch some contacts along the Wolf River at the Mukwa State Wildlife Area, (POTA US-4314).
From chapter one of CALLING CQ, written by Clinton B. DeSoto and published in 1941:
Calling CQ! Calling CQ to any amateur radio station!” A thousand times a night that call goes ringing out over the crowded amateur air lanes. It is the general call to any station–an invitation to any other amateur operator who might be listening to step up and chew the rag about anything and everything under the sun.
It is the trademark of the radio hams–that adventurous crew who roam the world at will, a band of good fellows, happy convivial, carefree. This book is their story. In it are tales of their adventures on earth and in the air. Tales of amateur radio….
Then–the question may be heard–what is this amateur radio? What’s it all about? What is it like to be an amateur short-wave operator? Well, it’s like this….
According to the official definition, amateur radio is “radio communication between amateur stations solely with a personal aim and without pecuniary interest.” A comparable definition might describe a diamond as a “carboniferous solid.” Yet, properly mounted, a diamond is a many-faceted gem of dazzling beauty. Amateur radio, too, has many facets.
This is one facet of amateur radio: it is a hobby. “The ordinary life of the ordinary man from whence spring the great majority of hams is a dull, drab and somewhat dreary struggle,” according to one amateur. “Psychologists tell us that periodically one should drop his work for awhile and try something else, that if it be interesting enough one will usually return with renewed interest and zest.” Then this amateur, a successful professional man, continues: “Amateur radio is my hobby. In its pursuit I find the balm of Gilead.”
“Being an amateur gives me the chance to meet people I would otherwise never meet,” says one. “That’s part of it. There’s more to it than that though. If I build a new amplifier or something and make it work I feel that I’m creating something. When I hook up a rig I’ve just finished and I push the key and a fellow in the next state answers me–all this with things I have made with my own hands–why, then I feel like I have accomplished something sort of worthwhile.”
He finds amateur radio “the means of communications with others on equal terms, of finding friendship, adventure and prestige while seated at one’s own fireside,” according to Dr Raymond V. Bowers. “In picking his human contacts out of the air, the amateur is not seen by them…. He is not known by the company he keeps nor by the clothes he wears, but by the signal he emits.
He enters a new world whose qualifications for success are within his reach. A good homemade set gives him more prestige than a commercially manufactured one. There are no century-old class prejudices to impede his progress. He enters a thoroughly democratic world where he rises or falls by his own efforts. When he is W9XYZ the beginner the radio elders help him willingly and when he becomes W9XYZ the record breaker and efficient traffic handler he willingly helps the younger generation. Without a pedigree, a chauffeur or an old master decorating his living room he can become a prince–of the air. At the close of the day, filled with the monotonous routine of the machine age, he can find adventure, vicarious travel, prestige and friendship by throwing in the switch and pounding his signals into the air…”
Hurricane Francine strengthened overnight and has become better organized. It’s expected to further strengthen over the Gulf of Mexico before landfall in Louisiana later today.
Those words were barked to a group of US Navy Midshipmen (me included) by Marine Drill Instructors just prior to a barracks inspection during a summer training cruise.
Space on a Navy ship is at premium and so personal items are rolled or folded to fit in very small lockers. As usual, the Navy prescribes what is folded and what is rolled. This is a prime example of getting your underwear tied in a knot.
Two Lockers Stacked
The Saturday morning inspection reversal by the Marines had another purpose and that was to teach the art of adapting, improvising and overcoming an unexpected turn in the road.
I never forgot that lesson and now it is just a part of my life. Whilst dabbling with the electrons it is just a part of the process. A variant is thinking out of the box.
Often, I will build a prototype and observe the knots and warts which are then addressed in the second build. The lesson, get it working properly 1st and then you can make it pretty.
It also is a strong point for building in modules as it provides three huge benefits.
1) Being able to test and align a specific sub-element of the whole circuit. Read you know that part works!
2) Having a benchmark and documentation of how a specific circuit performs. Read future troubleshooting has a reference point.
3) The opportunity to experiment with alternate modules such as Audio or Microphone Amplifiers. Read the Modular Approach facilitates such experimentation.
The Elecraft KH1 isn't even a year old yet. So what am I seeing on the Elecraft KX/KH e-mail reflector? "Speculation on the KH2" !
Wow! And it that wasn't enough, someone started expounding on what he'd like to see in a KX4!
I must be weird as my KX3 is now over a decade old and I'm still as happy with it as the day I got it. Now I know some of you may be thinking, "But Larry, you just purchased and are playing around with that QMX!" And you would be correct. But I purchased that to keep in the car for impromptu bouts of "radio activity". The price point was such that if my car ever got broken into, and the radio should become attached to someone's sticky fingers, it would not cause me to go jumping off a cliff like a lemming. i would be devastated if my KX3 ever got lifted, especially knowing whomever stole it would have no idea what it was and the radio would probably end up in a dumpster somewhere as they would probably not be able to fence it.
And in turn, the purchase of the QMX has deepened my appreciation for my KX3 even more. I wasn't even sure that was possible!
I've noticed throughout my Ham Radio career, from experiences gleaned by being members of various clubs and organizations that, in one sense, there are basically two types of Hams. And these two types are similar to car owners. "Type 1" will buy a car (or a radio) and will drive it until the wheels fall off (or the finals give out). "Type 2" has to trade in their car every couple of years for the flashiest new design with all the newest bells and whistles (same with radios). They are forever looking for that "penultimate".
Mind you, this is just an observation, Not meant to be disparaging to one type or the other. The second type that I mentioned surely spears on the economy, that's for sure. And I guess they also supply the market for those who are interested in a "pre-owned: model, perhaps looking for a bargain.
I guess it all goes back to "whatever floats your boat". And perhaps without the "Type 2a" the radio manufacturers would never be motivated to come up with new designs. So "Thank You!" Type 2's for keeping the innovations coming. If it was just us "Type 1s" out here, we'd probably still be using radios that weigh a ton and have tubes in them.
We returned from our week in Malta yesterday to the cold, rain and green countryside. Everyone we met was kind and helpful. It was hot and sunny almost all the time we were there. The hotel and food were excellent.
However, Malta is very built up (the most dense in Europe) and what little countryside there was was rocky and barren.
If you go on holiday for sun, swimming pools and food it might suit you. Overall, I am glad we went, but I doubt we will return.
Often I forget to submit my entry into this UKAC session. With my pathetic score I shall never even be close to winning, but it is good to show my support.
It is great to see the activity. The "real" stations were working some serious DX.

 Although quantum processors exist today, they are still a long way off from becoming practical...
  The Bluetooth SIG recently released the core specification for version 6.0 of Bluetooth. Compared to...
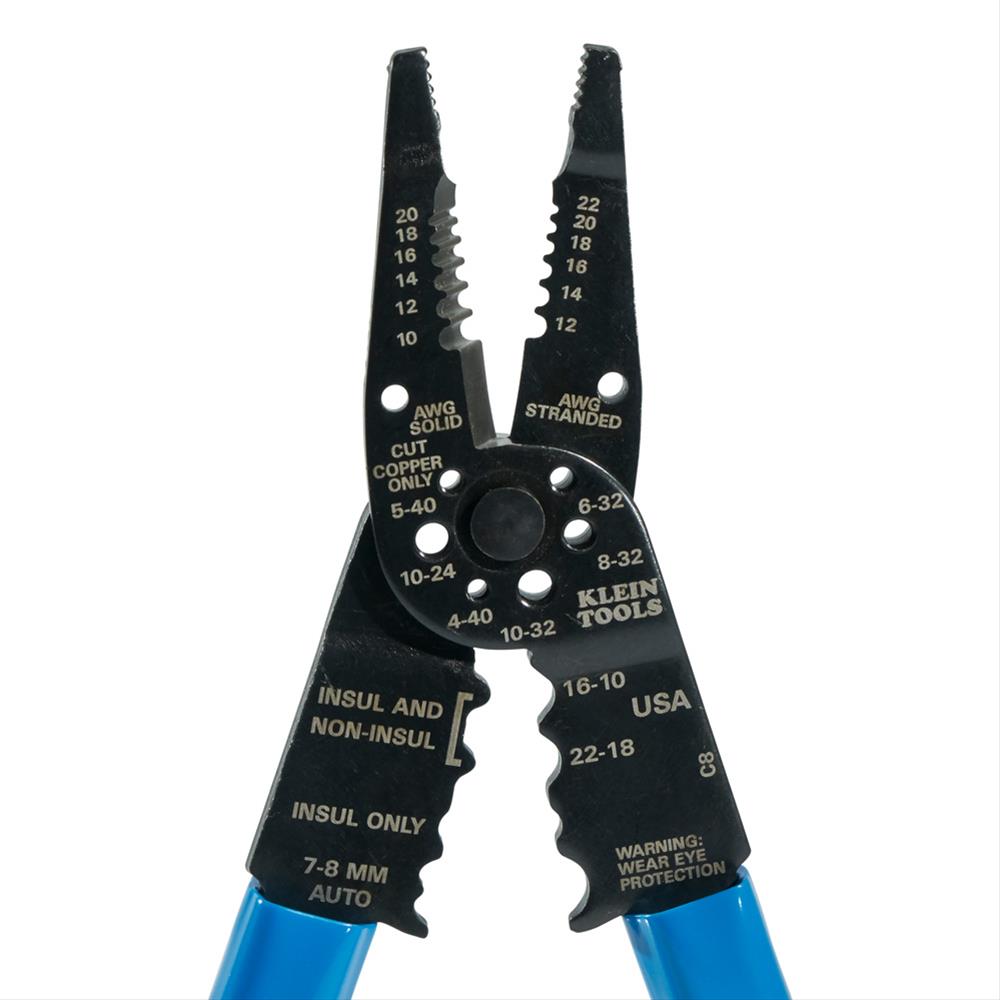
 Read more at RSGB.co.uk

.jpg)


